
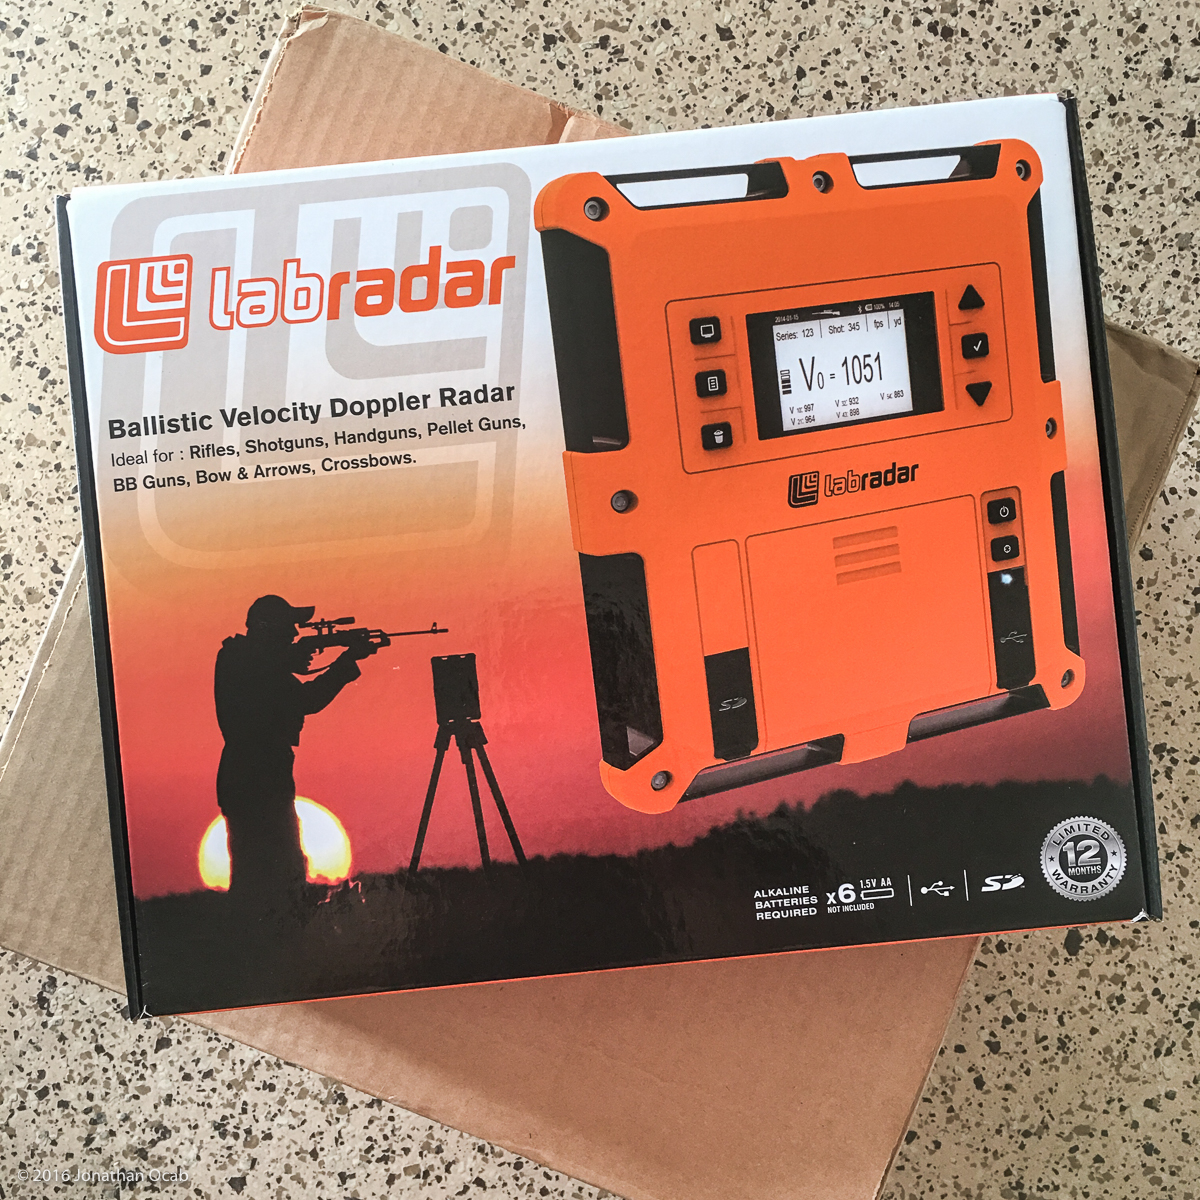
I just recently jumped on the latest craze in ammunition handloading / reloading by acquiring the LabRadar chronograph system.
Chronograph units are nothing new for shooters that are reloaders – anyone that makes their own ammunition by (typically) reusing their cartridge brass along with new components (bullets, powder, and primer) – as chronographs are essential tools for verifying the (safe) condition of a given load recipe.

Chronograph units are also invaluable for anyone who wants to create a ballistic data card based on a known zero. Knowing the muzzle velocity of a given ammunition cartridge in a given gun, will allow a shooter to use a ballistic calculator to generate a ballistic drop chart such that the shooter can have a reference table for dialing in a given distance on his sighting system to take a shot.
For the longest time, consumer chronographs were all optical based. Optical chronographs relied on sensors that would detect the bullet as it passed over the chronograph unit. It would get a reading when it passes over the front of the unit and a reading after it passes the rear of the unit, and then calculate the time between each bullet sensor detection to give a velocity value. Optical chronographs are relatively decent, even at the consumer level. Consumer grade optical chronographs can actually be had for under $100, and when compared to more expensive optical chronographs, essentially read consistently close to one another.
But the most common problem with the optical based chronographs is that they are susceptible to lighting conditions. Optical chronographs often came with diffusers that are placed over each sensor to help provide enough contrast for the sensors to pick up the bullet. Sometimes the optical sensors will not work in extremely bright sunny days when the sun is high in the sky. Often times the lighting conditions will be too dim (shaded) and the sensors don’t have enough light to work with.
There is also the inherent inconsistency of optical chronographs. Since the optical chronograph relies on two sensors for the bullet to pass over, the chronograph must be aligned perfectly in line beneath the flight path of the bullet. Any offset cant or angle relative to the muzzle and target could lead to incorrect readings. Not to mention that in order for readings to be comparable from range session to range session, the optical chronograph must be setup the same way every time with regards to cant and angle.
Another problem with optical chronographs, which is more embarrassing when it manifests itself, is possibility of shooting the chronograph unit. Since the bullet has to pass over the optical chronograph, the chronograph must be placed in front of the muzzle (and below). Due to the effects of the muzzle blast, many optical chronographs call for being placed at around 10 to 15 feet in front of the muzzle. Combined with carelessness and negligence, mistakenly shooting a chronograph unit does happen from time to time. Most people have heard range stories from a buddy about someone that came to the range, spent several minutes setting up a chronograph, lining up the gun on the bench, realigning the chronograph and rifle to get everything in line perfectly, only to put a round right into the chronograph with the first shot. I have never witnessed this first hand, but I have encountered a shot chronograph in the range garbage can a couple times in my life.
Several years back, a product known as the MagnetoSpeed came out on the market. Rather than using optical sensors, the MagnetoSpeed uses eletromagnetic sensors which detect the bullet in flight from the muzzle. This is superior to optical because there is no need to ‘see’ the bullet. The sensors simply rely on the disturbance of magnetic fields to detect the bullet as it passes over the sensors. The MagnetoSpeed addresses the setup consistency issue by design: it is clamped to the barrel so it can easily be placed in line with the bore. This is also the flaw of the MagnetoSpeed. Since the unit physically attaches to the barrel, it causes accuracy issues by affecting barrel harmonics. This could cause groups to open up and/or cause point of impact shifts. Users of the MagnetoSpeed will often only shoot with the MagnetoSpeed to get chronograph data only, and then detach the unit and shoot again to verify groups. This slows down ammunition testing since the operator will have to shoot twice as many groups per recipe.
Just over a year ago, the LabRadar was introduced and slowly trickled out to the consumer market.
As the name implies, the LabRadar chronograph uses doppler radar to detect the bullet in flight. Essentially, the radar unit tracks the bullet in flight and is able to calculate velocity based on the bullet flight data with respect to time.
Using doppler radar for collecting ballistics data has actually been a trend within commercial bullet and ammunition manufacturing over the past several years. Recently, companies like Hornady are intimating to their customers how they are utilizing industry grade radar applications to solve bullet design issues.
Obviously, the commercial / industry grade doppler radar used by ammunition and bullet manufacturers has a high monetary cost (and even a regulatory overhead) that would be too burdensome to your average consumer. But with the recent introduction of the LabRadar “personal radar” chronograph system, there is now a consumer grade doppler radar based chronograph available.
How does LabRadar improve upon the existing consumer grade chronographs?
For one, LabRadar does not limit the shooter to specific lighting conditions when trying to collect velocity data at the range. Since doppler radar uses radar waves and is not reliant on optical based sensors, the shooter can shoot in pitch dark night and still collect ballistics data. Doppler radar will be far more consistent than optical based sensors. As long as the LabRadar system is setup correctly adjacent to the firearm resulting in the bullet flight path being in the LabRadar’s radar cone, then the data should be consistent every time it is used, range session to range session. This type of setup is not as dependent on consistency like with an optical based chronograph, where cant and angle of the two (or more) optical sensors with respect to the bullet flight path can result in varied data from range session to range session.
Then of course, the chance of shooting the LabRadar is virtually eliminated because the LabRadar is setup directly adjacent to the muzzle/crown if not slightly behind it. The LabRadar is never operated forward of the muzzle.
I have long been using the Shooting Chrony family of optical based chronographs. I initially bought a Shooting Chrony F1 back in the early 2000s when I first started reloading. I eventually acquired a Shooting Chrony Alpha Master a few years later, which I still own now.
I don’t buy many new firearms, so my load development is quite infrequent. But recently, I started actually working up new loads because of a recent precision rifle project. Due to this new load development, I started questioning the data given to me by the Shooting Chrony. Between from range session to range session, I was seeing some average velocity data skewed by as much as 50 fps (with various known baseline loads) with mild to moderate temperature variances. Also, I found my club’s shooting facility main range (which I rarely use) is quite shaded due to the orientation of the firing line with respect to the hillside and the path of the sun, particularly in the morning, when I am usually at the range. At one range session, the Shooting Chrony optical sensors would not detect the bullet due to the lighting conditions. I tried with and without the diffusers and moving the chronograph closer to the muzzle with no luck. Only until around 0900 when the sun finally came up over the hill and spread light over much of the range did the Shooting Chrony start registering the bullet.
Coincidentally at one range session, I was speaking with a range officer at my club’s shooting facility as well as a couple other shooters, and the topic of chronograph data came up. Someone mentioned the MagnetoSpeed, and then the range officer brought up the LabRadar, which I had not heard of before. The discussion piqued my interest and I looked into it. The price was definitely the highest of any consumer chronograph out there, coming in at a retail price of $560 USD.
But assuming the LabRadar system worked as advertised, then it would obviously be a tool worthy of the price tag. The LabRadar was introduced in 2015, but the production runs were quite low. Infinition Inc. of Trois-Rivieres, Quebec, Canada, developed the system and they were not ready for the high demand for the LabRadar. Up until now, units are still selling fast and direct sales through Infinition’s primary distributor are often backordered.
As it would happen, Midway USA had some coupons valid over this past Independence Day weekend and they had the LabRadar chronograph in-stock, so I ended up ordering one from Midway USA.
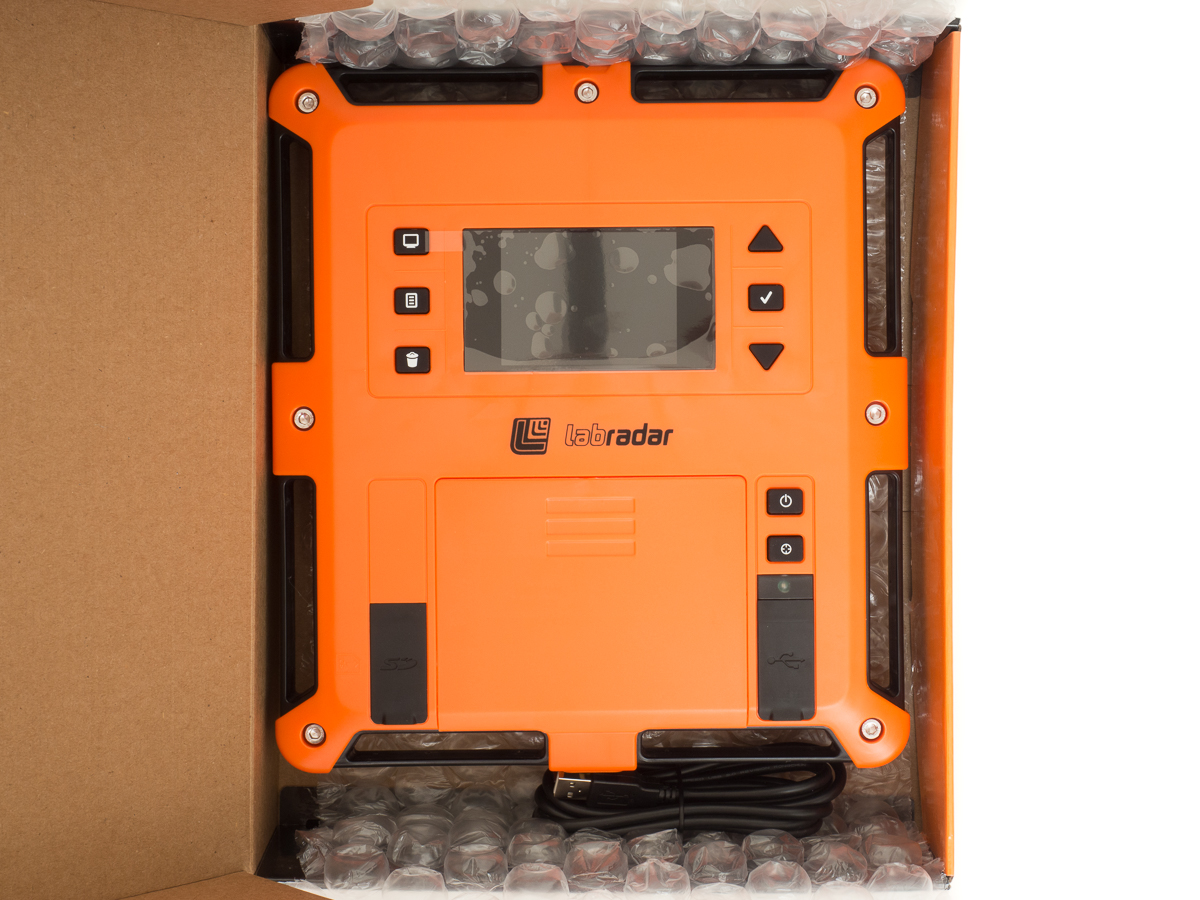
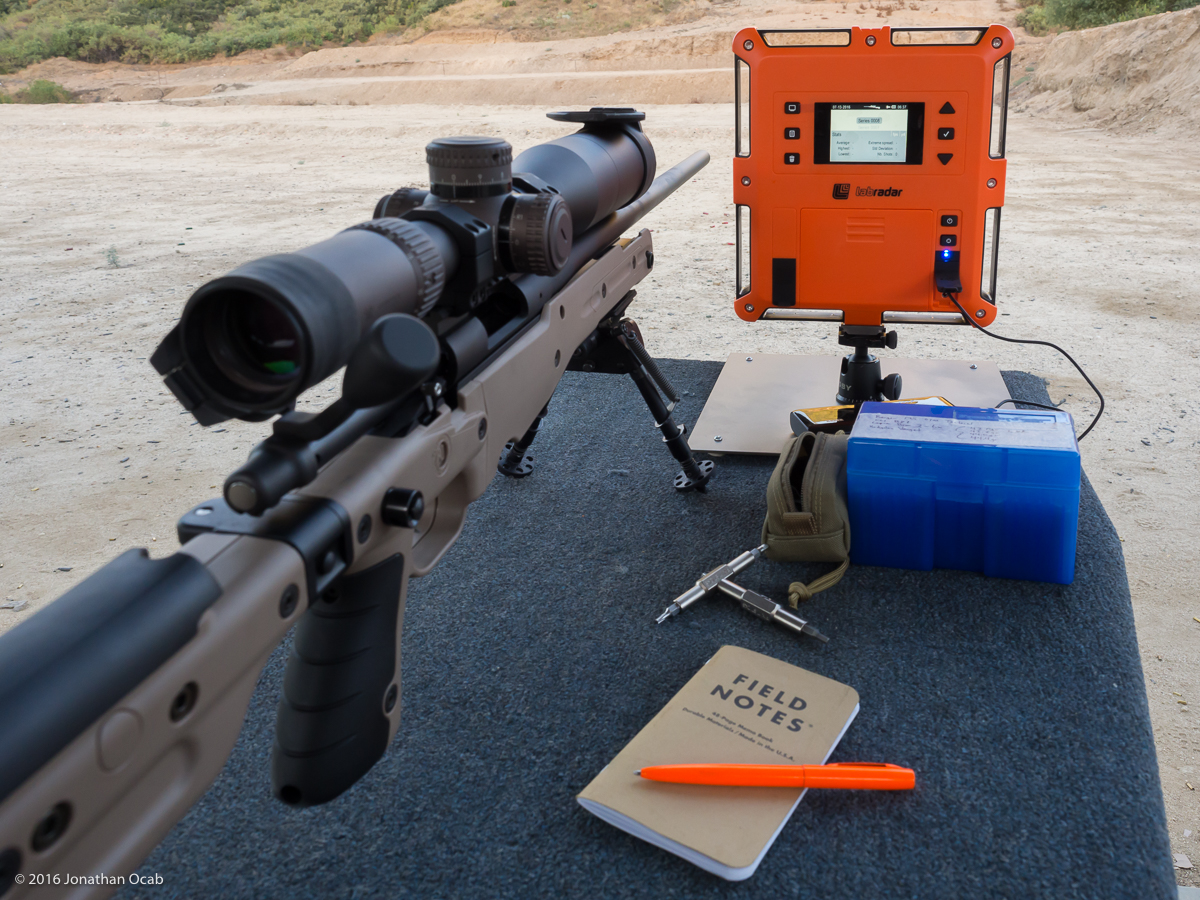
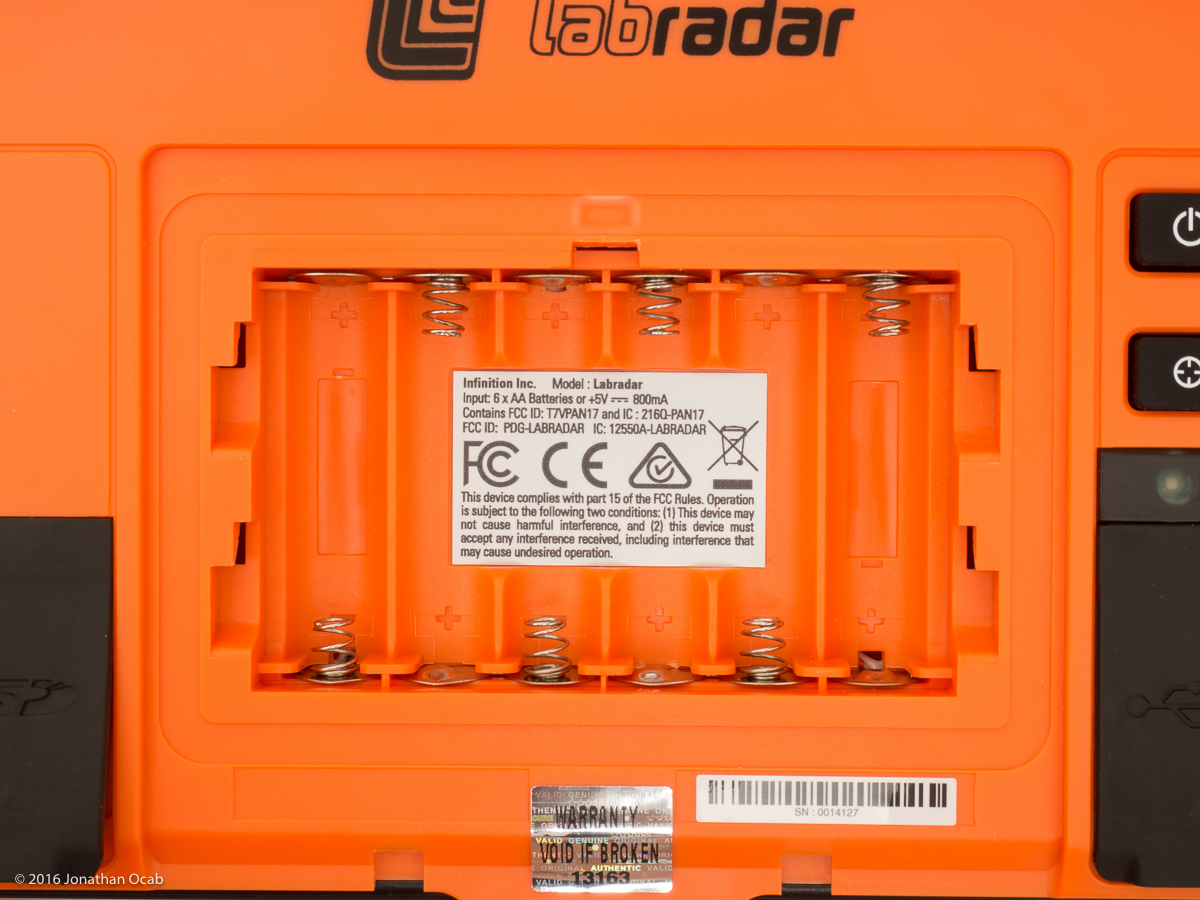
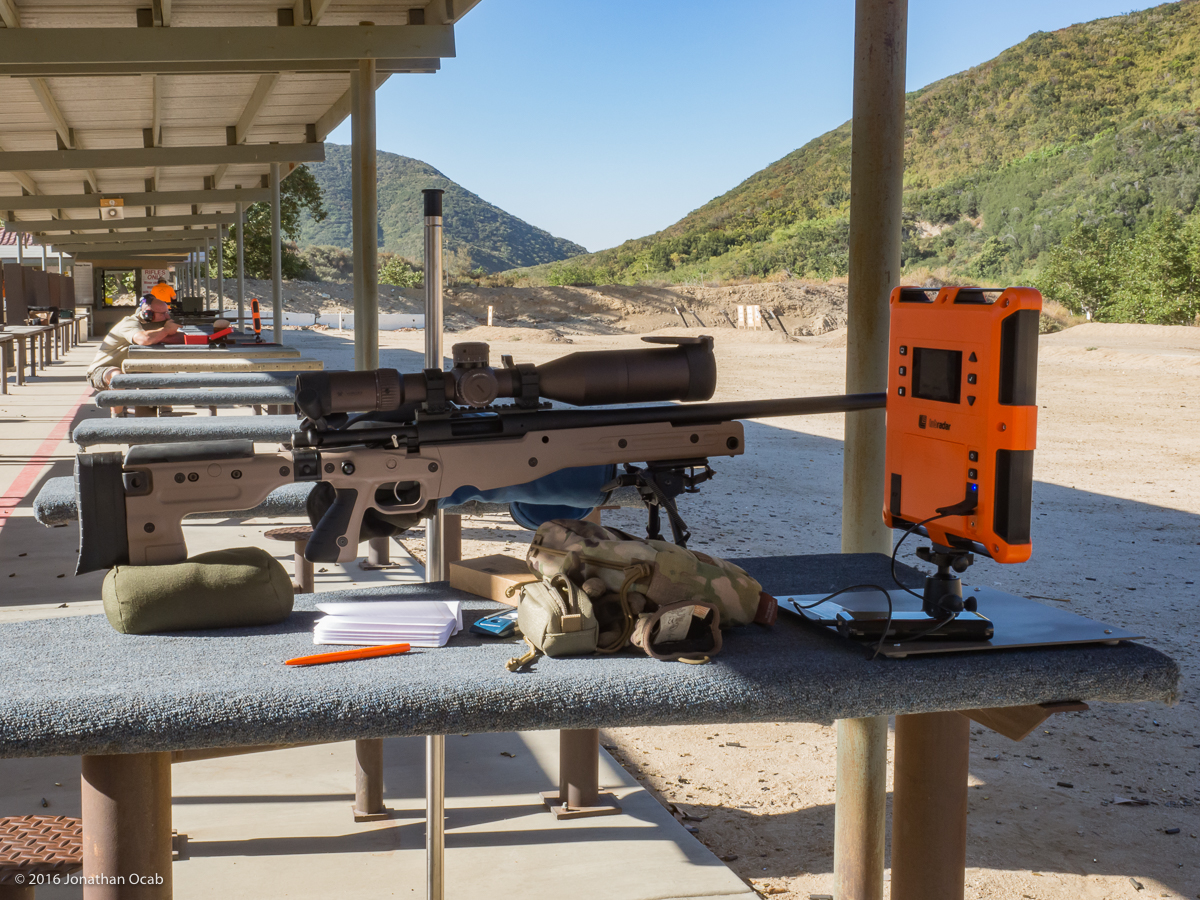
The LabRadar chronograph unit seems to have a fairly solid build, considering it is an all plastic housing, and weighs around 3 lbs. The unit has a basic LCD on the rear of the unit (which faces the shooter during operation) with a set of buttons to operate the menu system.
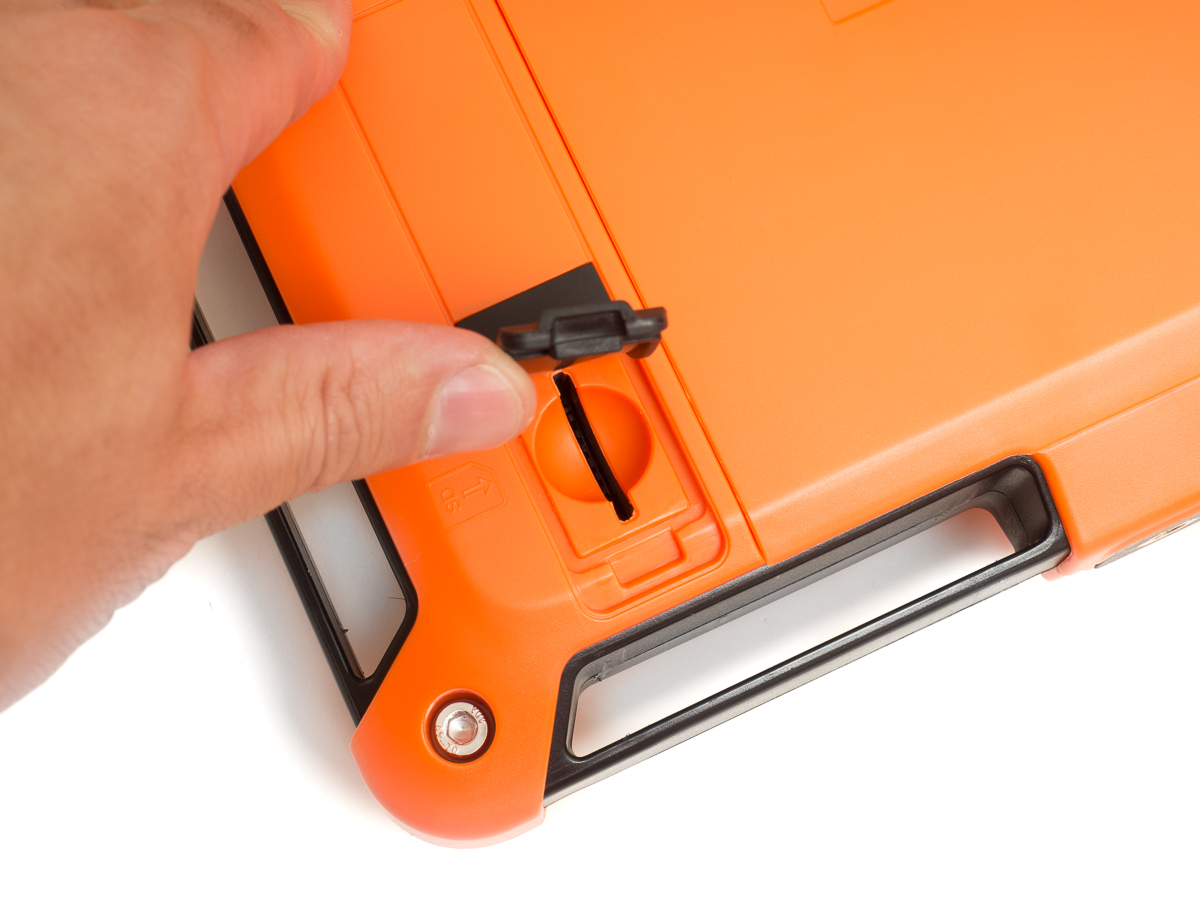
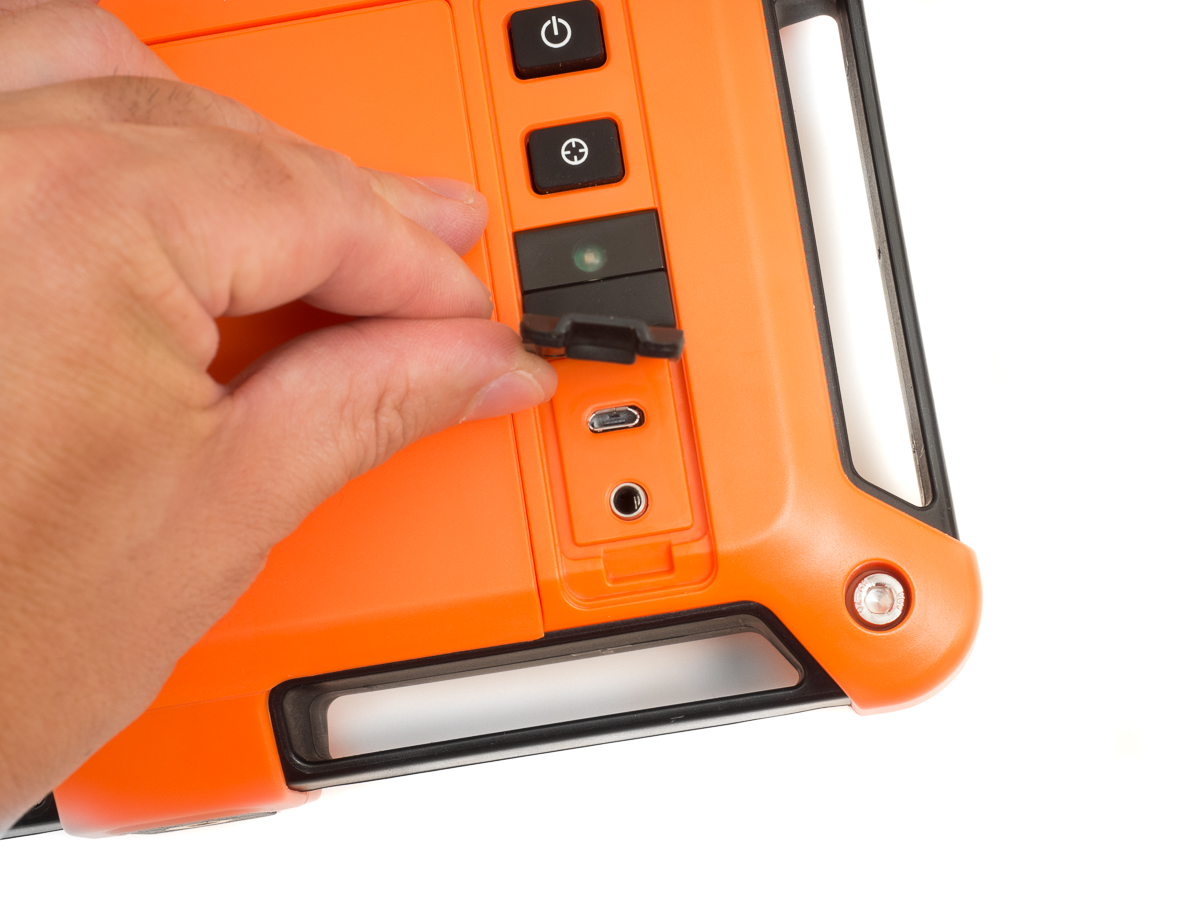
There are two rubber covers protecting two sets of ports. The left rubber cover protects the SD slot and the right cover protects the micro USB port and a stereo 1/8″ connector port for a LabRadar external trigger device.
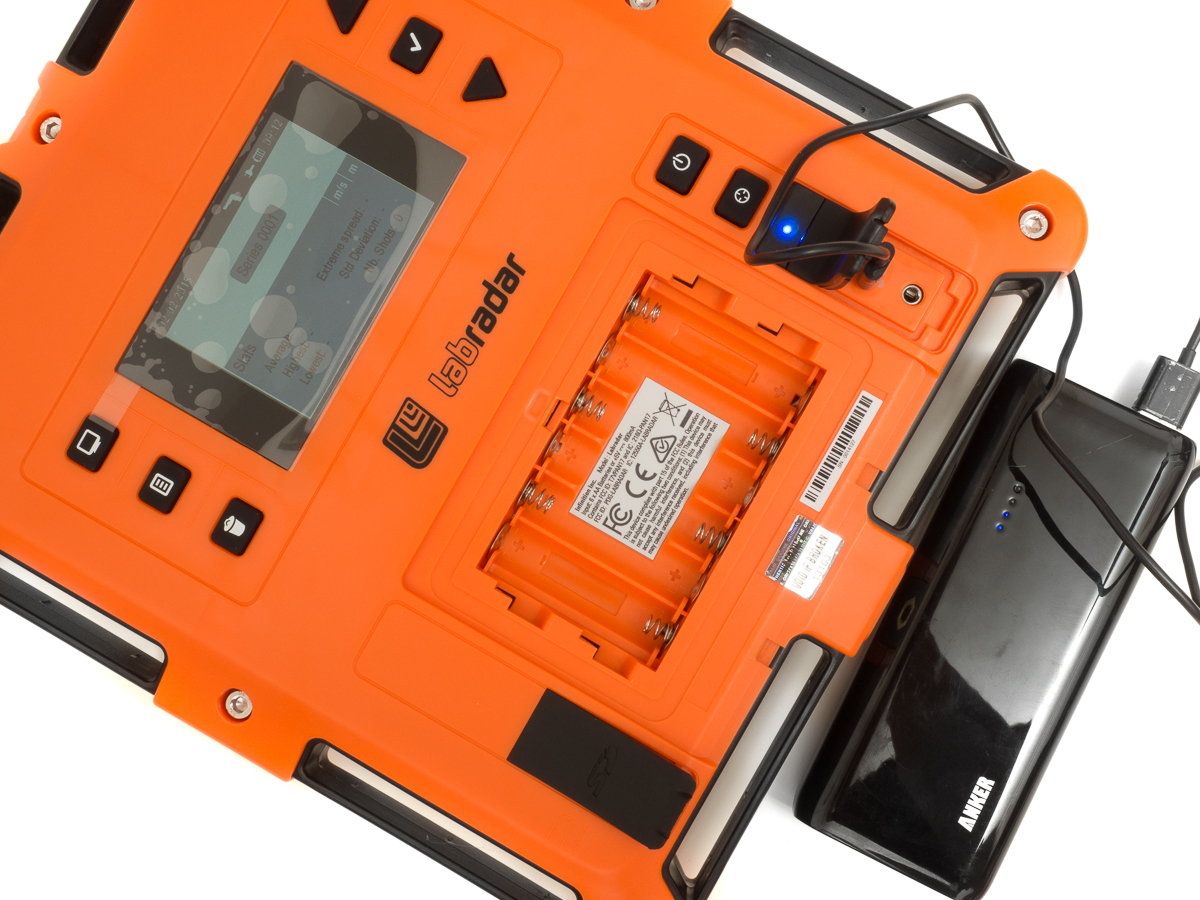
The LabRadar units is powered by six (6) AA batteries to power the unit with 5V at 800mA.
While I make substantial use of rechargeable Eneloop batteries due to cost effectiveness and environmental friendliness, I hate using AA batteries because they have a tendency to run down quickly in heavy use. If out at the range, I don’t want to have to worry about six (6) AA batteries running low, and needing to pack an extra set of fully charged six (6) AA batteries. Battery management is not a big deal with the Shooting Chrony chronograph because it is only powered by a single 9V, and carrying a spare (or two) 9V battery is simple.
Fortunately, the aforementioned micro USB port is designed to accept a power source to power the LabRadar unit. The specification calls for USB power of 5V at 1A. In this day in age of external portable USB battery packs for charging smartphones, the availability of USB power options is plentiful.
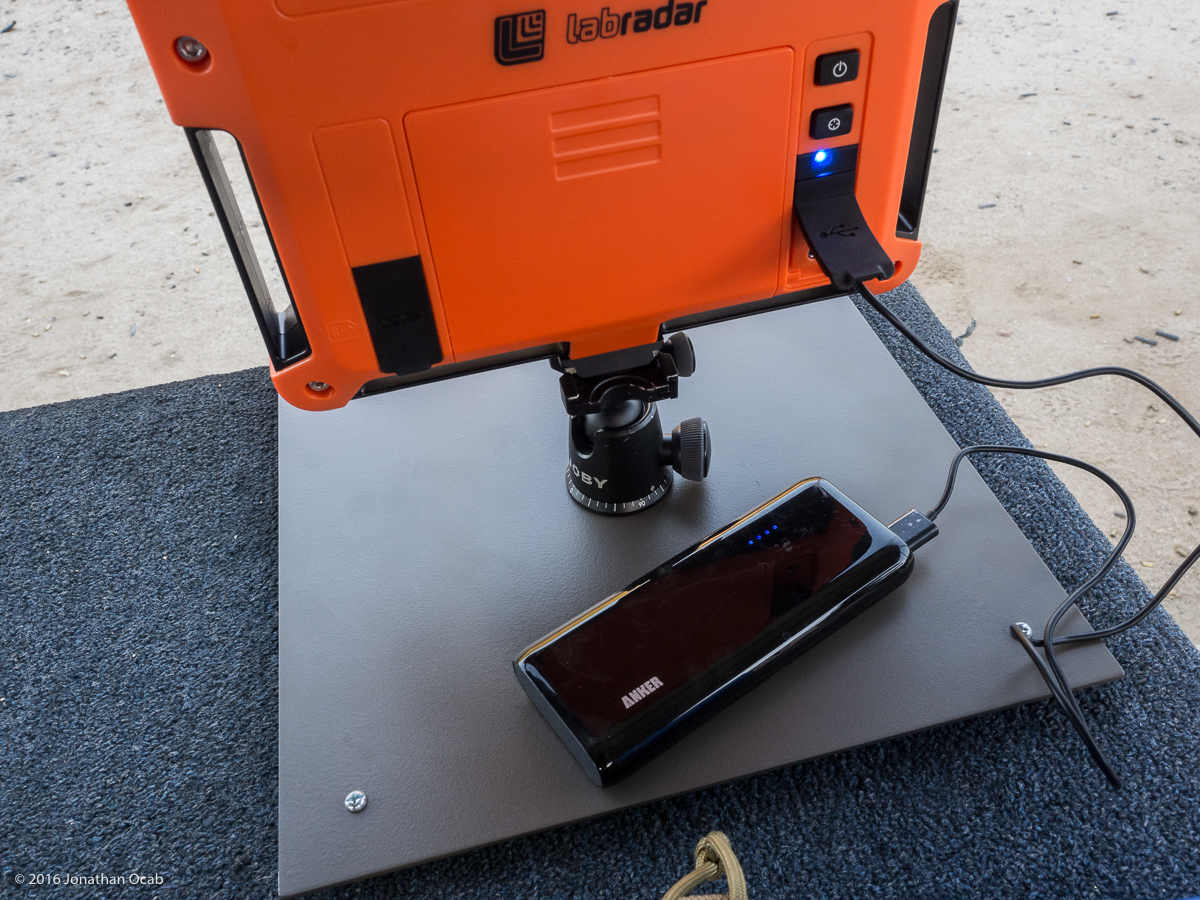
Since I already have Anker portable chargers for my phones, I decided to utilize an Anker 2nd Gen Astro E4 13000mAh battery pack I bought two years ago (now discontinued; superseded by the Astro E5 16750mAh).
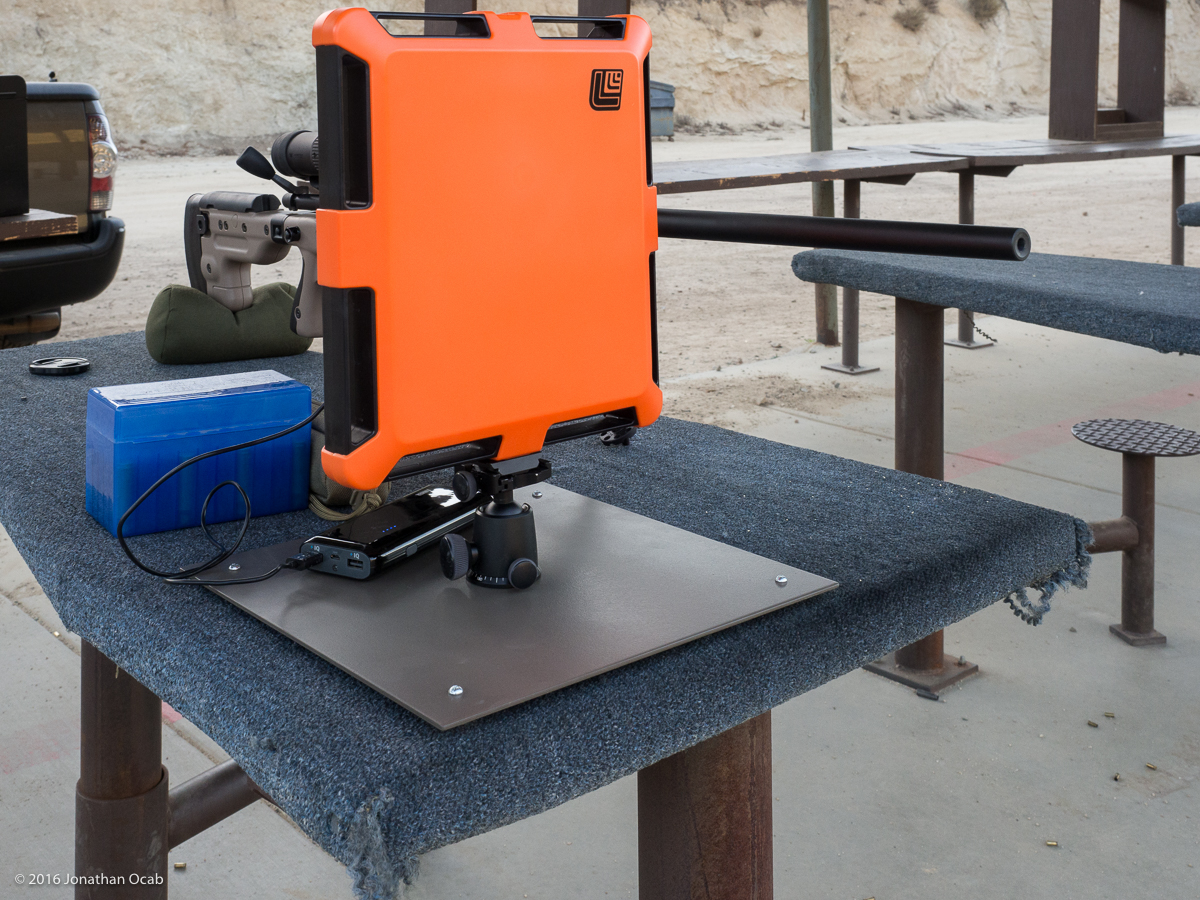
The LabRadar has a 1/4″-20 female thread on the bottom of the unit to be used with standard camera tripod heads or plates. Operators can obviously mount the LabRadar unit directly to a tripod head or via corresponding quick release plate go on a tripod.
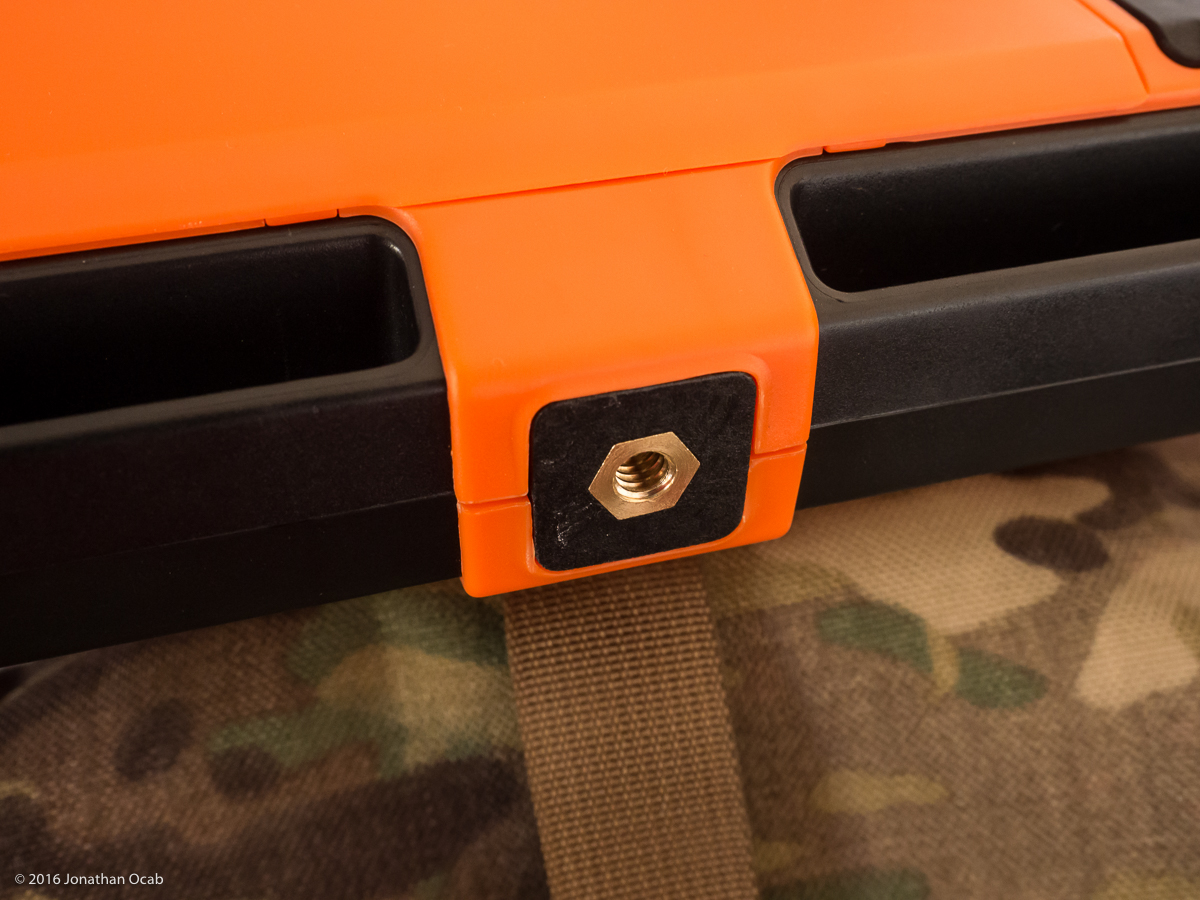
LabRadar produces a “bench mount” which retails for $40 USD. It is essentially a 12″x12″ metal base plate with a tripod head in the center so the LabRadar unit can be set on the same table or bench where the firearm is being shot from.
Personally, I felt $40 seemed excessive and while there is an older version being sold for $30, even than felt a bit much (ironic considering I spent $500+ on the unit itself).
I ended up going to a local metal supply store and bought a 12″x12″ 1/8″ thick steel plate for $6 and change, and bought some rubber screw-on bumpers and a 1/2″ long 3/8″-16 threaded bolt and 3/8″ washer for $3 and change from the local hardware store. After drilling out the 3/8″ center hole and four holes for the bolts for the rubber bumpers, I painted the plate with some Earth Brown Brownells Aluma-Hyde II I had in the cabinet. I then attached the rubber bumpers using some random nuts and bolts I had in my hardware bin in the garage, and repurposed one of my many tripod ball heads (specifically the one off my Joby Gorillapod), attaching that with the aformentioned 3/8″-16 bolt and washer to make my own bench mount.

The DIY bench mount only cost $10 in parts or so, not counting a tripod head which I simply took off one of my existing tripods. You can find a generic tripod head off Amazon for $10-$20, but obviously, to keep the cost below the price of the LabRadar branded bench mount, ideally you’ll repurpose an existing tripod head you already own.
The manual for the LabRadar is over 20 pages, but the actual usage instructions is quite short. While I recommend going through the manual, the system is fairly intuitive to use as far as the menu system is concerned.
There are many settings you’ll most likely have to (or want to) change out of the box. Some of the changes I immediately made were the velocity units (default m/s changed to fps), distance units (default meters default changed to yards), and weight units (default grams changed to grains). There are other settings that are going to be modified as you go along based on real-time, at the range conditions and scenarios.
But as far as the nitty gritty, I took the LabRadar out for an early morning range session and after I mounted it and placed it on the bench, all I did was adjust the projectile offset (default 12″ to 6″; muzzle should be within 6″ of the unit) since the bench allowed for close proximity of the LabRadar to the barrel, arm it and was off and running.
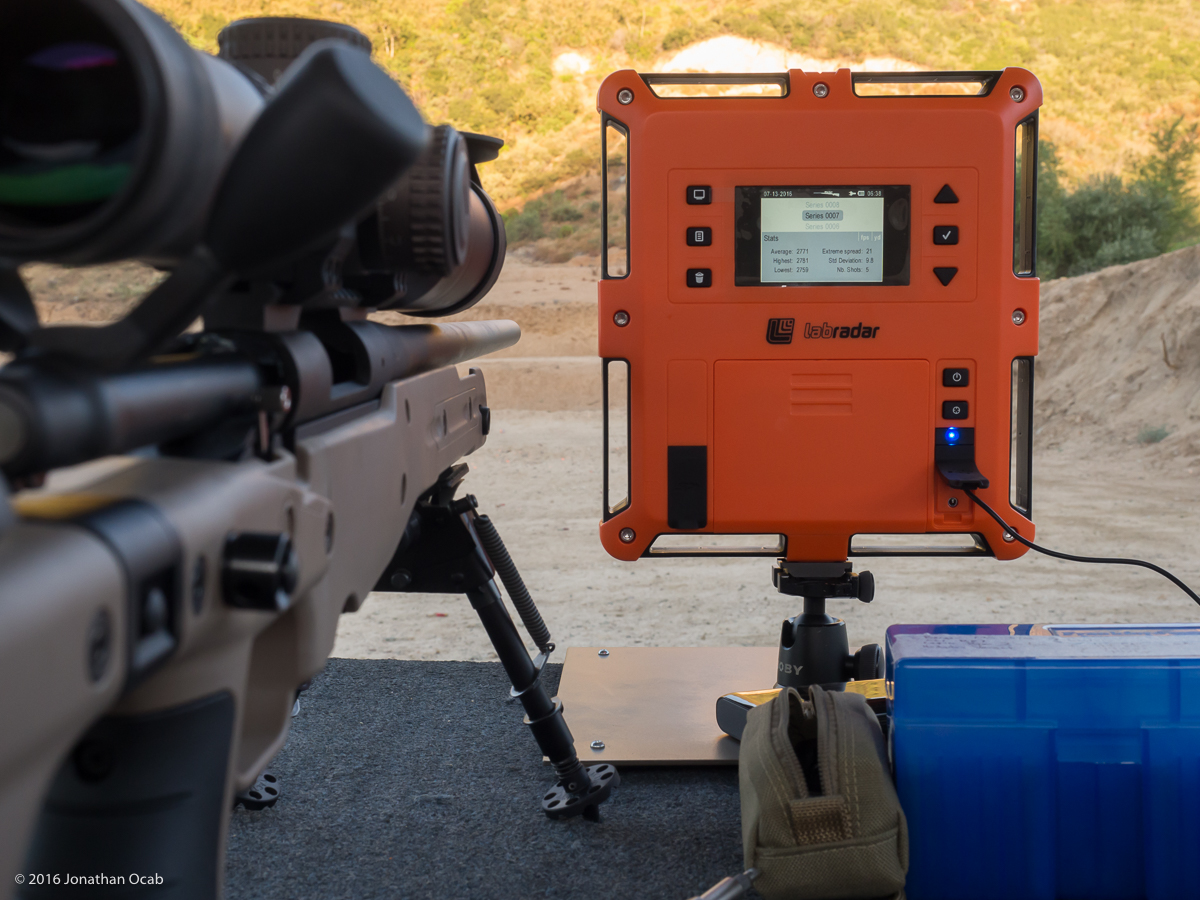
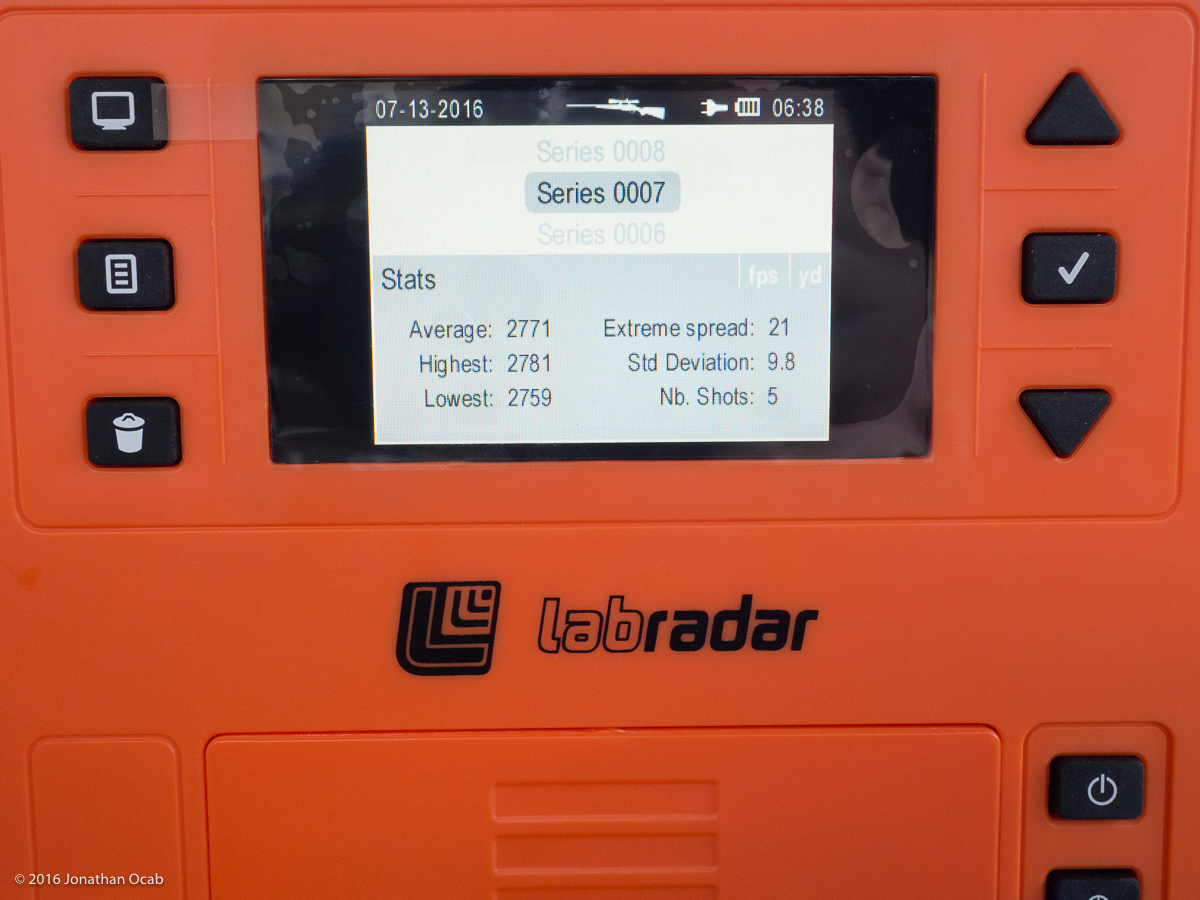
The LabRadar automatically calculates the extreme spread and standard deviation for the cumulative shots in a given string, shot after shot. Assuming the user enters in the weight of the bullet, it will also calculate kinetic energy and Power Factor (relevant for a sanctioned action pistol competitions). This data can easily be reviewed directly through the onboard menu system, but the strength is being able to pull the data off of the SD card.
The LabRadar can be connected directly to a computer and it will actually mount the SD card as a removable storage device (making the LabRadar a glorified card reader). But assuming you have your own SD card reader (either built-in to a computer or USB attached because you’re into digital photography), you can just eject the SD card from the LabRadar and use your own SD card reader.
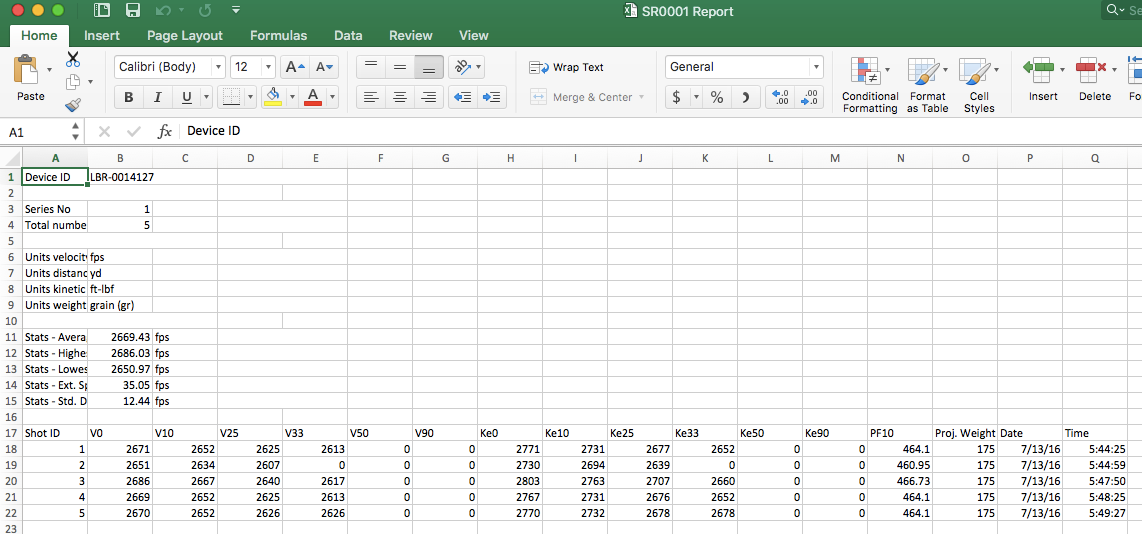
The data is written to the memory card in directories based on the series number, and within each series directory is a CSV file (comma separated values). This CSV file contains the compiled report data for that series including but not limited to the:
- muzzle velocities for all shots in the series
- highest shot velocity of the series
- lowest shot velocity of the series
- extreme spread of the series
- standard deviation of the series
- velocity and kinetic energy at the user defined distances set in the preferences
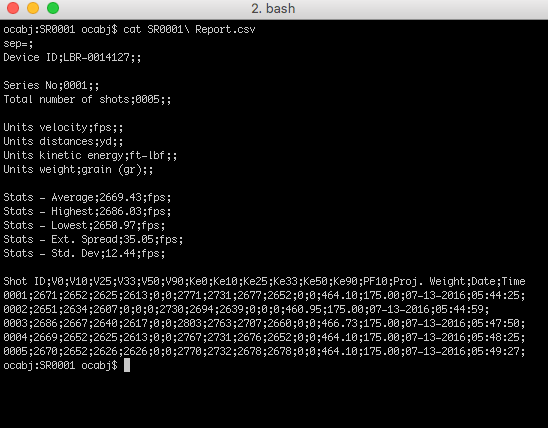
Note that a CSV file is simply a plaintext file. You can open it in any text editor application like Notepad or Wordpad in Windows. It just won’t be in fixed width columns for easy reading, which is the case if you open a CSV file using Microsoft Excel or another spreadsheet editor.
There will also be a TRK directory within each series directory that contains CSV files with tracking data for each shot in the series. If you open each individual shot tracking file, it will give the velocity during the entire flight of the bullet in which the LabRadar was able to detect the bullet
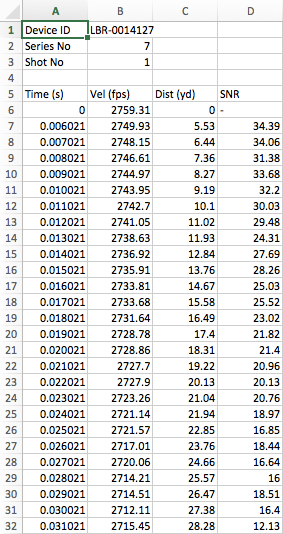
If you look at the screen shot above, you will see that it has velocities recorded for nearly every 1 yard. Quite impressive.
The Shooting Chrony Alpha Master is capable of recording strings and calculating extreme spread, standard deviation, and return the average, high, and low velocities for the string. But I was always too lazy to use the built in system, and I was always just writing down the velocities as they were displayed on the Chrony LCD. Then I would calculate the standard deviation and extreme spread on my own after the fact.
But the fact the LabRadar can store the data in a cross-platform compatible CSV file onto an SDHC memory card makes it too convenient not to use the built in calculations and reporting system.
The LabRadar only supports SD and SDHC cards (not SDXC or newer standards). This is not a big deal considering you can get SDHC as large as 32GB capacity, and the fact that the CSV files will rarely exceed a few KB. A 4GB SDHC card will theoretically hold hundreds of thousands of shots (if not millions).
When relying on the internal software to generate the calculated data, the user must be aware at all times of the status of the string on the LabRadar, and be sure to start a new string when switching to another load to test (collect data for). For example, I forgot to start a new string after I shot five (5) rounds of Berger 175gr Tactical OTM and 43.0gr Hodgdon Varget and switched to five (5) rounds of the same bullet with 43.5gr Hodgdon Varget.
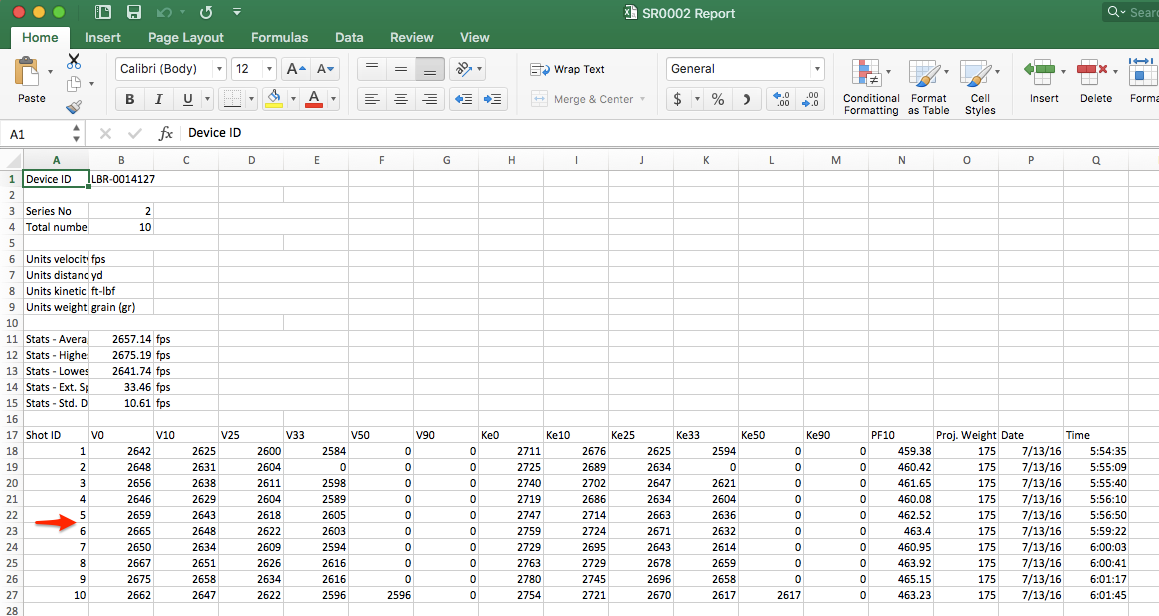
So the automatically calculated extreme spread and standard deviation data in the above series report is invalid, because it is a mix of shots with varying powder charge weights. But each individual shot’s data was recorded, so I can still go back and calculate the ES and SD by hand. But to save yourself the headache of having to do more work, just remember to start a new string whenever you switch to a new load recipe during load testing.
So what is the verdict?
My initial impression is that the LabRadar is quite impressive. I had zero errors with regards to detecting shots and obtaining the muzzle velocity. Although I did have two user errors resulting in me not getting the velocity data. In both incidents, I neglected to ‘arm’ the radar before taking the shot. I simply forgot to press the arm button (toggles LED from blue to orange; orange indicates radar is armed). Simple user error.
If you watch the embedded Range VLOG YouTube video above (Episode #11 of my Range VLOG series), you’ll notice I was literally the only person on the main firing line of my club’s shooting facility (all the other shooters were using the private bays).
So I did not test the unit with other shooters on the line, particularly with shooters on the adjacent benches, to see if the LabRadar would get false positives (other firearms triggering the unit) or other errors due to other activity on the firing line. This is something I want to do because I think it is probably the only scenario I can think of that would result in chronograph usage issues/errors. But published reports by other LabRadar owners indicates this is not an issue.
I went to the range the weekend after I posted this article to test the LabRadar with other shooters on the firing line and did get two false positives with the LabRadar. In both cases, another firearm triggered the LabRadar. It was able to pick up the bullet flight and return some sort value for one instance, but returned an error that it could not track on the other instance. It was interesting that I had a false positive because at the time, the nearest shooter was three benches away on both sides of me (left and right). I ended up just dialing down the sensitivity of the LabRadar from 1 to 2. After that, all was well.
The only other issue I had in my initial use of the LabRadar is that I could not create a new data series without cycling the unit off and on. But this is simply because I didn’t read through the manual to understand how to switch between the “Armed” and “Review” modes. Again, simple user error.
What was happening was that after I fired my last shot for a given string and pressed the arm button to disarm the radar (toggle light from orange to blue), it left me in the “last shot review” screen. I was pressing the String button while at the “last shot review” screen to bring up the New String prompt, but this doesn’t bring up the New String prompt while at the “last shot review” screen.
The operator has to completely exit Armed Mode by holding down the Arm button (while the armed light is blue; disarmed state) which will then to Review Mode. The terminology is a bit weird, but once you read the the manual, particularly the state diagrams, you will understand how to switch between the various modes in order to operate the LabRadar efficiently and effectively.
As far as power, using a standalone rechargeable USB battery pack is definitely the way to go with the LabRadar, so you don’t have to constantly manage sets of six (6) AA batteries. Again, since there are so many USB portable chargers available for smartphones and tablet devices, the options are plentiful and you should able to find one that will provide more than enough power for the LabRadar to run for multiple extended range sessions.
Now that you have read all of my rambling (or TL;DR’ed and scrolled all the way to the end), should you, as a shooter that competes and/or handloads your own ammunition, get a LabRadar?
YES.
I know I only have 40 rounds recorded with the LabRadar, but the ease of use and ability of the LabRadar to get velocity data in lighting conditions known to hinder my Shooting Chrony Alpha Master has me sold after only one range session. The initial reports from owners with earlier versions of the LabRadar reported some issues and inconsistencies, but the current 2016 production unit I have appears to be 100% functional.
Reliability can only be determined after the test of of time, so I can’t comment on this, yet. One important issue to note is that the firmware of the LabRadar is user upgradable. So if and when Infinition Inc. issues new firmware, owners can update their LabRadar units to receive updates and bug fixes without having to send their units to Infinition Inc. So there is built-in longevity with the LabRadar.
The current $560 USD retail price is going to be the one deterring factor for most prospective buyers, especially when gun owners can be some of the most frugal people on the planet. Since there are several optical chronographs that can be acquired under $150, the LabRadar can be a hard sell for the lower budget minded shooter.
But considering the Oehler 35P system, regarded as *the* best optical based chronograph, sells for $595 retail, the $560 price of the LabRadar is quite a deal.
Of course, the optical chronographs are all light condition sensitive.
The MagnetoSpeed units vary in retail price from $200 to $400 depending on the configuration, but introduce POI shift so chronograph testing and shooting for groups at the same time is not feasible.
So given the known limitations of optical and electromagnetic based chronographs, the LabRadar appears to surpass the other consumer grade chronographs currently on the market in terms of performance, function, and convenience, making the LabRadar a definite must have.
If you can afford it, that is.
David Walters
You should have gone with the magnetospeed sporter which weighs in at $189 and free shipping. I bought one and it’s an incredible value.
It’s so inexpensive that I gave one to a buddy of mine who’s been really helpful in getting this old Marine back into shooting. He’s a reloader, retired and a cheapo because of his fixed income and he just couldn’t believe how much his loads improved after he began using it to establish his MVs.
I cross tested it with an optical chrono (which you rightfully demean and the make of which I prefer not to mention) and it the measured MVs were within 2% of the other much more expensive optical chrono.
For the average Joe, the magnetospeed sporter is the ticket.
LF
ocabj
I was actually considering the MagnetoSpeed. The barrel clamping was the one detractor for me. I like being able to accuracy test (and/or sight in) while chronographing. Given the troubles I have been having with optical sensor chronographs at my current shooting facility’s main firing line, I am inclined to recommend the MagnetoSpeed over any optical sensor chronograph. But I would still prefer the LabRadar over all.
David Walters
Yes, if you combine sighting in and measuring MV the magnetospeed will change the poi by about a inch at 100 yards, in my experience.
But here a rationale for separating the two procedures if your zero range is not 100 yards (mine is 300 meters so as to get a very long maximum point blank range). To get a good ballistic drop table you need to know the MV of the load you’re firing. Measure that using a target at any range, doesn’t matter. 5 ft. will do.
Then prepare your ballistic table and from the table determine the difference between your POA and POI following that trajectory at what ever range is convenient for you, say 100 yards at the local rifle range. Then sight in your weapon at that range allowing for the difference between POA and POI.
Works for me.
Oh, Gentlemen readers, please let’s not get into a heated discussion about what range to zero your weapons. It’s a salt and pepper argument, some like it hot and spicy and some just like the taste of salt.
LF
Claus Ziegler
>The initial reports from owners with earlier versions of the LabRadar reported some issues and inconsistencies, but the current >2016 production unit I have appears to be 100% functional.
Could you tell me your serial number please?
Just want to get an indication when 2016 production was starting
Best regards,
Claus
ocabj
I’m not at home right now, but the serial number is visible in one of the photos on the page (see the one of the open battery door).
Claus Ziegler
#14127 from your picture ;-)
Do you have any information what kind of problems the early users had?
I ordered mine 2015 in August but shipment was February 2016 and I just picked it up
Best regards,
Claus
ocabj
The only thing I remember reading was the initial testing by Bryan Litz where he indicated it had issues detecting 22cal.
Claus Ziegler
ok, many thanks, but this Problem with the 22cal was solved long time ago, according to Labradar, so as you said: Everything should work fine now.
Brian
I’ve been kicking around the idea of getting one of these after rendering mine useless… Great review; it pretty much sealed the deal for me. Going to be ordering one in the next week or two.
+1 for seeing another gun guy knowing how to use ‘cat’
Rob
So … it will work with any caliber and powder, from .22LR to .45-90 black powder rifles? How about muzzleloaders?
Mike
Jonathan,
Your review was a deciding factor in my decision to order a Labradar today. Thanks for sharing your experiences.
Charlie
Thank you for the thorough report. I have been using an Oehler 33 since the 1980’s. I recently got a smoking deal on a magnetospeed. It will be used when shooting away from a range (I live next to 7,500 square miles of BLM land). Next year, I will get the Lab Radar, as I have a lot of load work-ups to do then.
Larry
ordered mine today. Got 60$ promo off offer and took it.
F18Dave
Got mine for Christmas and got out to the range today. I will be getting the USB supplied battery pack as the AA’s drained quickly. Great tool. 2nd on reading the instructions!
Eric
The LabRadar works indoors as well, although I could not get it to reliably detect a .223 round at a 25 yd. indoor range. It detected handgun rounds just fine.
Mickey Meador
I’ve used my LabRadar 2 yr now with 0 problems. The machine is supposed to have Bluetooth but the mfr. hasn’t updated the firmware. I contacted them and they said it would be released summer 2017 but as of today 2-2-2018 it’s still not available.