
My mid-2009 13″ MacBook Pro has been a solid workhouse for the past three or so years, but I’ve been needing a new computer for some heavier lifting (e.g. video editing). So I finally decided to try out a Mac Mini.
I was going to get another MacBook Pro to replace my 13″ MBP, but the Mac Mini seemed like a more interesting solution for my working needs.
First off, I tend to not use my laptop away from a desk anymore. My iPad pretty much gets most of my “away from the desk” duty.
Second, getting a new laptop seemed like it would be keeping me down the continuous road of laptops only. Granted, I could have gotten a new 13″ MBP and been done with it. But if my laptop tends to remain at the desk, why not get a desktop? I have been pretty much laptop only (primary) for the past 7-8 years (not counting my day job workstation).
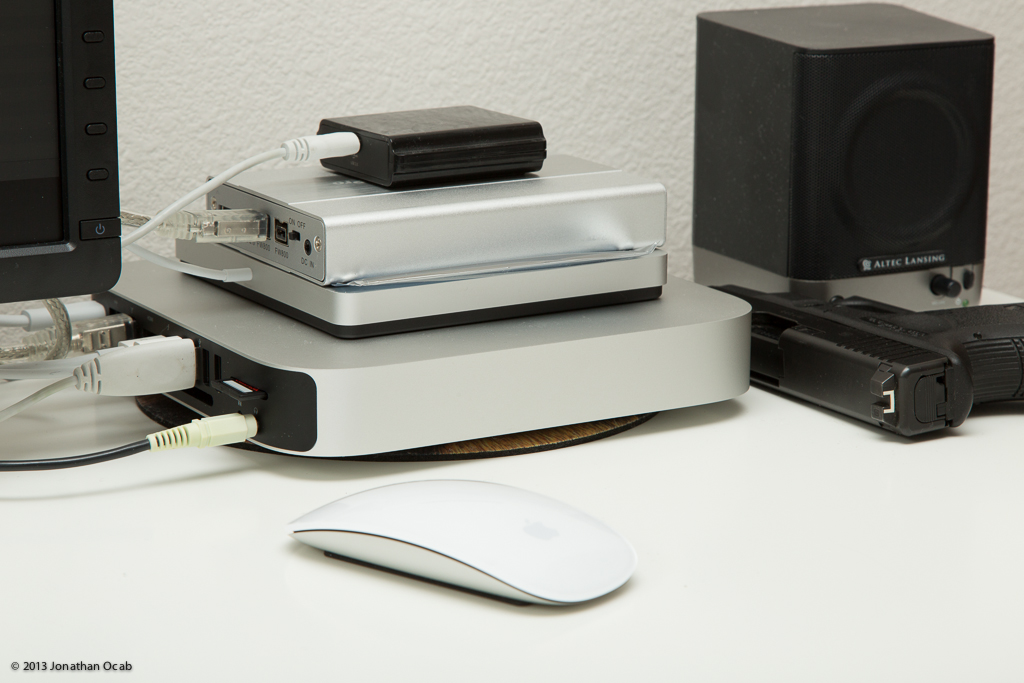
Third, the Mac Mini still offered portability. The one concept that intrigued me about the Mac Mini is how small it is. The current model (late-2012) measures 7.7″ x 7.7″ x 1.4″ and weighs in at 2.7lbs (stock). My thoughts were to take the Mini between home and office, keeping my set of peripherals (display, keyboard, mouse) at home and another at the office.
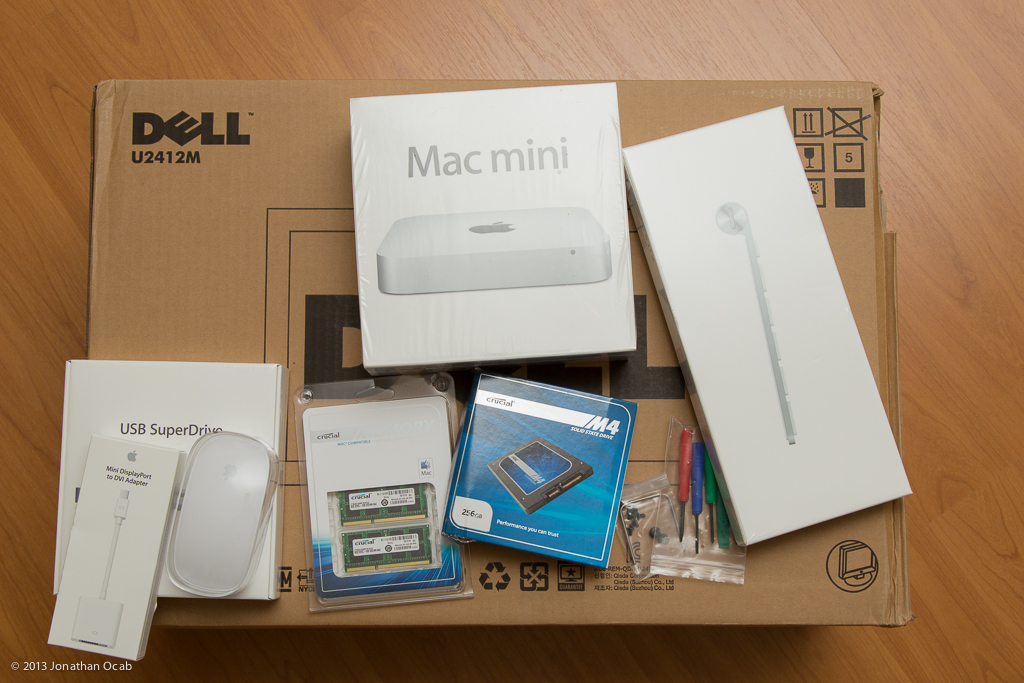
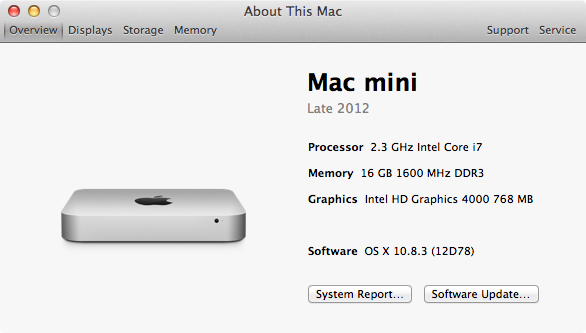
That said, I ended up ordering the late-2012 Mac Mini with 2.3GHz i7 (quad core) processor, along with an Apple wireless keyboard and Magic Mouse from Apple. I also ordered a Dell U2412M 24″ IPS display and Crucial m4 256GB SSD from Amazon and the 16GB (2x8GB) RAM kit from Crucial.
For the SSD, I ordered the OWC “Data Doubler” kit which allows adding an SSD (or any other 2.5″ SATA drive) to the Mac Mini as a second drive. Thus, I am running dual drives in my Mac Mini (stock 1TB SATA platter with the 256GB SSD).
Installing the second drive actually requires disassembling the entire Mac Mini, which involves taking out the entire logic board (aka motherboard). It’s a lot of steps, but it’s actually quite simple. Thankfully, OWC has a nice video tutorial to walk you through the disassembly and reassembly of the Mac Mini.

After about 30 minutes to install the drive, I installed Mac OS X 10.8.3 and Windows 7 via Boot Camp on the Crucial 256GB SSD.
It is very important to state that after you install an SSD as a second drive to supplement the stock factory platter drive, that you do not use Disk Utility from the Recovery Partition nor a Mac OS X 10.8.2+ install disc/image.
The reason being is that the Disk Utility launched from the Recovery Partition (or the install image) will think the SSD+platter combo is a “Fusion” drive (the single drive that is a hybrid SSD and platter). If you launch the Disk Utility from the Recovery Partition or the install image and select either of the two drives, it will state that there is an error with the drive and ask to fix it (or ignore). This is because it sees both the SSD and platter volumes, and assumes that they are a Fusion drive that has been some how corrupted and no longer in single logical volume. If you select fix, Disk Utility will end up rebuilding the ‘fused’ volume and you will end up with a single visible “Fusion” drive and Disk Utility will not let you ‘break’ the fused volume so you can install OS X on the SSD (or the platter drive if you felt so inclined, but why?).
Basically, don’t ever use Disk Utility (from Recovery Partition or during OS X install process) on a Mac Mini with an SSD and a platter drive, unless you actually do want to fuse them together into a single volume.
This is somewhat of a bug. ‘Somewhat’ in that a Mac Mini with dual drives, one SSD and one platter, isn’t a supported configuration by Apple. But I anticipate they will fix the Disk Utility app in the Recovery / Installer in the near future.
So what if you accidentally fused your two drives without realizing what the ‘fix’ action meant? I know a solution (because I actually did accidentally fuse the two drives together).
One solution is to take both drives out of the Mac Mini and plug them into another computer that isn’t Fusion drive aware (e.g. Mac OS X 10.8.1 or prior, Windows, Linux) and then completely low level format the drive. This is obviously time consuming and tedious (physical removal of the drives and reinstallation).
Another solution that I used was to launch the Terminal (which can be done from the Recovery Partition or an installer image) and use the diskutil coreStorage commands.
- Execute diskutil coreStorage list which will display an exiting Fusion volumes.
- Look for the “Logical Volume Group” line which also contains a roughly 32 digit hexadecimal string that is the UUID for the LVG.
- Execute diskutil coreStorage delete <UUID> where <UUID> is the hexadecimal string for the LVG.
Once you delete the LVG, Disk Utility will see the two separate physical drives again (and not a single fused drive). DO NOT select the drives in the Disk Utility interface. It will continue to assume they are a broken Fusion volume. Just continue on with the Mountain Lion installer at this point. When it comes time in the process to select a drive to install on, it will let you pick the SSD (or the platter) and it will format the entire drive (by itself and not fused) appropriately.
When you boot Mountain Lion after the install is complete, the Disk Utility application from within the installed OS will allow you to format the platter drive (if you installed on the SSD) without any complaints about it thinking the drive has an error.
After all this, the end result is a nice ~3lb box that contains a 2.3GHz quad core processor and 16GB of RAM.
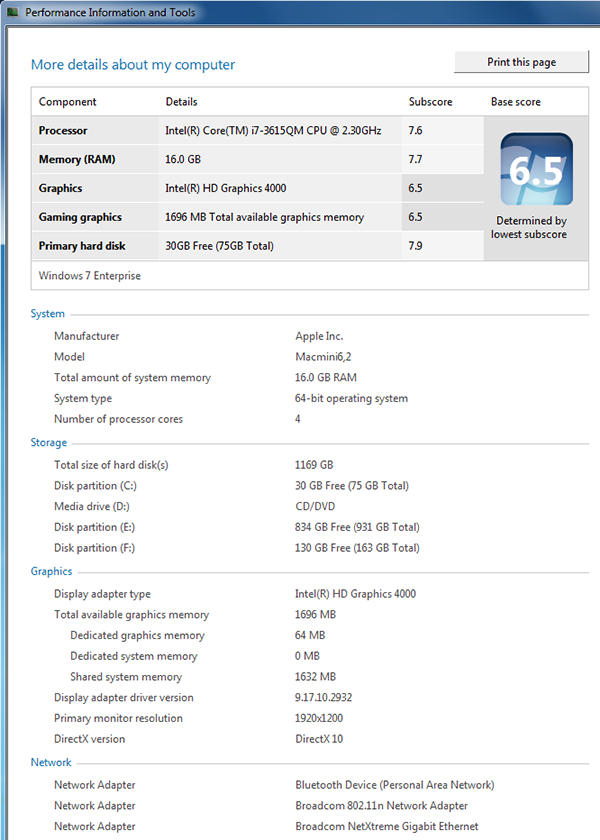
As I mentioned earlier, I installed Windows 7 (64-bit Enterprise) on the Mac Mini via Bootcamp just so I have bare metal Windows running for some random heavy crunching tasks that require Windows.
Anyway, the Mac Mini is a great little machine. Quad core and 16GB in such a small form factor is very nifty to say the least.
The Dell U2412M isn’t bad either. I’m not a display expert, so I’m not going to say much about it. But I pretty much bought it because I wanted a decent IPS display for the Mac Mini at a low cost. It was either the Dell U2412M or the Asus PA248Q. I was actually set on the Asus PA248Q when I was still deciding on how to configure a Mac Mini after I bought one. It looked good on paper as far as coming pre-calibrated from the factory. But I ended up picking the Dell because it seemed like there were more good reviews of the Dell versus the Asus.
Granted, going by forum posts isn’t the greatest way to gauge quality of a display, but that’s all I had since I didn’t know anyone with both displays and where I could compare the two in person.
Here’s a quick breakdown of the items I acquired for this system:
Lorenz Szabo
Great post and I agree on your choice: I have been advocating the Mac Mini plus iPad (I use a top-of-line iPad 4 and an iPad Mini) for some time now. The MacMini is my entertainment/sync-hub/workstation and performs as such very good.
Mac Mini 2018: “Big Power, Small Package” Continues – ocabj.net
[…] several years of using a Mac Mini (Late-2012) at home, I decided to get another Mac Mini (2018) to replace it. The Mac Mini is significantly more […]