
There are a lot of new gun owners / shooters as of late whose first foray into the shooting sports is with the AR-15 rifle. Even though many are opting for flat-top (Picatinny rail) upper receivers instead of the traditional A2 “carry handle” style rifle, a good number still opt for iron sights of some sort, whether it be a detachable A2 carry handle or some type of flip-up / BUIS system.
That said, often these new gun owners are confused or unsure of how to aim with the sights; a rear aperture and front sight post system. I’m often asked, “Do I put the front sight post at the bottom of the target?” or “Do I put the front sight post at the center of the target?” or “How should I hold on target?”
All of these questions are in reference to what is known as sight picture. Sight picture is basically the correlation between the shooter’s eye and the target, through an aligned sighting system (in this case, aligned front and rear sights).
Before I continue discussing the types of sight pictures, or ‘holds’, used with traditional US service rifle sights (the M1, M14, and M16 all used a rear aperture with a front sight post), I want to quickly state the obvious regarding proper sight alignment with the AR-15/M-16.
The top of the front sight post should be in the center of the rear aperture.
That’s it.
Don’t worry about where the front sight ears are located in relation to the rear aperture or the target. As far as the front sight focal plane is concerned, you should only be focused on the front sight post itself.
Not the front sight ears. Not the front sight base. Just the very top of that front sight post and the top edge better be in the center of the rear aperture. Continuing on.
So how should you hold the front sight in relation to the target?
Well, there is no right sight picture because what is “the best” varies shooter to shooter and from condition to condition.
The most common and simplest method to implement is “center hold” which is also known as POA = POI; Point of Aim = Point of Impact. Translation: The bullet will impact wherever the top of the front sight post is aimed at. Simple enough.
Author Note for 2012-11-25: This article is linked quite often on the Internet and I have received many requests to make the graphical representation of “Center Hold” more distinct, by making the target black and front sight post black differing shades. This is a good point and I re-uploaded a version where the target black/circle is a lighter grey for better instructional understanding.

The next common method is the “6 o’clock hold” sometimes referred to as a ‘lollipop’. This is when you place the top of the front sight post at the bottom of the target. This is most commonly used in competitive shooting on traditional NRA targets (black circles) in which case the very top of the front sight post is placed right at the bottom of the target black. Even though the front sight post is at the bottom of the black, the bullet will impact at the center of the black. This requires a known/standard target size at the known distance.

So for most basic field and recreational shooting, the center hold and 6 o’clock hold are two most people will ever need to use.
The next two alternative holds are most likely to be used in NRA High Power Rifle competitions (“Across the Course”).
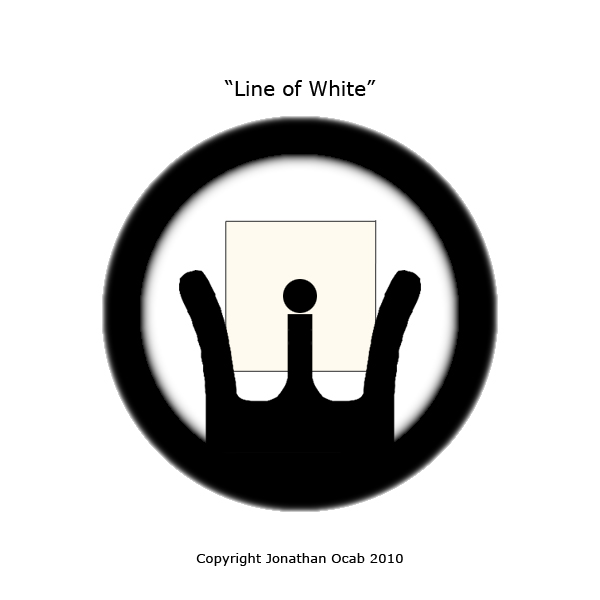
One alternative sight picture is known as a “line of white hold”. This is a variation of the 6 o’clock hold except the shooter will hold the top of the front sight post just a little bit lower than in the 6 o’clock hold, such that there is a small amount of white between the top of the front sight post and the bottom of the target black.
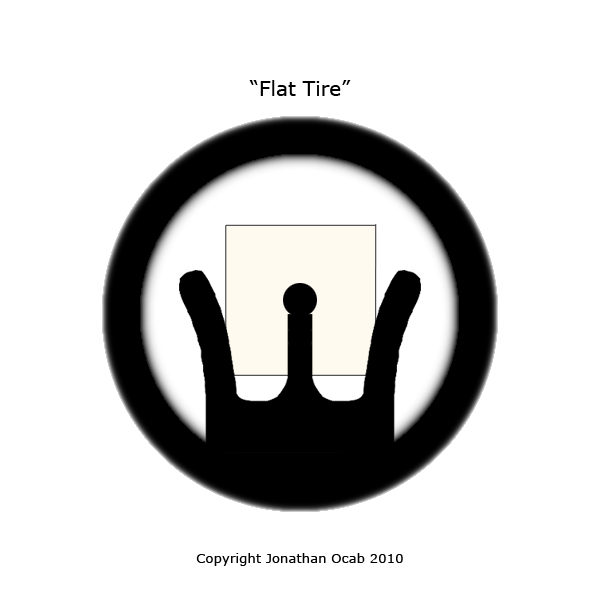
Another alternative sight pictures is known as a “flat-tire hold”. This is also a variation of the 6 o’clock hold except the shooter will hold the front sight post just a little bit higher than in the 6 o’clock hold such that the top of the front sight post goes up into the bottom of the target black. This gives the target black the appearance of a circle with a slightly flat side on the 6 o’clock position which makes it look like a flat-tire, hence the name.
I have just presented four different types of sight picture methods.
Which one should you use? Again, I can’t really say what will work best for you since what works best for one shooter won’t work best for another. We all have different eyes and we all have different brains. The way we visualize and interpret may work well with one hold and not with another.
What do I use? I currently use center hold for the 200 yard standing slow fire, 200 yard sitting rapid fire, and 300 yard prone rapid fire stages. Then I use 6 o’clock hold for 600 yard prone, generally. I say generally because depending on the lighting conditions and fatigue, I may use line of white hold.
When you shoot in an Across the Course match, the 600 yard stage of fire is the last stage of the day. For 4-5 hours, you’ve been constantly getting on the line, shooting, repacking gear, scoring, moving to the pits, pulling pits, getting back on the line, etc. So after all that, you’re expected to suit up, strap on a sling, and lay down to shoot 22 rounds at a target 600 yards away, hoping to put all of those shots into a 12″ 10-ring (or ideally a 6″ X-ring). Body fatigue can also lead to vision fatigue and mental fatigue. Dehydration might come into play. Thus, sometimes how you perceive the target black at 600 yards may change from when you are fresh and energetic.
Or even if your eyes are fresh, you may gradually fatigue during your 22-round slow fire string. This is what often happens to me. When I’m dead on and shooting well on the target at 600 yards, I’ll know when I’m getting tired when I notice somewhere in the middle of the string (i.e. shot 9 or shot 10), I’ll begin to hit high in the 10-ring or put a shot in the 9-ring at 12 o’clock.
This is the beginning of eye fatigue which is resulting in sight fade. I’m losing the sight even though I’m trying to focus on the front sight when breaking the shot, and I’m starting to bleed the front sight post up into the target black.
In order to counter this, I will start to use line of white hold. This will ensure I keep the front sight post down below the target black and not up into the black (resulting in a 12 o’clock 9-ring shot). One may ask, “Why not just adjust the rear sight down a couple clicks to counter this?” The reason why you would not do that is because if you bring the sight down, you’re still going to be suffering sight fade and most likely will continue to bleed the sight higher and higher into the sight black. The problem isn’t the zero. The problem is with your eyes and front sight. Thus, in this case, you want to control how your eye is perceiving the sight picture by choosing a different one for the situation.
Hopefully this has provided some information and insight regarding sight picture (and sight alignment). Again, I can’t definitively tell you which sight picture / hold will work best for you. Your best bet is to go to the range and try them all.
Remember: The key to any good sight picture is to focus on the front sight when you break the shot.
I say again: Focus on the front sight. Perhaps I will write a segment on front sight focus in the near future.
Michael Z. Williamson
Excellent breakdown. I just forwarded this to a student. Thanks.
AR front sight post
[…] try a different sight picture method. I am a big proponent of the "lollipop" method. Sight Picture: A primer It is effective in cases where you are shooting at targets that are smaller than the width of your […]
Terry Risse
Great help on sight picture techniques. I just purchased an AR-15 and was having difficulties because I was using a 6 oclock hold for a variety of target sizes and shapes from 0-200 yds. Because the targets were not always appropriate sizes for the different ranges I was struggling with the results. As a result of trial and error, I had suspected that center hold would work better although I did not know the terminology prior to reading your article. The article explained the concepts clearly and I have a better idea which direction to go from here.
Thanks.
Danny
Great article I was looking for something just like this. I had to scroll up and down to find the difference between some of the sights but it was very informative. Can I suggest that you make the target black dot a different color so it can be distinguished from the weapon sights? In that case the center hold black weapon sights would be half way up the black or other color dot target I’m assuming?
ocabj
Good point on that image. If I get a chance and remember it, I’ll update that graphic.
Cal Watyford
Since targets are all different shape, I use the centyer hold. Have for over 70 years regardless of the sight being used. Scope, open etc.
C al
Luxlift
Great blog here! Also your web site a lot up very fast!
What web host are you using? Can I am getting your affiliate link in your host?
I want my web site loaded up as fast as yours lol
Kevin Winters
Overall I thought this was a good article. I’ve seen all of these techniques employed. I do believe there is a little room for improvement though. You mentioned focusing on the front sight post a couple of different times, but I don’t know that you emphasize enough, the importance of that, or that it comes through in your graphics. I realize I’m telling you things you know but believe it bears repeating since a portion of your target audience seems to be new AR shooters. When you see three items (the rear sight aperture, front sight post, and the target) aligned but at different distances from your eye, it is only possible for one of the items to be in focus at any given time. When shooting that should be the front sight post. In your graphics the rear sight aperture appears to be fuzzy but the target appears crisp. If I was teaching a course of instruction that included sight picture I would change the graphics so the rear sight aperture was a bit fuzzier and the target was slightly out of focus, leaving the front sight post as the only crisp object in the field of view.
Big Labosky
AGREED BLUR REAR SIGHT BOTH EYES OPEN PEOPLE! PRACTICE REPETITIVE CHEEK WELD POSITION ON BUTTOCK I HAVE ALWAYS BEEN A LOW HOLD AS MUCH OF JAW AND HEAD TOUCHING THE STOCK. SO I CAN FEEL THE WEAPONS ACTIONS WHILE BEING ALSO ABLE TO SIGHT PICTURE ACQUIRE AND TRANSITION DISTANCES. I ALSO AM A LET… MY NOSE TICKLE THE CHARGING HANDLE GUY. IT GIVES ME A 3 POINT OF CONTINUED REFERENCE .. THATS WHAT WORKS FOR ME. EVERYONE’S DIFFRENT , DO WHATS BEST FOR YOU. MY PRIMARY AIMING DEVICES ARE ALL TRIJICON ACOG 4×32 FIXED WITH RED TRIANGLE AND RANGED DROPPED TO 800 YARDS. I RUN IT FLATTOP AND CO WITNESS TROY INDUSTRIES STEEL FLIP UPS CAUSE IM OLD SCHOOL AND LIKE A HEAVY WEAPON. I “LOLYPOP” THE TROYS AND ZERO AT 200 ALIGNED WITH MY ACOG CO WITTNESSED LOVE THIS TRANISTIONAL COMBO MY FRONT TROY INTIGRATES AS A GAS BLOCK- BAYONET LUG. I JUST RECENTLY PICKED UP A M9 PIG STICKER FROM A FRIEND. TRUST ME THE BAYONET ADDS MORE WEIGHT BUT ALL RECOIL IS GONE. RAPID FIRE OF 62GR 5.56 IS COMPARABLE TO A 1022 RUGGER. NOTHING…