
I finally participated in my first NRL Hunter match in January 2024 at the Gunsite Academy facility in Paulden (Arizona). This location is the home of the Ghost Hunter match and the 2024 Ghost Hunter provided me the opportunity to cut my teeth in this emerging competitive format.
For those that are not familiar with NRL Hunter, the premise of NRL Hunter is to bring hunting-style of shooting into a competitive format where the competitor is required to find the targets in a given area, range those targets, and shoot those targets all within a set time limit. All the stages in an NRL Hunter match will be blind stages, or in other words, you do not know what the target search area or firing position will look like until your stage time starts.
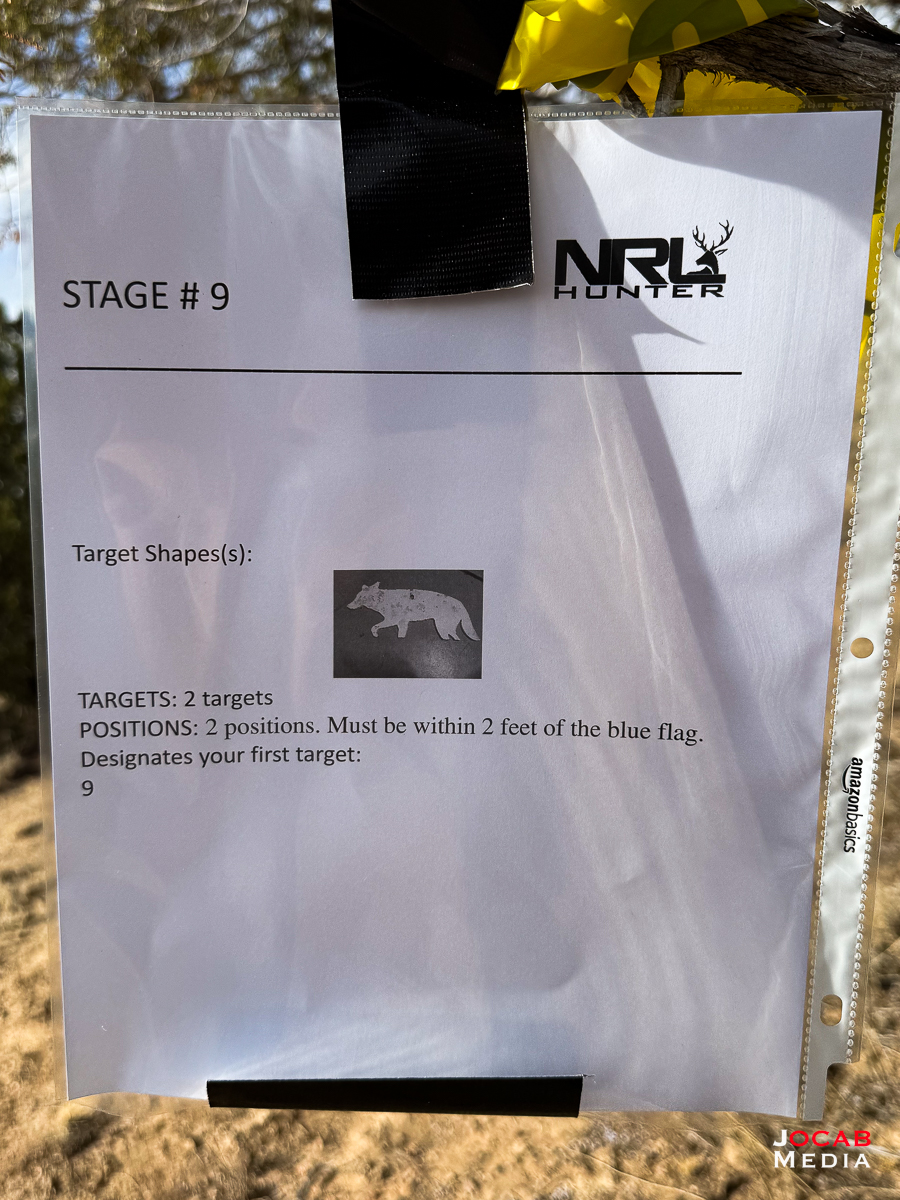
While this may sound a bit difficult, the scope of the stage is confined to four hits on target(s). A stage will have either one (1) target that is shot from four (4) different positions, two (2) targets that are shot from two (2) positions, or four (4) targets that are shot from one (1) position. The competitor has two (2) shots to hit the given target+position, where two (2) points are given for a first round hit or one (1) point is given for a second round hit. If both shots are missed, then the competitor gets zero (0) points for that target+position and continues on to the next target+position.
This means that the maximum points for a single stage will be eight (8) points, or four (4) first round hits. All stages have a four (4) minute time limit.
Two competitors can participate as a team, where both team shooters will engage the stage targets, one after the other, but in a time limit of six (6) minutes.
I did publish a Range VLOG episode which has coverage of several stages that I shot during the 2024 Ghost Hunter match. If you watch this Range VLOG episode, you will see that did not shoot very well and I did place near the bottom of the pack. But I learned a lot from this match.
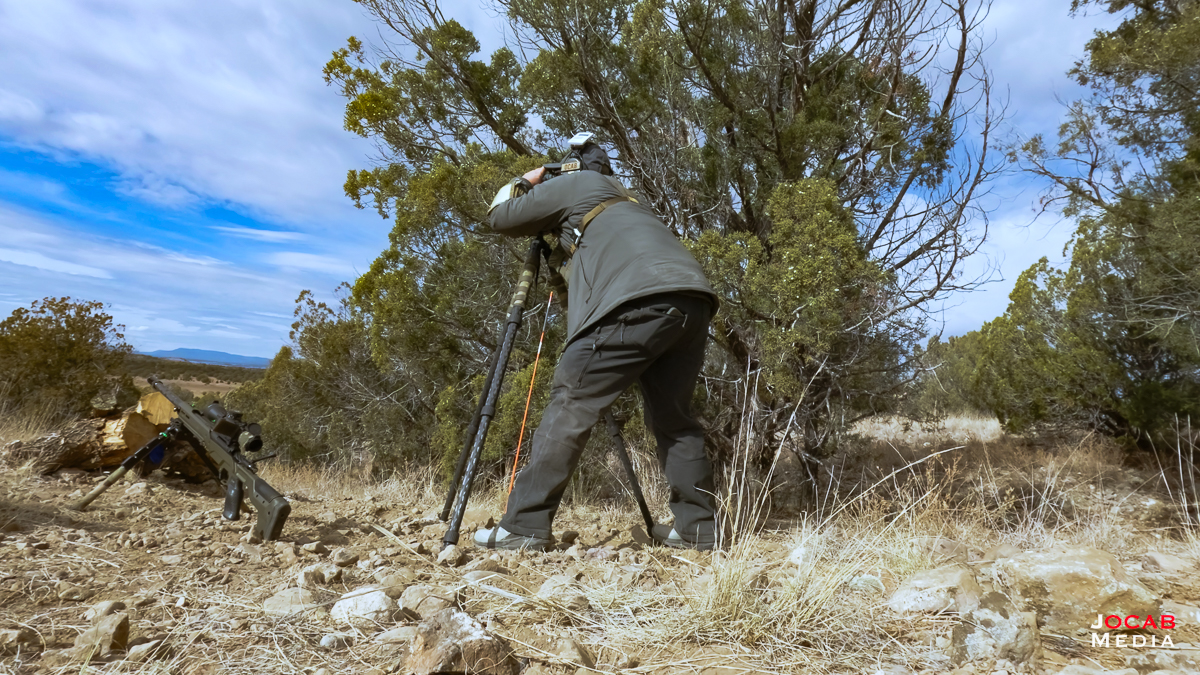
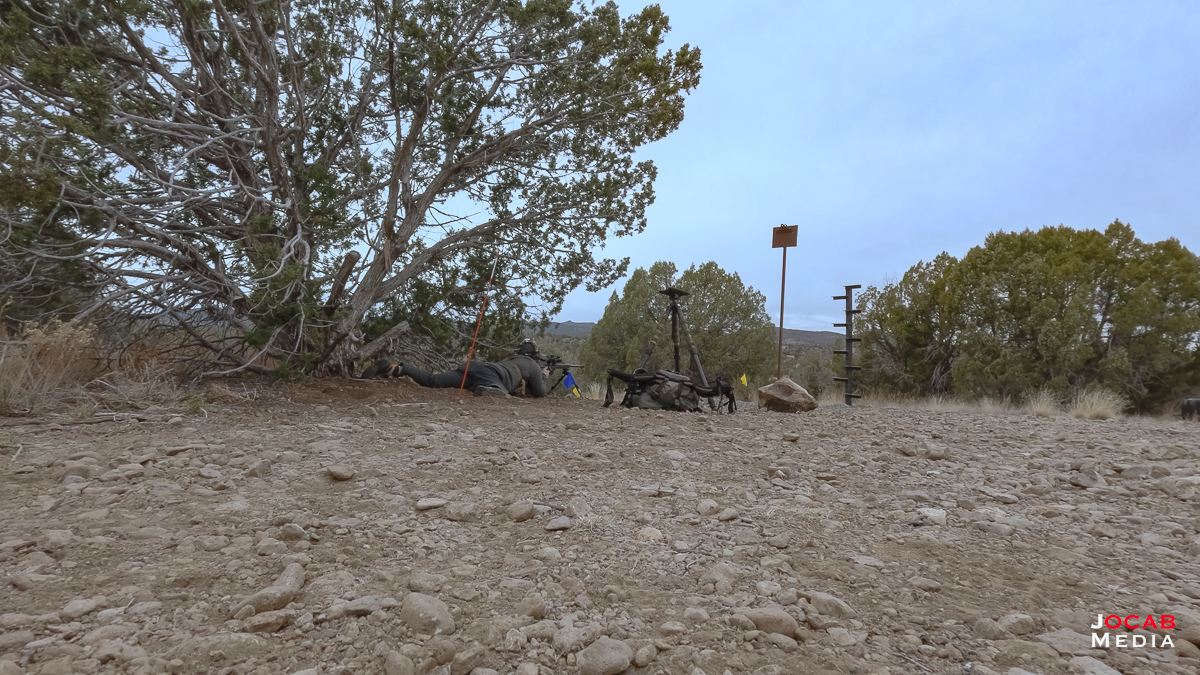
First and foremost, the biggest takeaway from my first NRL Hunter match is that the match is won or lost on the glass. You cannot shoot and hit targets if you do not know where they are. You need to be efficient and effective in locating the targets. Efficient in getting the glassing system setup from the tripod off the pack, bag onto to the tripod + tac table, binoculars out and on the tripod, and eyes looking through and scanning the area. Effective in being able to scan, seek, and locate the given targets, and range those targets accurately.
Immediately, I realized that my time getting on the glass and looking through the binoculars at the target area was taking me as long as 60 seconds. This does include a solid 15-25 seconds it took to get from the start point to the firing point. Thus, I need to work on being more efficient in setting up by glassing system.
I will be taking the time to run drills of getting the backpack off the body and setting up the glassing system. I would like to optimize this as much as possible.
Furthermore, getting my bag deployed onto the tripod to glass from (rest binoculars on) also took more time that I felt was desirable. I am going to figure out ways to optimize the bag usage, including looking into keeping a bag permanently on the tac table so that I do not have to unhook / unclip a bag from the backpack or body (belt).
Several stages I had a hard time locating a target, even in a 2 target x 2 position stage. For the most part, you should be able to find the first target as the first target will be close to a numbered placard for that stage.
So you should be able to walk away with a least one point (assuming you have a solid firing solution). I feel that the biggest difficult in finding the other targets after the first is contrast. Very often targets blend into the terrain. Paulden (Arizona) exhibits a high desert style of terrain with a good mix of trees, brush, and other southwest desert foliage. When the targets are placed in front of a large bush or tree, the outline of the target can be difficult to see.
My only response to this is to take more time every week scanning areas and trying to look at details. I plan on hitting up my local wilderness park to observe the wide area to pick out details as well as going to the side areas of my range with views of the forest area.
Being able to keep track of time and knowing when to move on is another key takeaway. As I mentioned, the stage for an individual competitor is 4 minutes. In a few stages, I tried to push the time limit and find the additional targets and sometimes did not get on the rifle until there was only one minute left.
This is a bad idea because in a multi-target stage, you need time to setup the shots. For instance, in a 2×2 stage (2 targets, 2 positions), even if you only find one target and give yourself the last 1 minute, you need to get into the first firing position, make a shot (or potentially 2 shots with a first round miss), and move to the next position and make a shot. I was given the advice that if you get on the rifle at the two minute mark, even if you can’t find the additional targets. I feel this is relatively sound advice.
After I finished the first day (NRL Hunter matches are 2-day matches), I realized I never used my CKYE-POD triple pull as a triple pull. Multiple times I went to shooting off a tripod due to low foliage obscuring targets while prone. However, those engagements were not ideal and I felt that deploying the triple pull would have been a lot faster and allow me to use the tripod as rear support.
I did end up using the triple pull multiple times on Day 2 of the match, where having a higher position off the ground was beneficial, if not required, to engage the targets. I will plan on making use of the CKYE-POD triple pull for taller shooting position, as it proved to be quiet stable when using a tripod for rear support.
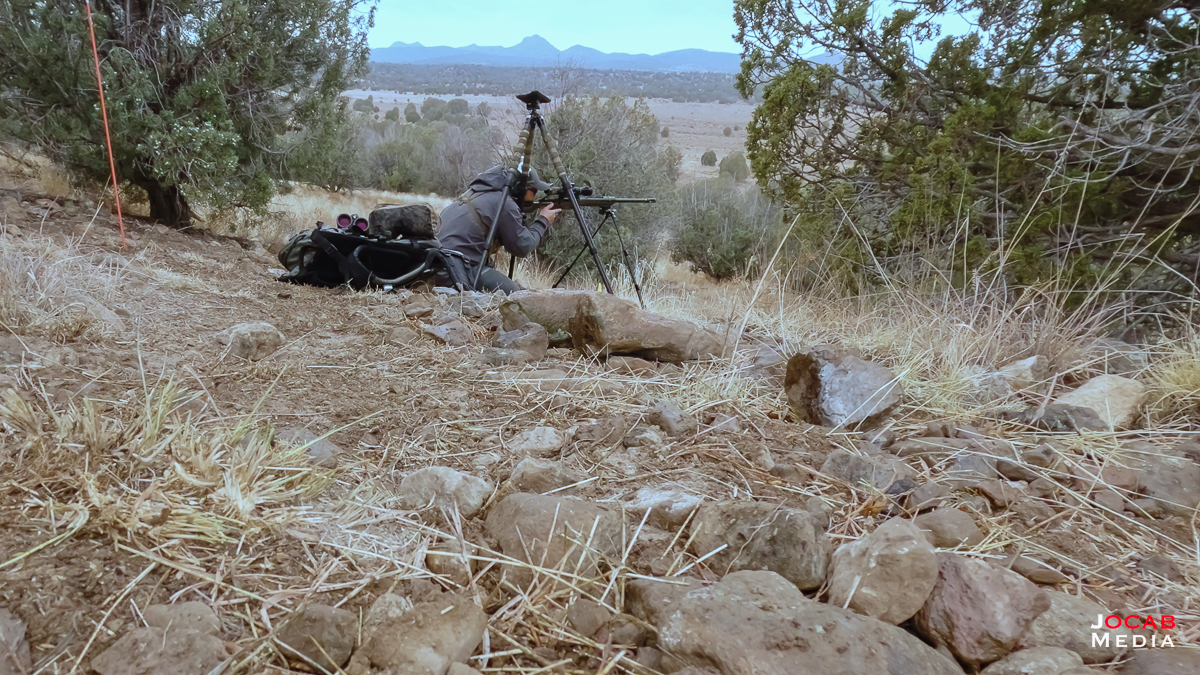
This brings up the issue of being able to assess the shooting position effectively and to adapt quickly if needed. Specifically, knowing when prone will not be an ideal shooting position.
When you are on the binoculars trying to locate targets, you are on a sighting pin where all targets are supposed to be visible from. The actual shooting position will be just forward of that pin. This shift in the point of view of the targets changes the line of sight and may result in an ability to no longer see the target from prone or low to the ground.
Multiple times I went to prone to begin engaging the targets, only to find out the target was obscured. I then scrambled to try and establish a tripod (or triple pull) position.
It is very hard to train one’s self to gauge (without getting into the prone position), whether or not a firing point will permit the prone position with target visibility. However, I feel that what I can train for is quick deployment of an alternative firing position. Not only do I need to train on deploying a tripod or taller bipod on-the-fly, but I also need to train myself on checking other positions from points on different sides of the firing point flag.
To clarify, the firing point is usually marked by another pin or flag, and stages will often indicate that the competitor must be within a certain distance (e.g., 2 feet) from the firing pin/flag for any given shooting position.
For instance, I learned that people often engaged a 1-target 4-position stage by starting 2 feet behind the firing pin, then moving one foot forward for each additional position. I often shot from left to right, which meant I was constantly shifting my point of view / line of sight on the targets just slightly. Moving back to front or front to back would minimize this point of view / line of sight shift between positions and ensure that the target would be visible from the same plane (e.g., prone) as the first position.
One minor lesson learned is that I need to mark my brass ahead of time. I was going to mark my brass when I got to my hotel in Arizona, but I forgot to bring my marking tool. So I ended up pulling a lot of random brass along with mine after each stage, and likely left my own because I didn’t pick them up. Furthermore, I will accept the fact that I will likely lose brass in an NRL Hunter match. Brass will fly during the stage and given the stage can have logs, stones, rocks, etc., near the firing point, brass will likely land where it won’t be seen.
Beyond the general match lessons learned, I did come away with opinions on my gear load out for the match.
I packed spare bipod in my backpack (Stone Glacier Approach 2800) and it was fortunate that I did so, because unfortunately, my CKYE-POD triple pull came apart on the second to last stage on day 1. I ended up using an Atlas CAL on the last two stages.
Note that I intended to use a TBAC as my backup bipod, but I inadvertently put my Atlas CAL in my backpack and the TBAC bipod in my rifle hard case (which I transported my rifle in) and decided just to use the Atlas CAL as my backup since it was already in my backpack.
Along with this topic, I was fortunate that I had a Fix It Sticks toolkit in my backpack as it was useful for reassembling and tightening up the CKYE-POD.
In my NRL Hunter kit walk-through video where I talked about what I planned on using for NRL Hunter, I mentioned that I would be carrying three shooting/support bags.
I ended up carrying only one: the Armageddon Gear Sticky Game Changer OG with git-lite fill. I figured that the added weight and space for the two other bags was unnecessary as prone wouldn’t be a perfect flat prone on most of the stages and the Game Changer would be versatile enough. This thought was correct and I the Game Changer was sufficient.
However, I do feel like that I may carry a thin, flat bag permanently strapped to my tac table so I can optimize my glassing system setup (not having to reach for, unclip, and set up bag on tripod). So if anything, I may carry two bags, but one will be for rifle support while the other is specifically for the tac table and binocular use.
I used the RRS SOAR TFCT-34 with Anvil-30 which is a nice relatively compact and lightweight tripod system. But I will be switching to an inverted tripod for NRL Hunter. The TFCT-34 is a four (4) segment tripod with three (3) locks and I felt I spent a lot of time getting the tripod setup. An inverted is always going to be faster and I do already the RRS SOAR TVC-22i. However, I decided not to run the TVC-22i due to the longer collapsed length of over 38 inches and my perception of it as a flat-range / PRS-style tripod. In retrospect, I should have sacrificed the carry length and used this tripod.
But to try and bridge the gap of form factor between the TFCT-34 and TVC-22i, I have acquired the RRS SOAR TVC-22i compact which is a little shorter that the full-size TVC-22i with a collapsed length of 30 inches.
In my kit walk-through video, I also mentioned that I was likely going to carry my SIG KILO6K-HD 8×32 as my backup rangefinding binocular to my primary Swarovski Optik EL Range 10×42. I did not do this and ended up packing my SIG KILO8K-ABS LRF monocular as my backup ranging system. I believe this weight and space savings was worth the risk of possibly having a malfunctioning primary binocular. Furthermore, I did not even bring my KILO6K-HD 8×32 binocular in my vehicle to Arizona.
Prior to my first NRL Hunter match, I decided to carry three magazines total, two (2) AW and one (1) AICS magazine, as my rifle is configured to accept both AW and AICS magazines. I did carry three magazines on me during the match and I will be cutting down to just the two AW magazines for future matches. I feel like running one magazine and a backup magazine for an emergency reload (e.g., malfunction on a stage) will be sufficient for future matches.
I ran the Cole-Tac Cheat Sheet, which is a simple scope mounted loop fabric tab that accepts hook-backed vinyl cards, where the vinyl cards are written on for data reference. I use this in NRL22 and I felt that it would be a handy way to record the data on the stage targets and keep on the rifle. While it did work to some degree, my methodology was flawed. In NRL22, I know the target distances ahead of time and am just recording the drop in MILs on the card. I adopted this same concept during the NRL Hunter stage, where I would range the target using the LRF and then write down the MIL drop on the card. When I got to the rifle, I knew to dial, say 3.4 MIL, but I was sort of guessing my hold over for wind because I neglected to write down the distance (yards). Thus, I could not utilize my gun number effectively as I did not have the distance to extrapolate a wind hold using the gun number (e.g., gun number of 6 with a 378 yard target and a full value 9 mph wind means approximately .5 or .6 MIL windage hold).
I am going to experiment ranging objects at distance and then writing down both the distance (yards) and the elevation hold (MIL) on a cheat sheet to see if I can effectively do so. Otherwise, I may opt to make more use of my arm board and try using painters tape and a pen every stage. One competitor in my squad was using painters tape over his armboard and would write down his data, and then peel off the tape after the stage to go with a new piece of tape. This works great as it gives more real estate to write and it also better in the rain. It rained on Day 2 of the Ghost Hunter match making the vinyl card a little difficult to use as the wet erase pen was wiping off easily.
Overall, I have a lot to work on when it comes to NRL Hunter and am eager to put changes into place for my next NRL Hunter match. I also have an After Action Report video for the NRL Hunter 2024 Ghost Hunter match where I discuss some of the items I wrote about here.
Comment on this post