
After several years of shooting the AR-15 platform in a strictly High Power Rifle “Across the Course” competitive format, I finally put together a non-competition Service Rifle upper receiver. This article is pretty much a write-up of this build from start to finish, along with my opinions of some of the parts used in the build as well as information and data gathered during live fire testing.

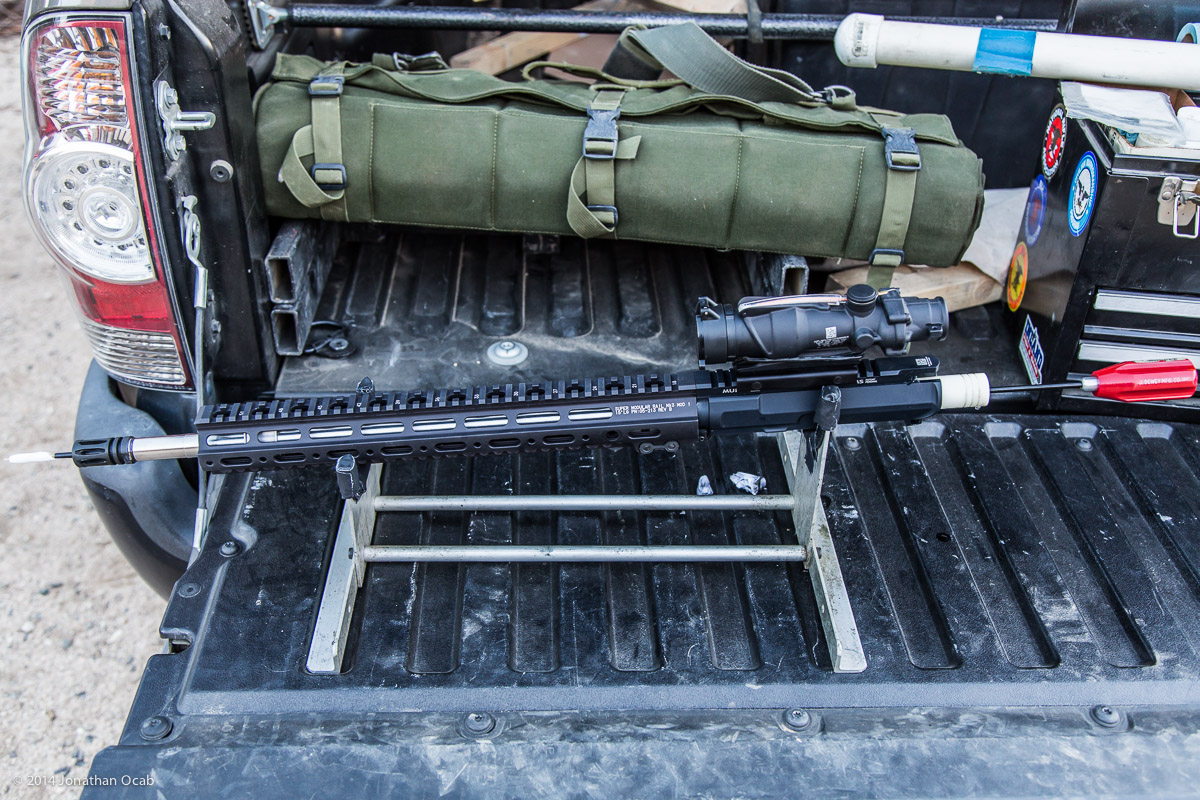
What sparked this whole build is the Geissele Super Modular Rail (SMR) MK3 15″ handguard that I literally won in a Geissele Facebook promotion in the summer of last year.
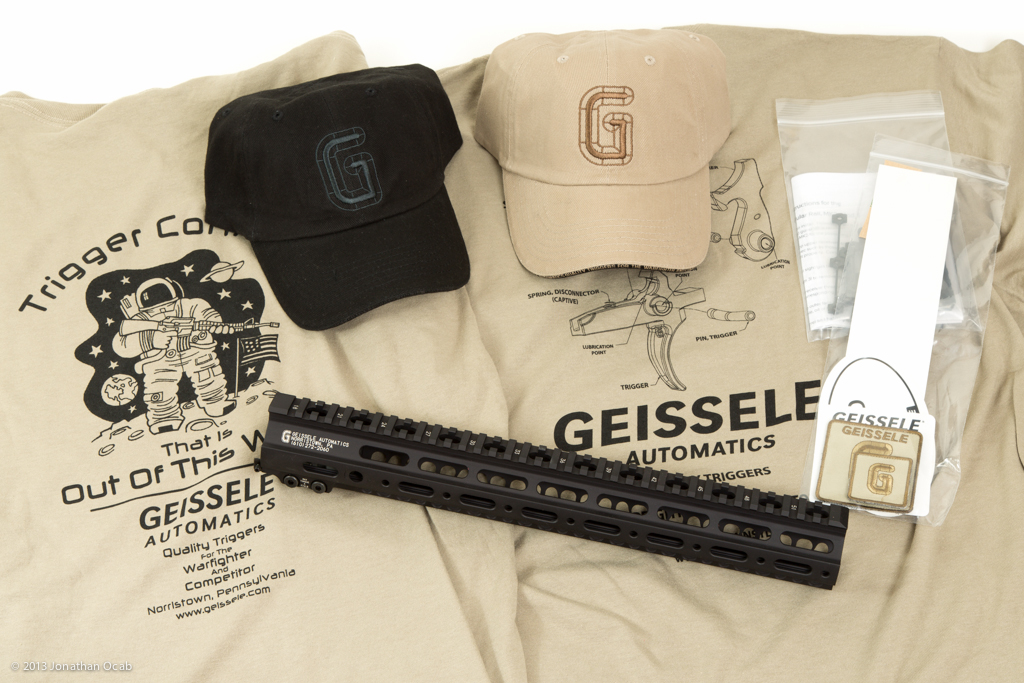
I received the Geissele SMR MK3 and was so impressed by it that I wanted to actually use it, which meant that I needed to get all the other parts necessary to complete an upper receiver.
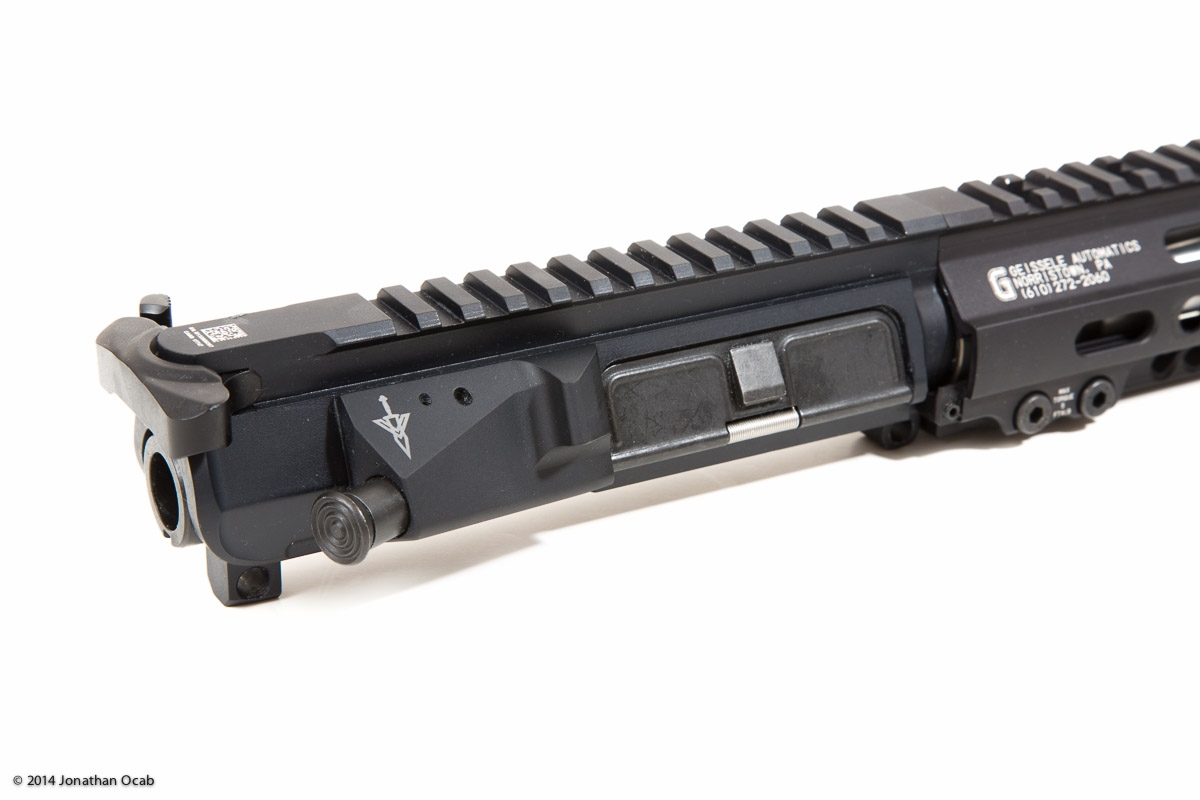
The first item I ended up acquiring beyond the handguard is a VLTOR MUR-1 billet upper receiver. It’s a non-milspec receiver because it has thicker walls, but I have always been intrigued by the thick walled upper receivers ever since I was pondering a Space Gun for Match Rifle Across the Course competitions back in late 2000’s. Anyway, I decided to try out the VLTOR MUR-1 since it seems to be in high demand (usually sold out).
After that, I decided I was going to go with an 18″ barrel, which is usually associated with SPR-style AR-15 rifles. SPR, or Special Purpose Rifle, became prevalent in the mid-2000’s after the US Navy developed what is known as the Mk 12 Special Purpose Rifle for SOCOM units. The Mk 12 SPR uses an 18″ 1-in-7″ twist heavy barrel, so after the Mk 12 became public knowledge, civilian firearms consumers started adopting 18″ barrels for their own SPR-style builds. What is important to note is that the Mk 12 was specifically designed to use Mk 262 ammunition which was developed around the same time as the Mk 12. Mk 262 ammunition is basically a military spec cartridge using a 77gr 22cal (.224″) BTHP bullet (specifically the Sierra MatchKing 77gr BTHP).
Anyway, part of the decision to go with an 18″ SPR-style build is because I wanted to have an upper that would work fine with my competition Service Rifle lowers (A2 stock). That way, if a scenario arose that required a rifle configured more for practical or tactical use, then I could simply swap upper receivers. Many will ask, “Why not just build a whole new rifle with a new lower?” My response to that is that being in California, I only have a limited number of State Registered AR rifles that are allowed to have fully operational (removable) magazine wells. I have “off-list” lowers, but none of them are built since I don’t care to use a bullet button.
The other reason for choosing the 18″ SPR barrel is that I already use 75gr and 77gr bullets due to my High Power Service Rifle competition background. I have extensive experience using the ‘heavyweight’ 22cal (.224″) bullets and prefer to shoot them, so an 18″ SPR barrel is ideal for me.
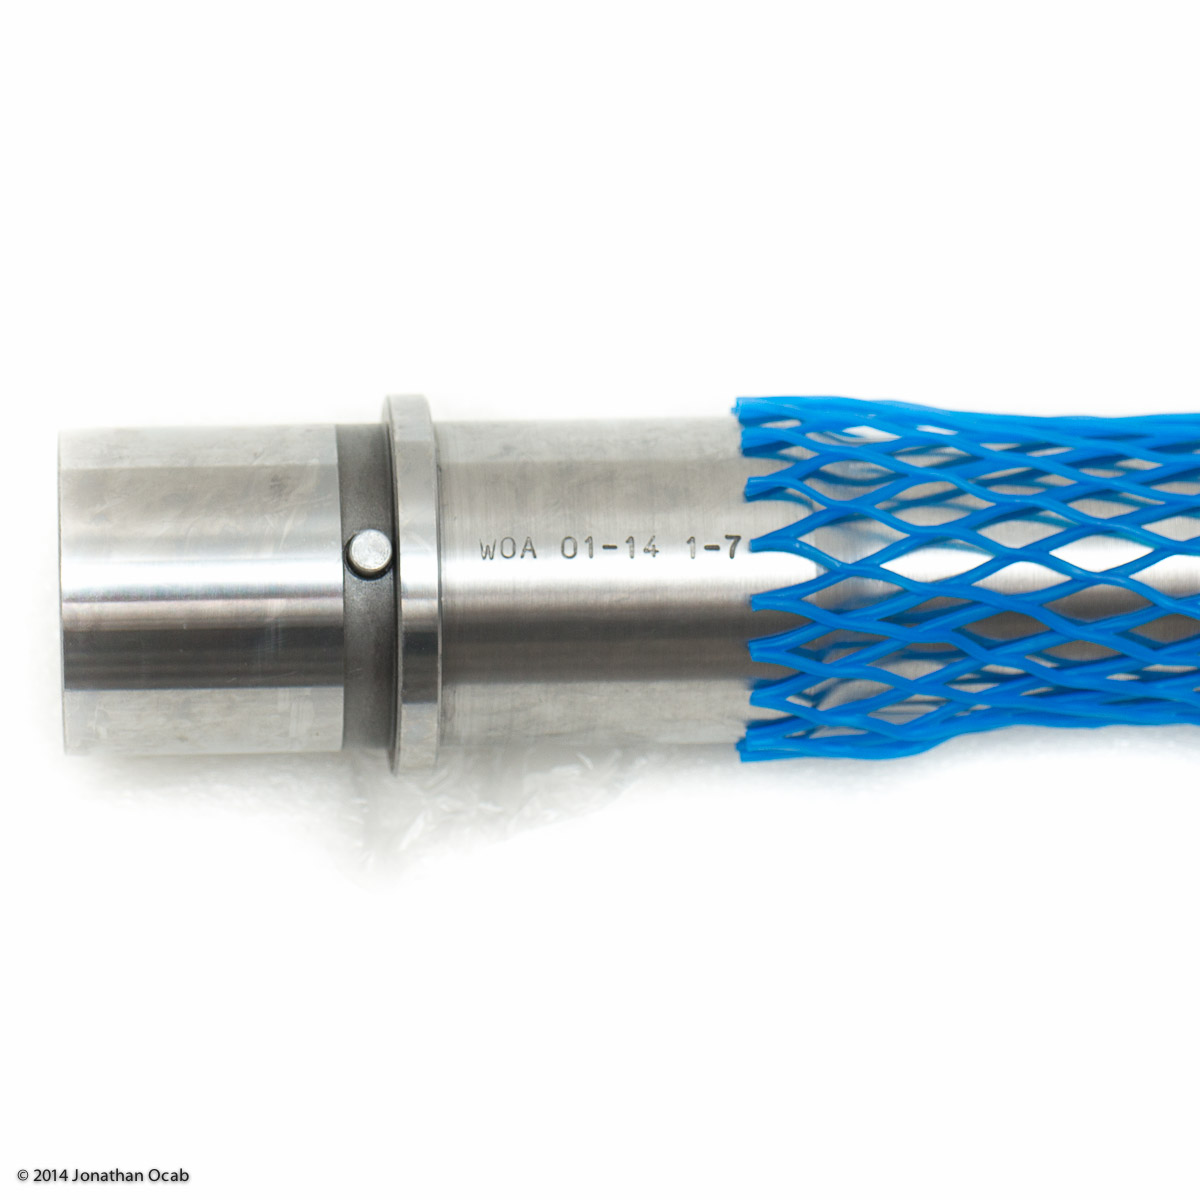
That said, I was able to score a White Oak Armament 18″ 1-in-7″ twist SPR barrel with a rifle length gas system from Brownells. While I’m a fan of WOA since I have been using their uppers in High Power Service Rifle ever since I’ve been competing in Across the Course, I was willing to try an 18″ SPR barrel from another manufacturer. But since Brownells had the WOA in stock, I went ahead and bought it.
I needed a low-profile gas block since the 15″ rail covers the gas hole of the barrel, so I decided to get the Geissele low-profile Super Gas Block.
This made sense considering I’m using the Geissele rail, and therefore a Geissele gas block would be guaranteed compatible (enough clearance).
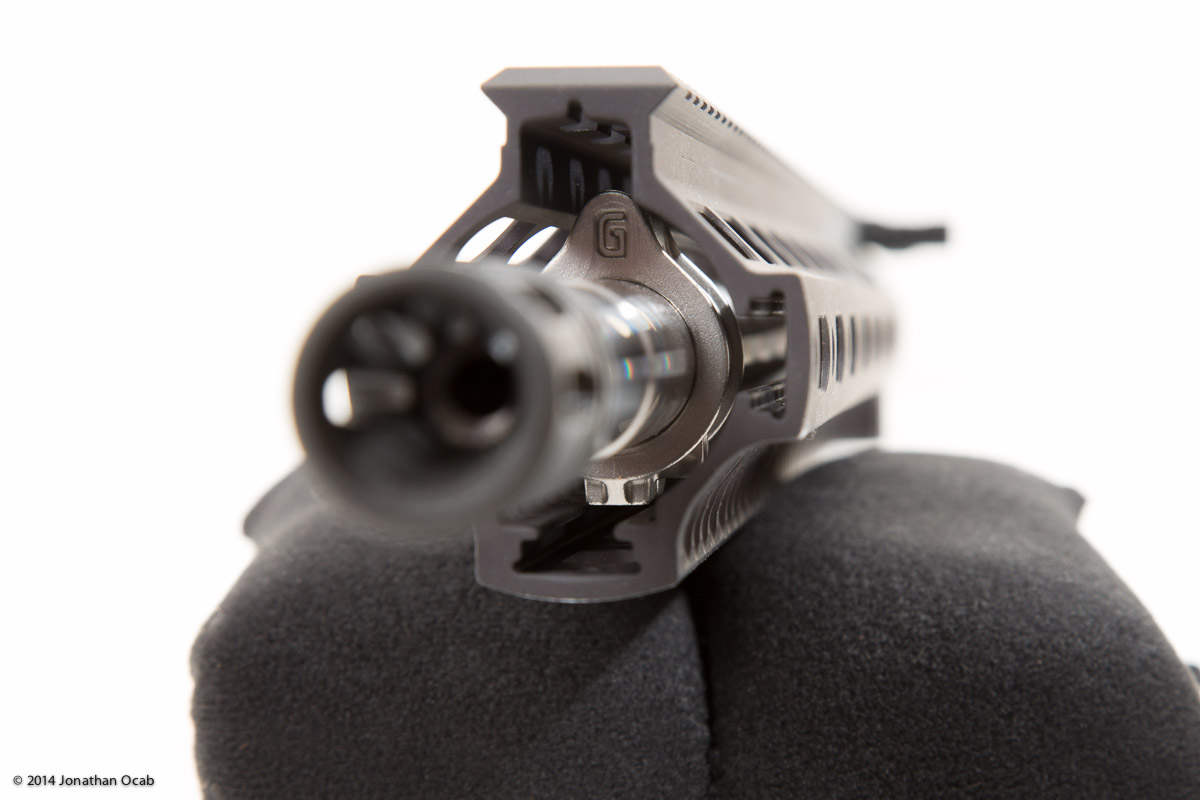
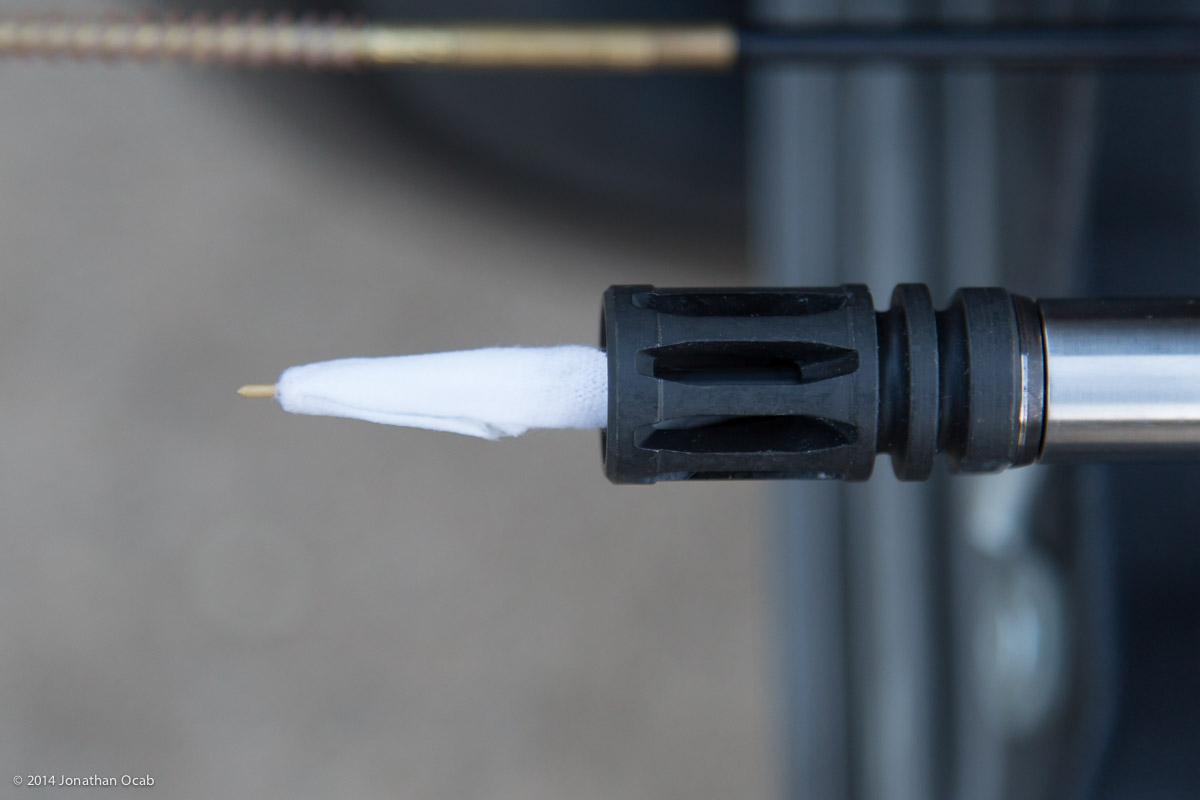
To round out all the small parts, I picked up a Spikes Tactical complete bolt carrier group, a Bravo Company GUNFIGHTER charging handle, and an A2 flash hider.
As I was acquiring the various parts to complete the upper receiver, the choice of optic was constantly nagging me. I had no idea what to go with. Being an SPR-style rifle, it would make sense to go with a scope, but at the same time, I wanted the speed of a red dot since I am very familiar with red dots.
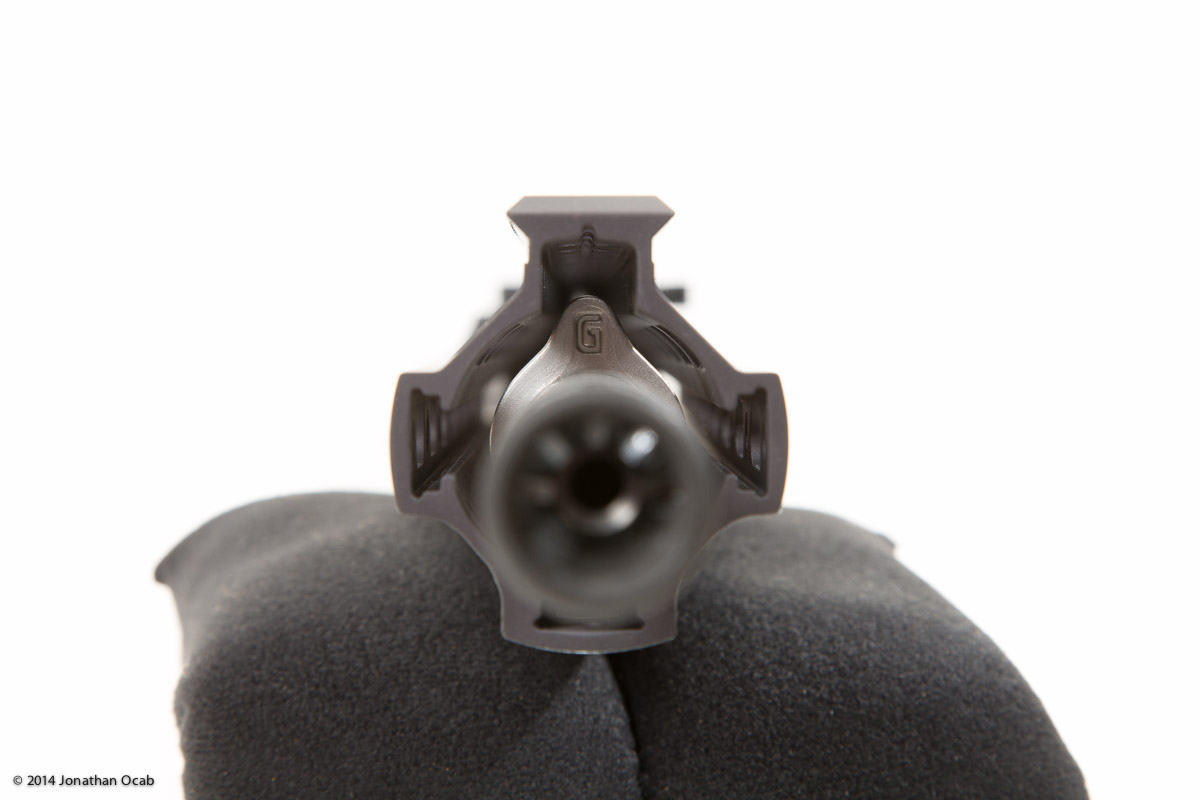
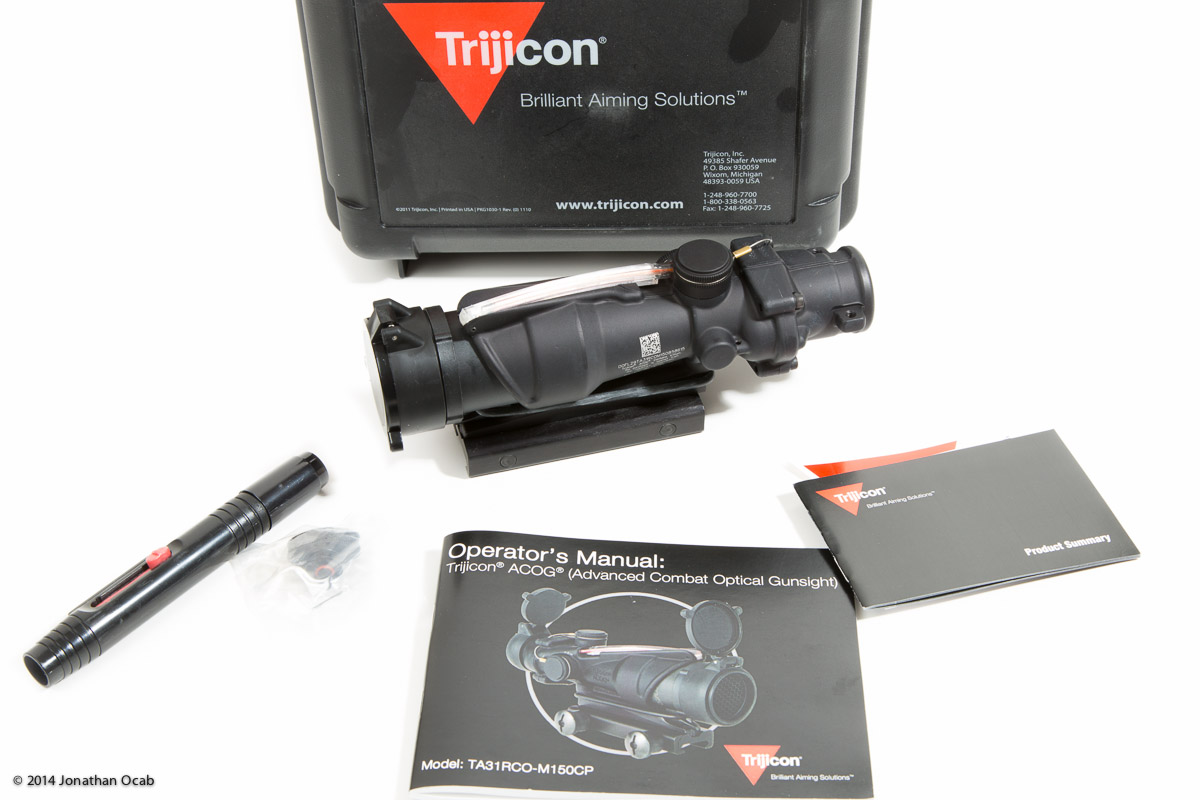
I ended up ordering a Larue Tactical LT104 mount with the full intention of ordering the Leupold MK4 MR/T 2.5-8×36 M2 illuminated Mil-dot, but while the Larue mount was in transit, I changed my mind and decided to order the Trijicon ACOG TA31RCO-M150CP 4×32 BAC.
Why did I change my mind and completely diverge away from both a scope and red dot optic?
My thoughts were that I should go with an optic that I could use in a very dynamic, fast, and fluid, multiple target scenario with varying distances, such that I could put rounds on target(s) quickly and effectively without having to make elevation adjustments. The ACOG RCO (Rifle Combat Optic) reticle offers this along with fast, intuitive range finding capabilities. Yes, a mil-dot scope can be used as a hold-over/hold-under reticle, but the BDC style reticle of the ACOG is more attuned for that style of target acquisition and engagement.
As far as why I specifically picked the TA31RCO-M150CP which is the US Army RCO, it’s mainly because it seemed like it would offer the best ‘compatibility’ for the 18″ SPR. The Marines Corps RCO is built and issued in two different models, the TA31RCO-A4CP and TA31RCO-M4CP, for the M16-A4 and M4, respectively. This is because the BDC reticle is tuned on the A4CP for the M855 (62gr steel core FMJ) trajectory out of a 20″ barrel and the M4CP for the M855 trajectory out of a 14.5″ barrel.
The M150 on the other hand is deployed on the M4, M16A2/A4, and M249 SAW, so I assumed the BDC is designed for general trajectories of 5.56 NATO out of a 14.5″ or 20″ barrel, and should be fine for my 18″ SPR barrel.
The M150 also has 1/2 MOA adjustments with finger turnable knobs unlike the Marine Corps RCO’s which are 1/3 MOA adjustments and require a ‘tool’ (e.g. screwdriver, rim of a cartridge casing). 1/3MOA is nice, but in my opinion, too complex for an RCO. 1/2 MOA is enough for combat use and if you need finer adjustments, you may as well go with 1/4 MOA.
After choosing and acquiring the parts, I threw it all together.
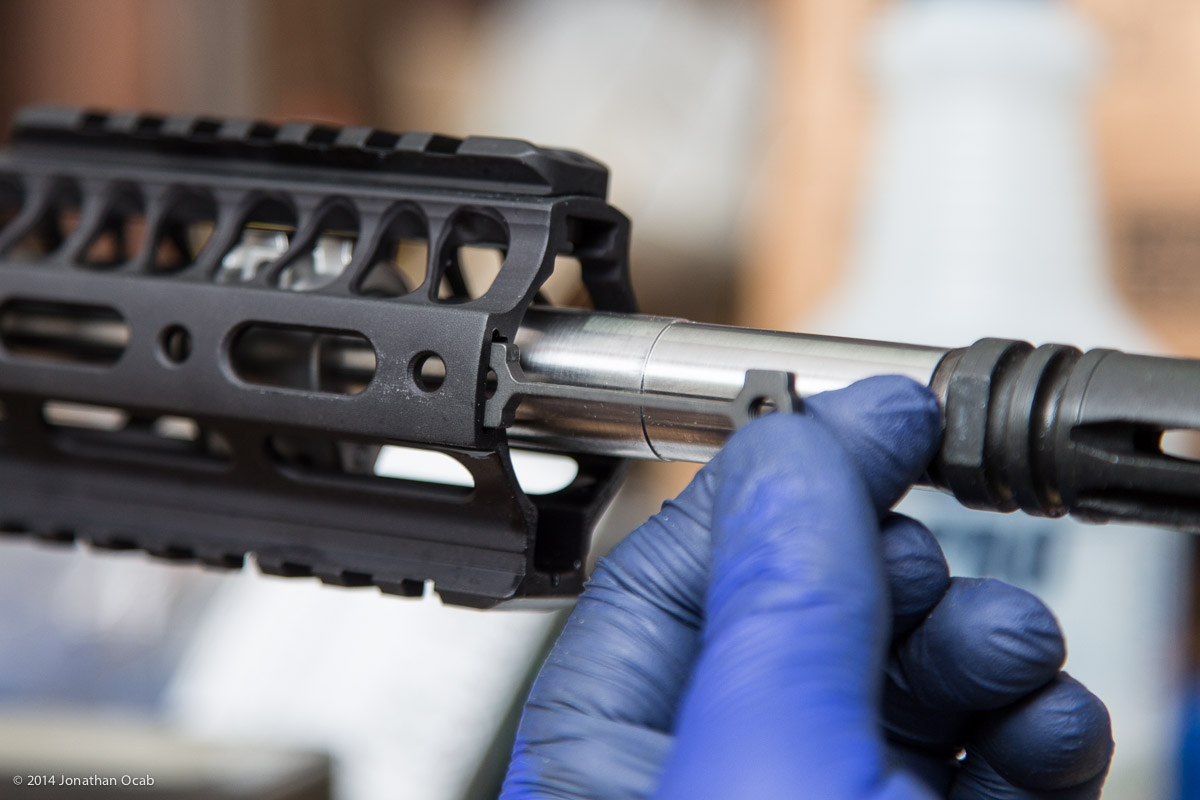
The Geissele SMR was pretty simple to install. Geissele includes the necessary barrel nut tool which is required for the proprietary barrel nut of the SMR. Using a barrel extension torque tool (Brownells item # 080-000-637WB), the barrel nut tool, a bench vise, and a torque wrench, I snugged the barrel nut on at 40 ft-lbs (in compliance with Geissele documentation).

Once I got the barrel nut secured, I installed the gas block+tube and slide the rail on with little effort. With 5 ft-lbs on the rail bolts and then tightening down the nylon tipped rail anti-rotation screws, the Geissele Super Modular Rail was good to go.
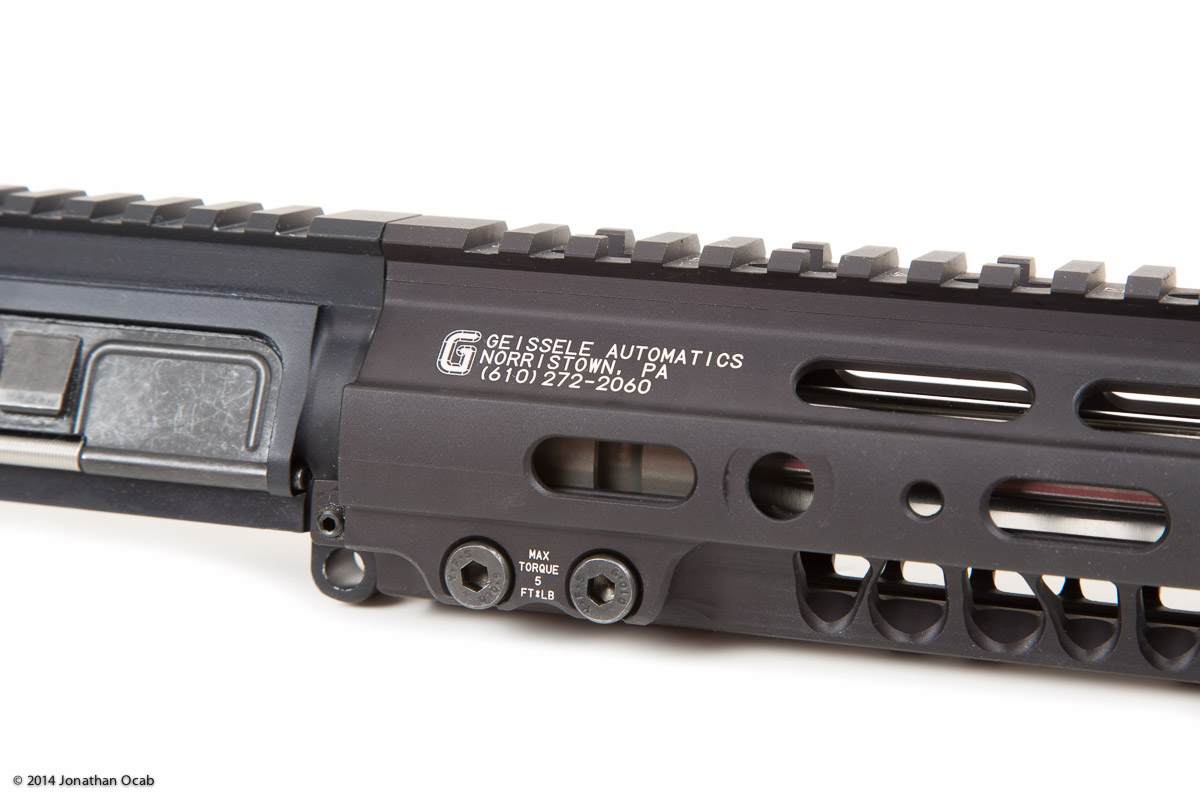
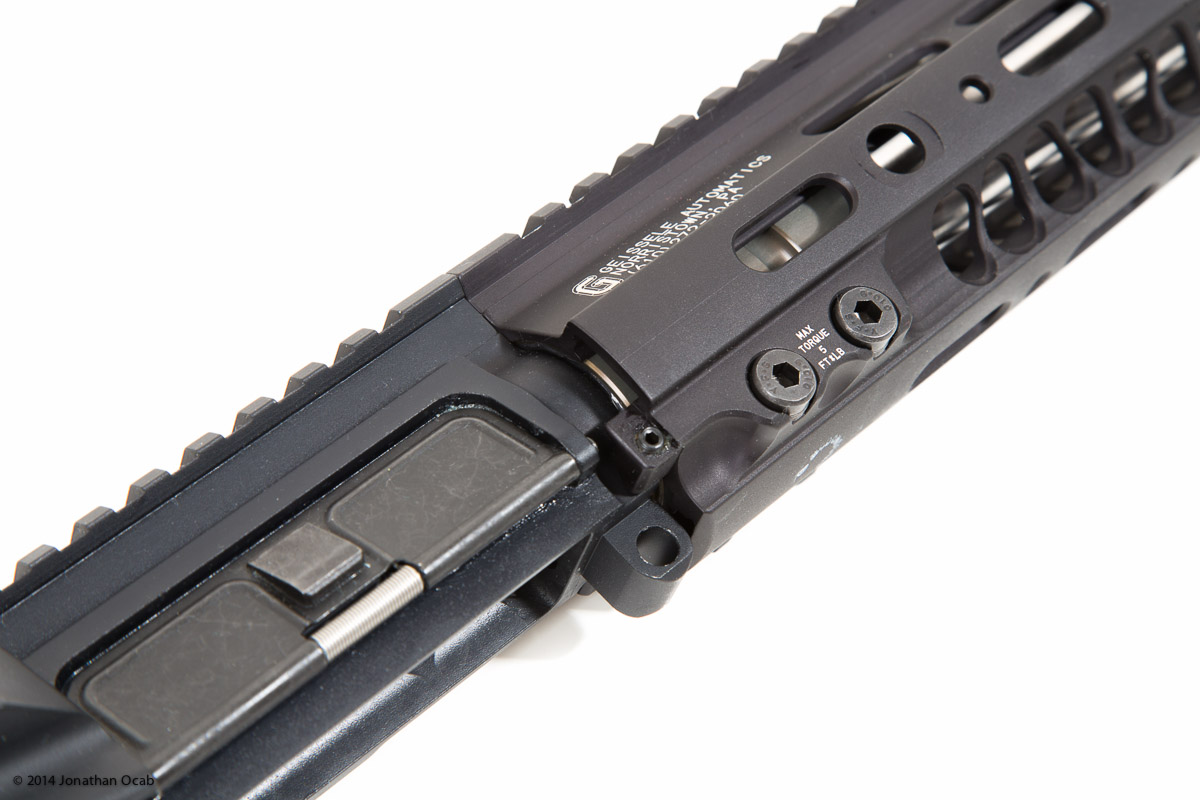
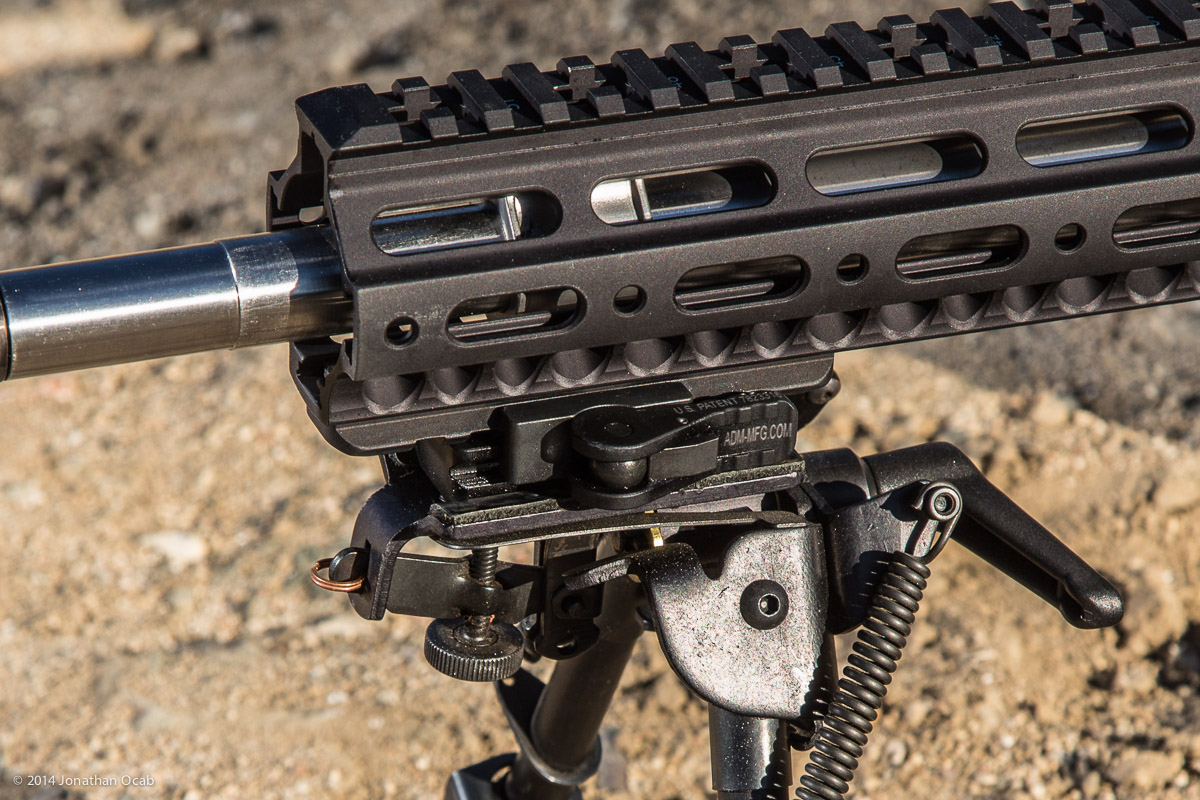
As far as the Geissele Super Modular Rail is concerned, it’s a quality piece of kit. The design of the barrel nut is smart and sound making for a very secure handguard attachment point to the receiver. People will note that it’s not a quad rail. It only has the top, twelve o’clock position milled for 1913 Picatinny rail slots.
This actually makes for a thinner overall diameter handguard because there’s no need to put rail covers around the rail for a more comfortable grip area. If you want to add more devices onto the handguard via Picatinny mounts, Geissele includes three accessory rails which you can install on the sides or bottom parts of the handguard to add attachment points.
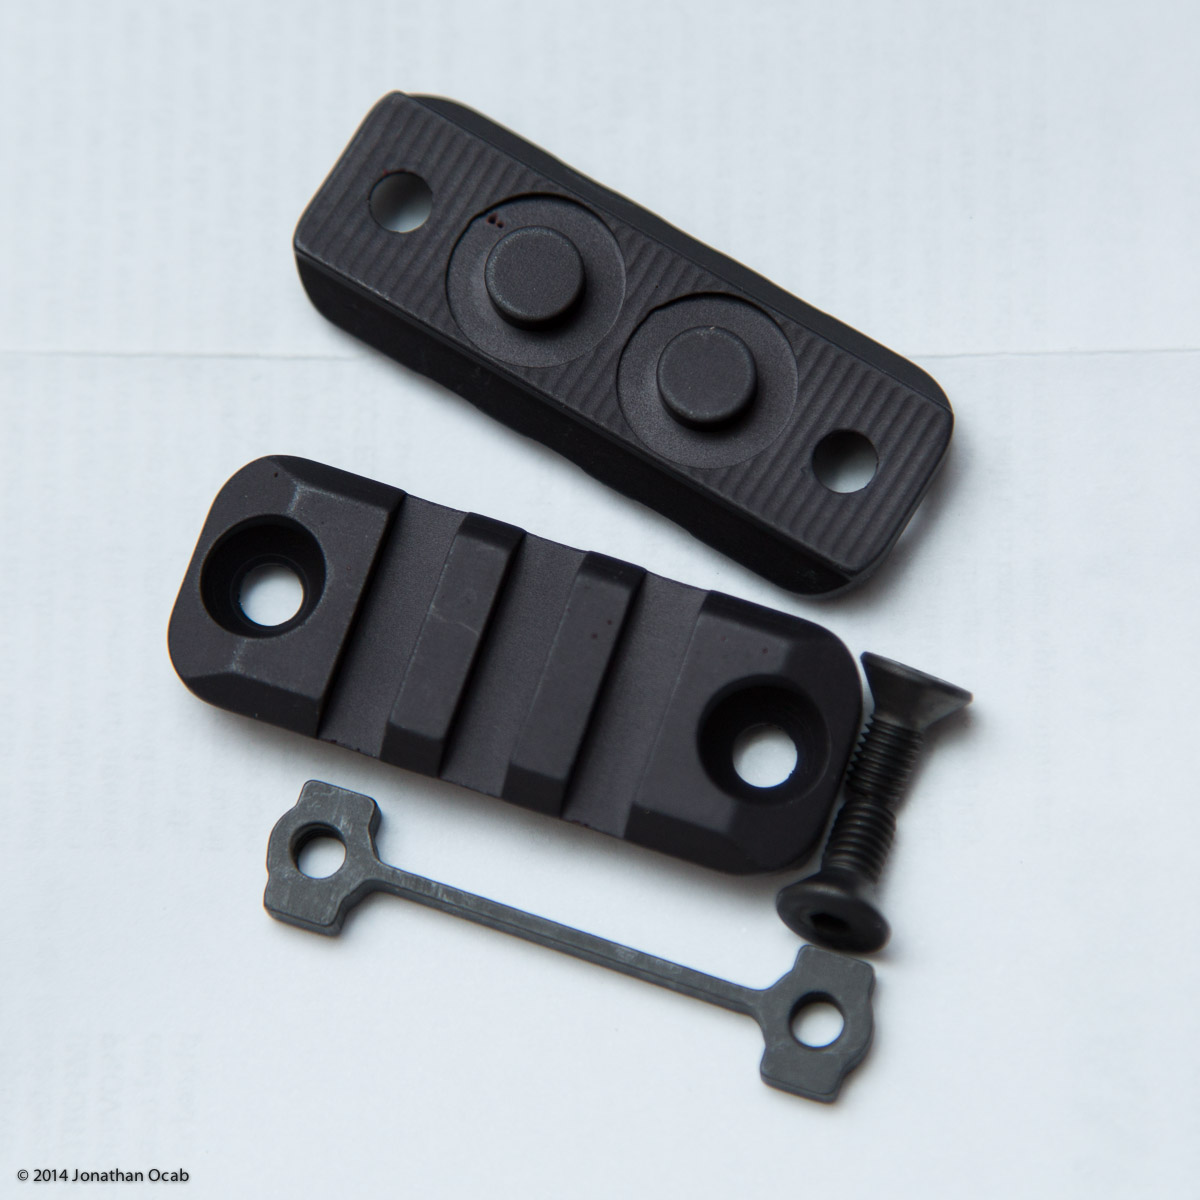
The install of the accessory rail is pretty simple. You just have to slide the accessory rail nut on inside of the handguard (recessed slot) which then accept the hex screws that secure the accessory rail to the handguard.
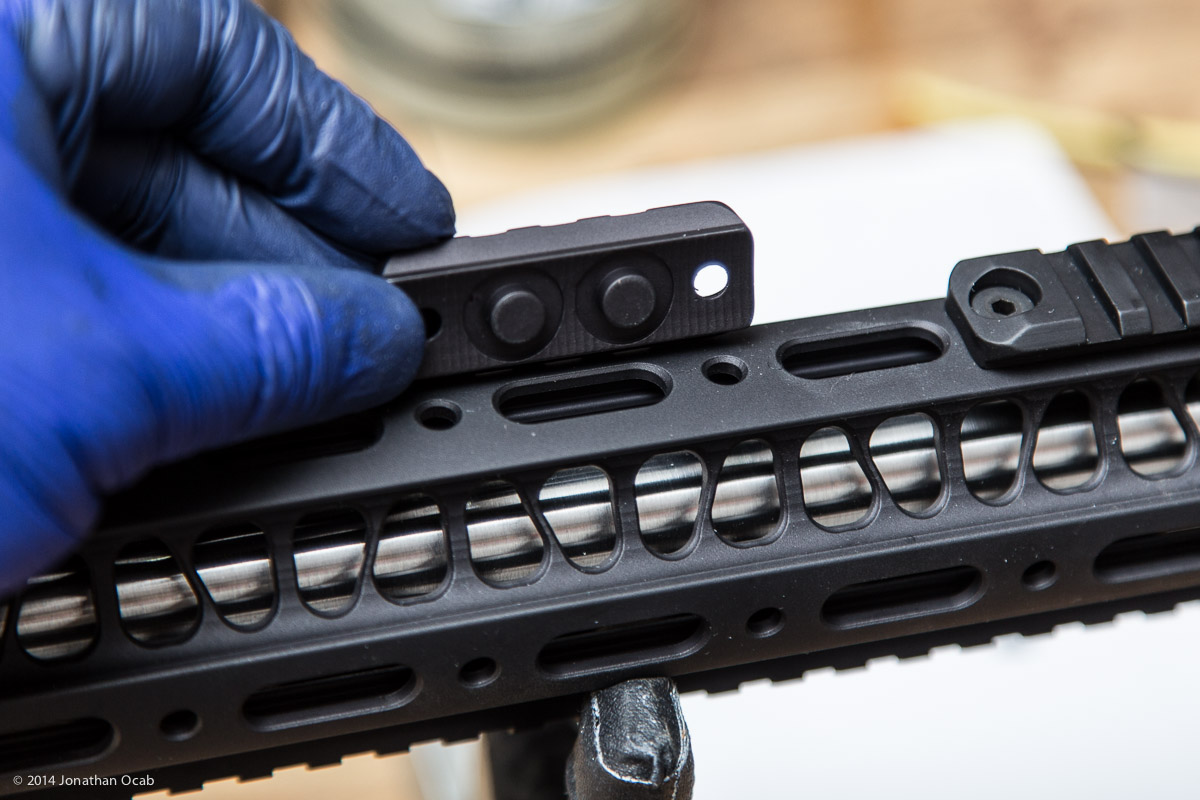
I only added one accessory rail to the 6 o’clock portion of the handguard in order to accommodate the bipod quick-release attachment.
I haven’t really researched railed handguards in a long time, but from what I can tell, the Geissele SMR variants are above average in price and are more expensive than most free-floating railed handguards out there. Having installed only a few different types of free-floating handguards in the past, I can definitely say that the Geissele SMR is probably the best design with regards to the barrel nut and overall contour. Installation is a breeze and only requires one proprietary tool (the supplied barrel nut wrench). No worries or concerns about trying to line up the barrel nut to be in line with the gas tube. Just tighten to 40 ft-lbs and you’re good to go.
If I actually had to buy a free-floating railed handguard solution for an AR-15, I wouldn’t hesitate to get the Geissele Super Modular Rail.
Continuing on, after I installed the barrel and received the bolt carrier group and charging handle, I verified the headspace of the bolt and barrel.
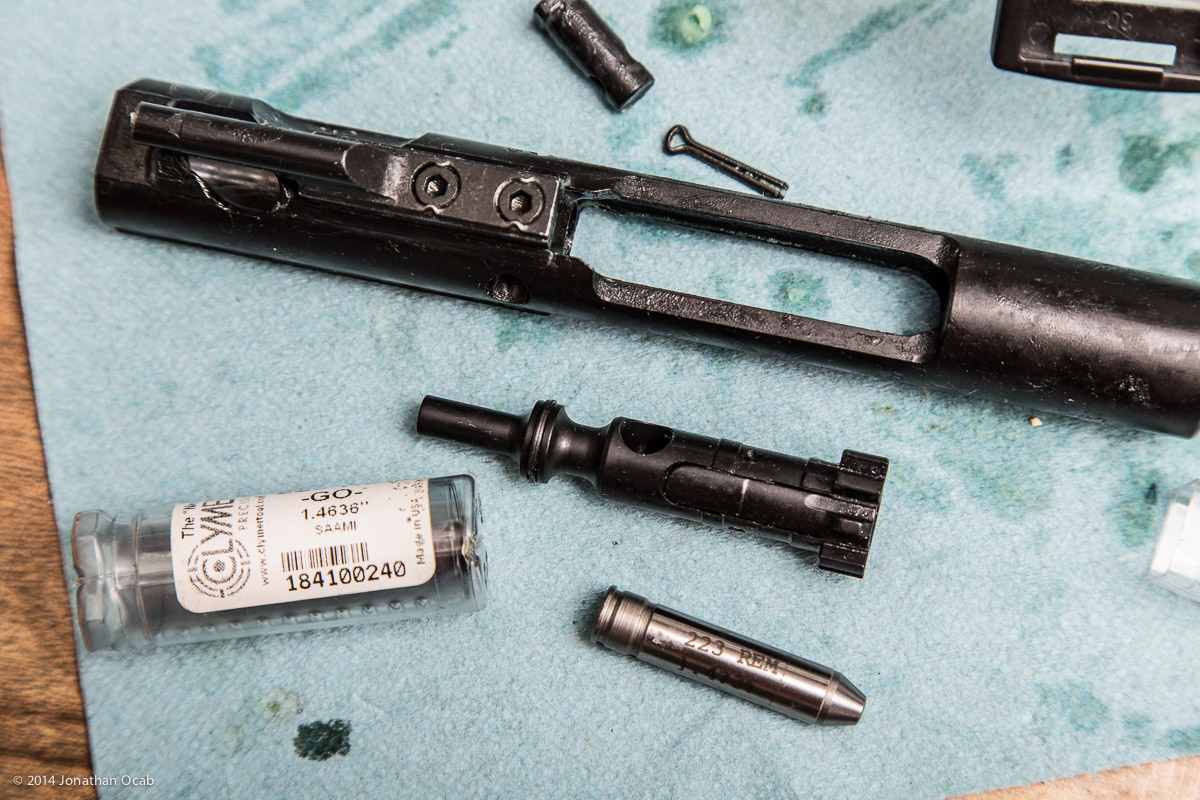
If you ever put together an upper receiver from scratch, you should always verify the headspace. I know that it’s common knowledge that as long as the bolt and barrel are made to specification, the bolt will headspace properly with the barrel / barrel extension, even if the bolt and barrel come from different manufacturers. But at the same time, there’s always a chance that either a bolt or a barrel are not within specification during manufacture so you should spend the $60-$75 on a ‘go’ gauge (or gage) and a field gauge to make sure the bolt meets the minimum headspace requirement and the maximum headspace requirement.
I know a lot of people put a lot of faith in getting ‘in-spec’ parts and skip checking headspace on built-from-scratch AR-15 rifles.
But, I think $75 is a small price to pay for piece of mind and to save yourself (and others) from serious physical injury and/or death from assembling an out-of-spec firearm.
Note: For 5.56 NATO and .223 Wylde chambers, a .223 Remington SAAMI go gauge and a 5.56 NATO field gauge are what you will want to use. I personally use the Clymer .223 Remington SAAMI go gauge and the Brownells ‘Colt’ 5.56 NATO field gauge (Brownells item # 319-418-033WB).
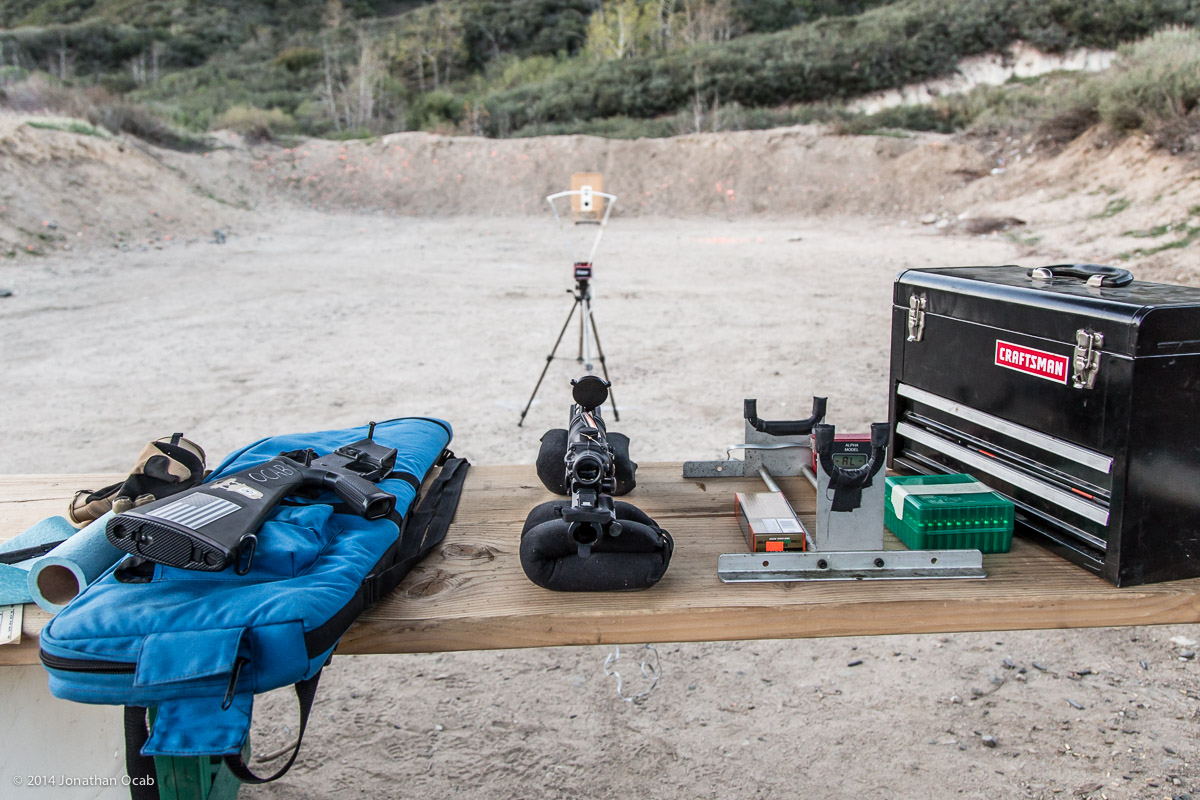
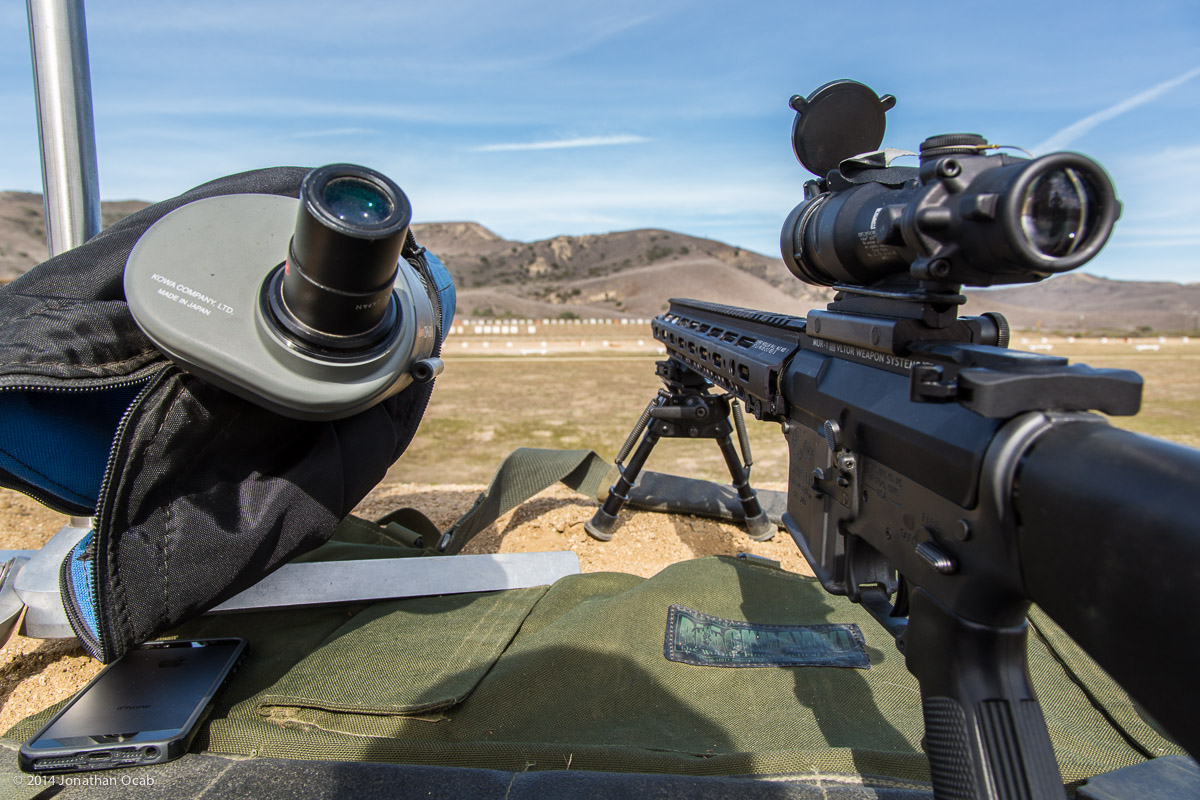
After the headspace check and installing the Trijicon ACOG TA31RCO-M150 using the supplied TA51 Picatinny mount, I took it out to the West End Gun Club shooting facility to break-in the barrel, get a no-wind windage zero, and get some baseline chronograph data.
Barrel break-in procedures are a controversial topic. Some people swear by them, others say it’s a complete a waste of time. I personally prefer to do it because I do think some initial finish lapping of the bore won’t hurt and my process doesn’t take much time to do.
I use the following procedure when I break-in a new barrel:
- Clean the bore. Barrels should be cleaned when new, regardless of a break-in process. Get whatever oils or debris may be left over in the barrel after the rifling and chamber were cut.
- Fire one (1) round and clean for the first four (4) rounds.
- Fire three (3) rounds and clean.
- Fire three (3) rounds and clean.
- Fire five or ten rounds and clean.
That’s pretty much my break-in process. 15-20 rounds fired with a lot of cleaning.
Did this accomplish anything? I honestly can’t scientifically quantify whether or not my barrel is any better because of the above process. But I subscribe to the ‘old’ school mentality that a barrel should have a minimal break-in period in order to fire lap the machining marks that may be in the bore. Even if it didn’t accomplish anything, I only spent 15-20 rounds and a couple hours of time doing it.
Not to mention, the whole time I’m following the above process, I’m making sight adjustments and taking chronograph data. So at the very least I’m being efficient with what could be viewed as an ‘inefficient’ task (breaking in a barrel).
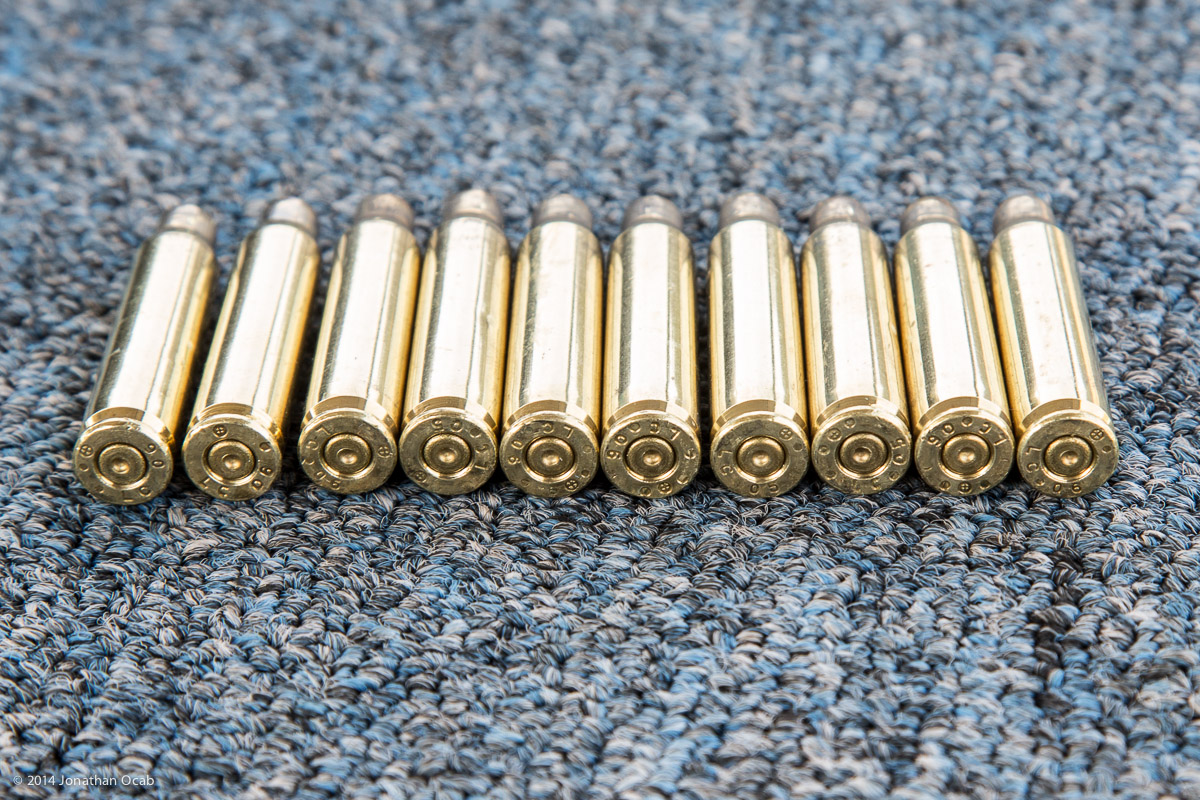
When I broke in the barrel, I used some factory Federal Gold Medal Match .223 Remington 77gr (Sierra MatchKing). I couldn’t get my hands on any Black Hills 77gr ammunition locally and didn’t feel like ordering any. But I was quite surprised by the chronograph results. That morning I was getting an average of 2530fps with the Federal GMM 77gr ammo. 2530fps is insanely slow for ammunition that is supposed to be spec’ed for 2750fps. Assuming the 2530fps average was a good reading, then that 2750fps spec must be out of a 24″ test barrel.
I tested a handload using a Hornady 75gr BTHP and 24.0gr RL15 (Remington 7-1/2 and Lake City case) that same morning and the chronograph average was 2648fps. That same load averaged 2705fps a few days later.
My standard/default High Power Service Rifle load for the 200 and 300 yard line (magazine length ammunition) is 24.0gr RL15 with any 75gr or 77gr BTHP variant, whether it be Berger, Hornady, Lapua, Nosler, Sierra, etc, seated to 2.260″ in a Lake City case and a magnum or benchrest primer.
It’s possible the Federal GMM was affected by the colder weather or perhaps the barrel was actually still breaking in and resulted in slower muzzle velocities. Either way, Federal GMM is still slower than my standard 24.0gr RL15 and 75/77gr BTHP variant load that I use by at least 100fps in the same conditions.
After the initial chronograph results, I bumped the load a half grain to go with 24.5gr RL15 and a 75/77gr BTHP. With a 77gr Nosler, the 24.5gr RL15 clocked at an average of 2749fps in the 18″ SPR barrel with a standard deviation of 6fps. The point of impact was about the same as with the 24.0gr RL15 at 100 meters (note: I got an elevation zero for 100 meters, not yards), maybe a half-minute higher.

The fired cases and primers didn’t show any concerning pressure signs, so I settled on using the half-grain hotter load for this particular gun.
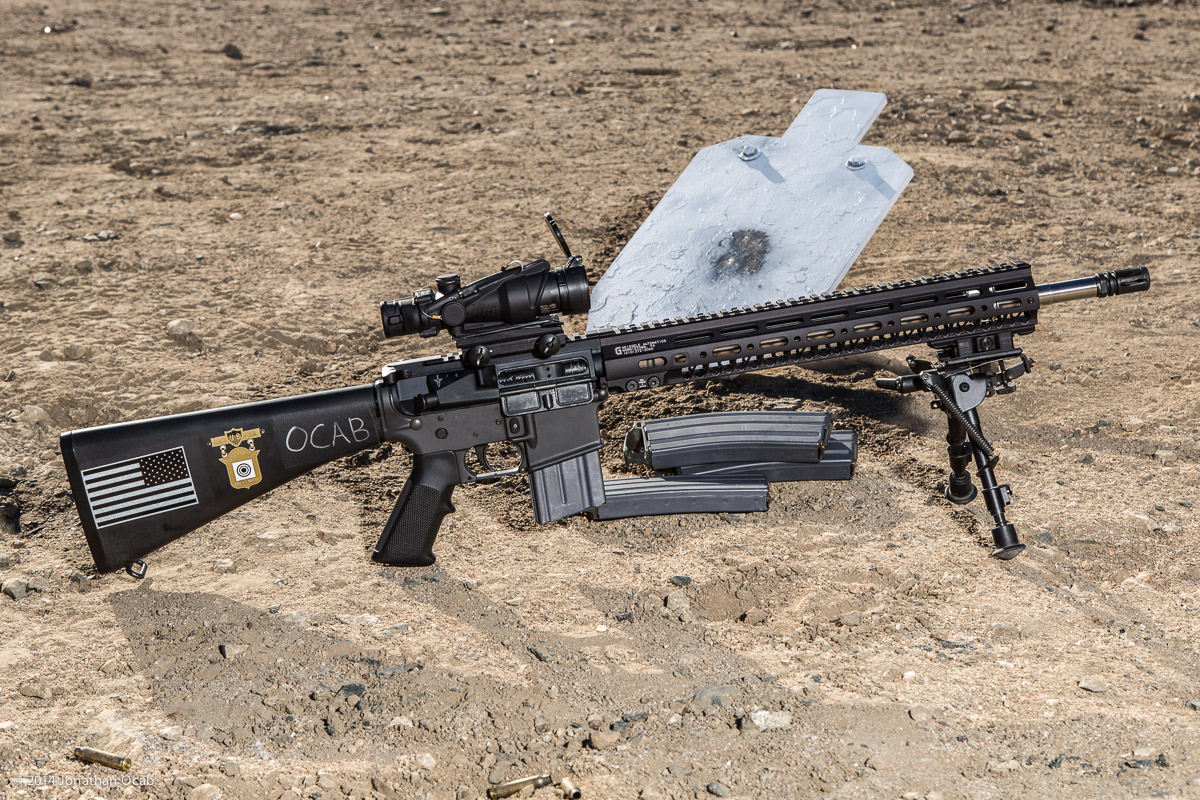
After getting a load picked out and establishing a 100 meter zero for the tip / top of the chevron of the ACOG RCO reticle, I took the rifle out to Marine Corps Base Camp Pendleton for a Mid-Range 300/500/600 yard match hosted by the Santa Margarita Gun Club.
Since the ACOG BDC reticle is defined for meters, not yards, I wanted to shoot the 24.5gr RL15 + 77gr Nosler (~2750fps) load at actual distance so I could get an idea of where the point of impact actually hits on target in relation to the ACOG’s meter BDC reticle.
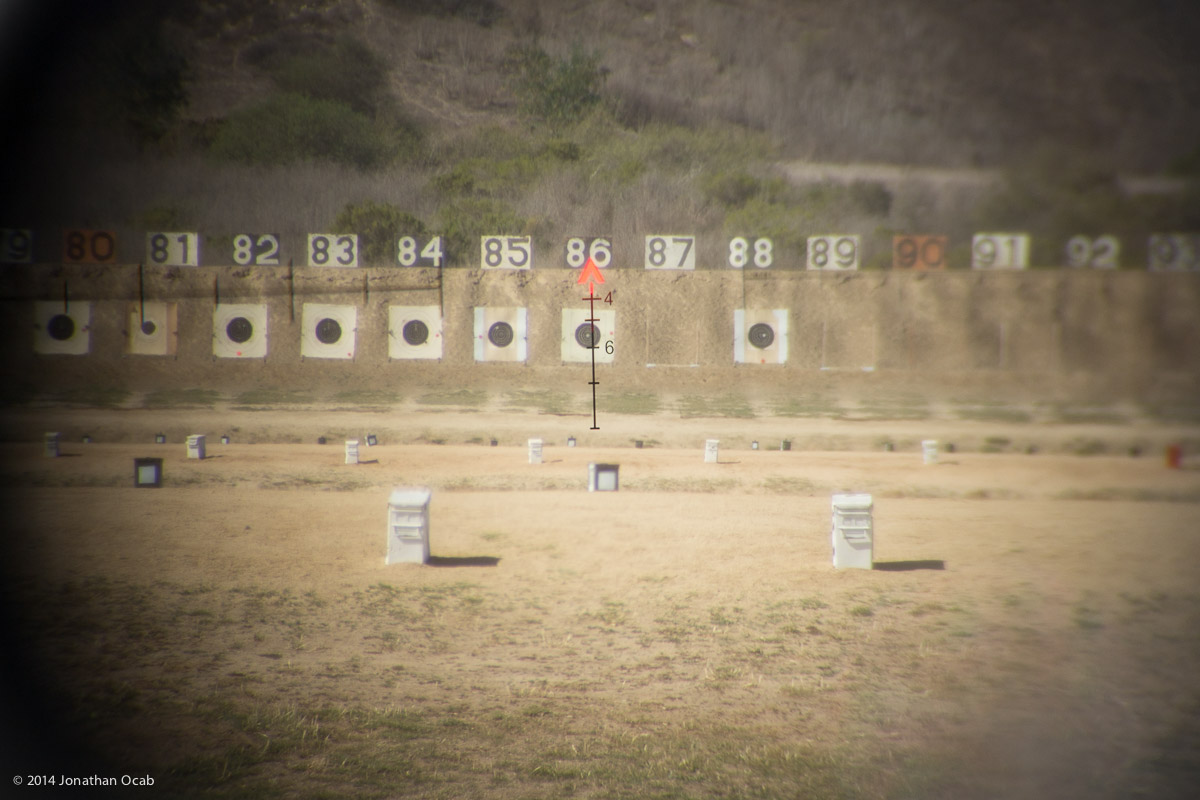
At each the 300, 500, and 600 yard lines, I found that I would use the 300, 500, and 600 meter reticles, respectively, but hold under the point of impact about halfway between center and 6 o’clock hold on the F-Class target. For those that are not familiar with official NRA High Power targets, the target black for F-Class 300 yard is 17.85″, while the target black for 500 and 600 yards F-Class are 30″ and 36″, respectively.
So I was holding (aiming) about 5″ low of center on the 300 yard target using the 300 meter reticle, about 8″ low of center on the 500 yard target, using the 500 meter reticle, and about 9″ low of center on the 600″ yard target using the 600 meter reticle. If you calculate the numbers, that’s about 1.5 to 1.6 MOA low of center for all three distances.
While I shot pretty poorly as far as my match score is concerned, it was to be expected since shooting an F-Class target with a 4×32 ACOG using a BDC reticle without dialing in any elevation adjustments is not a match worthy platform. But I attended the match for the sole purpose of getting live fire data at true, known yardage distances with the combat optic.
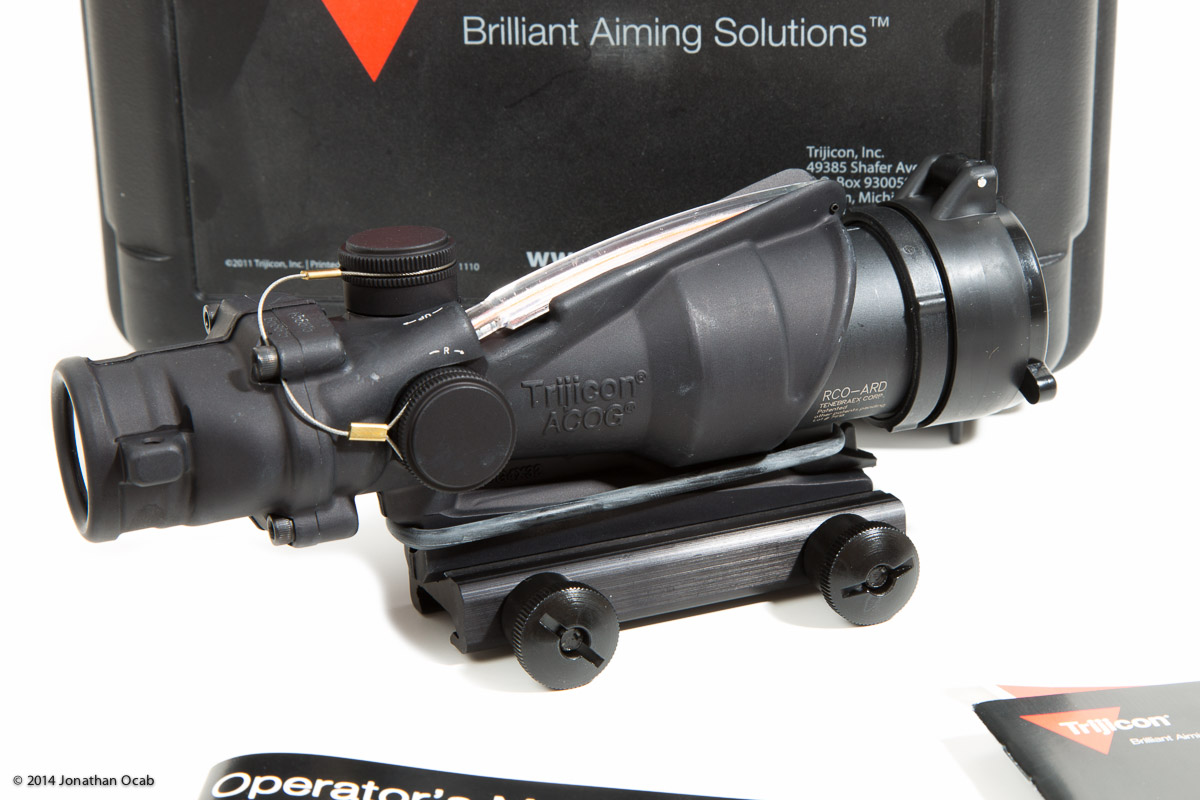
One important tip for anyone using a dual illuminated ACOG such as the TA31RCO variant is to use dark tape to cover up the full length of the fiberoptic “light collector” on the top of the ACOG.
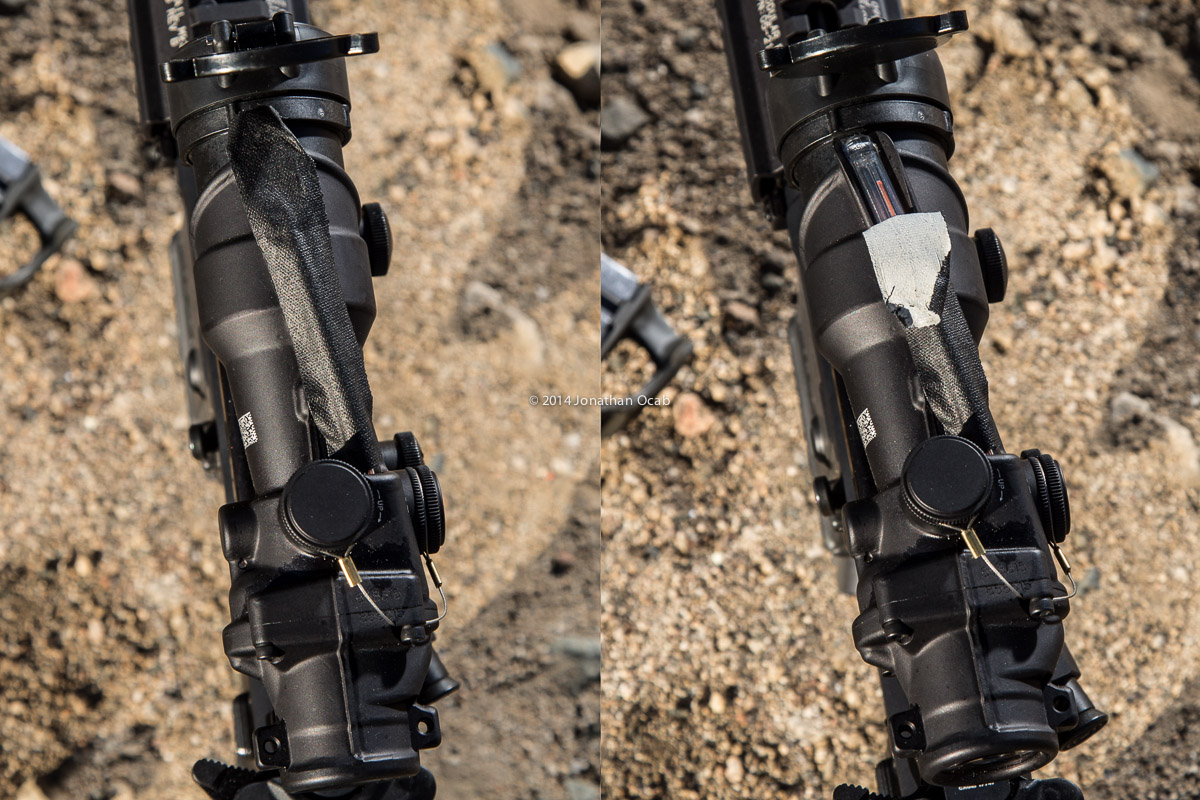
The chevron in the TA31RCO reticle is illuminated by both tritium inside the ACOG, and by the fiberoptic on the external housing. In complete darkness, the tritium illuminates the chevron as a ‘backup’ light source. But generally, the fiberoptic is the primary power/light source for the reticle illumination.
The above method of fieldcraft is intended to control the amount of light entering the ACOG which in turn controls how bright the red chevron is illuminated. In bright sunlight, the chevron will be illuminated far too brightly if the entire length of the fiberoptic is exposed. This will ‘washout’ the target that the chevron is placed over in the sight picture. Therefore, covering the fiberoptic with dark tape allows the operator to exposure the necessary amount of the fiberoptic light collector for the prevailing light conditions.
The ACOG manual recommends using riggers tape, which is often associated with duct tape or military reinforcement tape (aka “100 mph tape”). I personally recommend using gaffers tape. If you use duct tape or 100 mph tape on an item then remove the tape, adhesive residue is often left on the item and is a pain to remove, especially if the tape has been left on for a long time.
Gaffers tape on the other hand leaves very little adhesive residue, even in longer term applications. Also, gaffers tape can often be reused a few more times since it maintains adhesion much better than duct tape. You can acquire gaffers tape from speciality photography or audio/video retailers since gaffers tape is commonly used for grip/rigging of cables for production sets.
After the parts acquisition, the actual assembly, break-in, load testing, and live fire data collection, I can say right now that this is a fairly decent build. I’m tempted to actually put a scope on it to test it’s true accuracy at distance, but I don’t feel like going down that path to take it beyond my intended application. I simply want a rifle that can be picked up and ready to go for a variety of defensive and dynamic scenarios. This rifle configuration right now is a pretty solid general use gun and should serve quite well in that capacity.
If anything, this rifle’s one core weakness is CQB. There is the ideology of “point shooting” and “snap shooting” with an ACOG. But it might be worthwhile to get a Trijicon RMR or an Aimpoint Micro T1 along with the appropriate offset mount to throw on this rifle in the event I have to engage at extreme close quarters.
Then again, that’s why you also carry a sidearm.
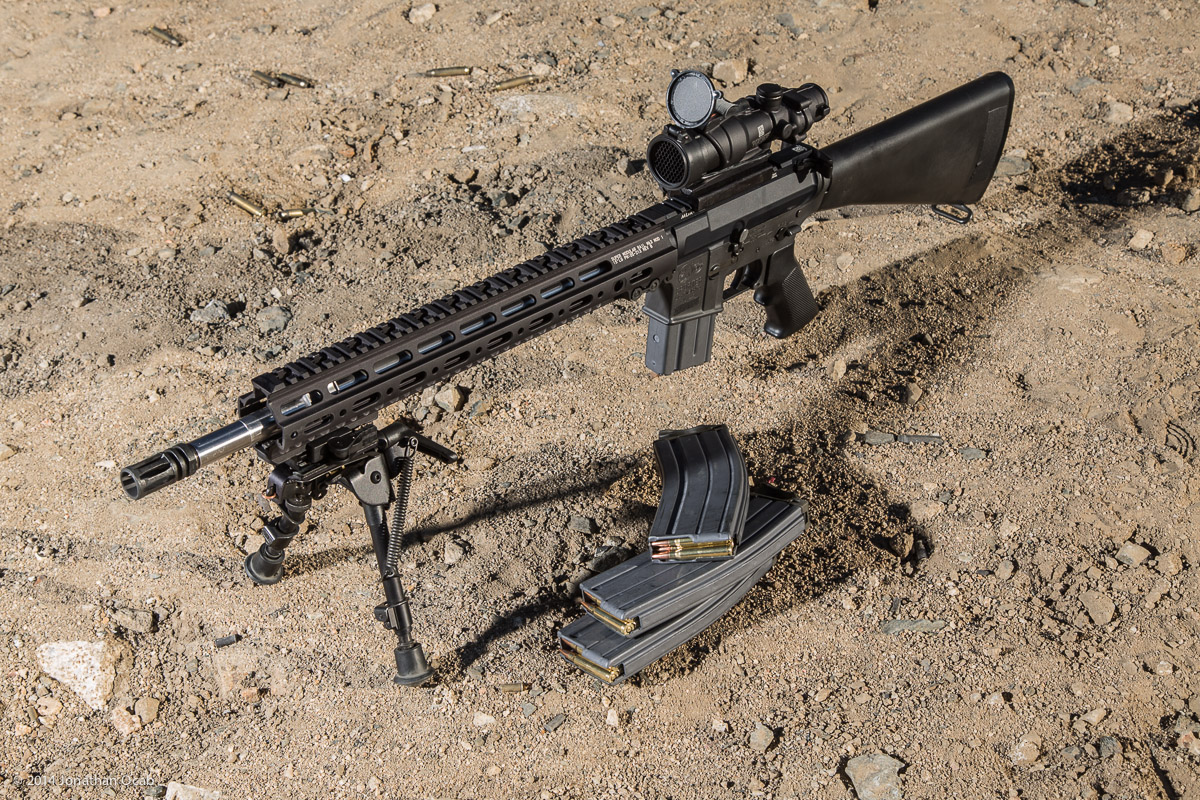
Upper Receiver Build Checklist:
- VLTOR MUR-1 upper receiver with forward assist
- White Oak Armament 18″ 1-in-7″ stainless steel SPR barrel with rifle length gas system (.223 Wylde)
- Geissele Super Modular Rail Mk3 15″ handguard
- Geissele Super Gas Block
- Spikes Tactical bolt carrier group
- Bravo Company BCMGUNFIGHTER charging handle
- Trijicon AGOG TA31RCO-M150CP with TA51 mount
Accessories:
- American Defense bipod adapter
- Harris Bipod S-BRM
Lower Receiver (pre-existing / Service Rifle competition) Configuration:
- Geissele Hi-Speed National Match Service Rifle trigger
- Colt lower receiver
- Colt A2 stock
- Colt A2 pistol grip
blackgemagema
I don’t know guns but that’s a pretty rifle. =)
MisterPo
Nice build. Any regrets on going with the Trijicon ACOG rather than the Leopold that you originally planned on getting?
ocabj
Not really. Sometimes I think I should have gotten a scope, but then when I actually shoot with the ACOG, I realize that it’s solid for what it is: A quality ‘combat’ optic that is rugged, repeatable, with a range reticle.
Though, if I didn’t already have a gun built with long range precision capabilities, I probably would have opted for a scope instead of the ACOG.
Dave
On the cqb side, you can flip downed the front scope mount and use the acog as a occluded gun sight similar to and old armeson OEG. With both eyes open your brain will combine the two images and your acog will work somewhat like a red dot, good to about 100 yards.
Not perfectly, but well enough!