
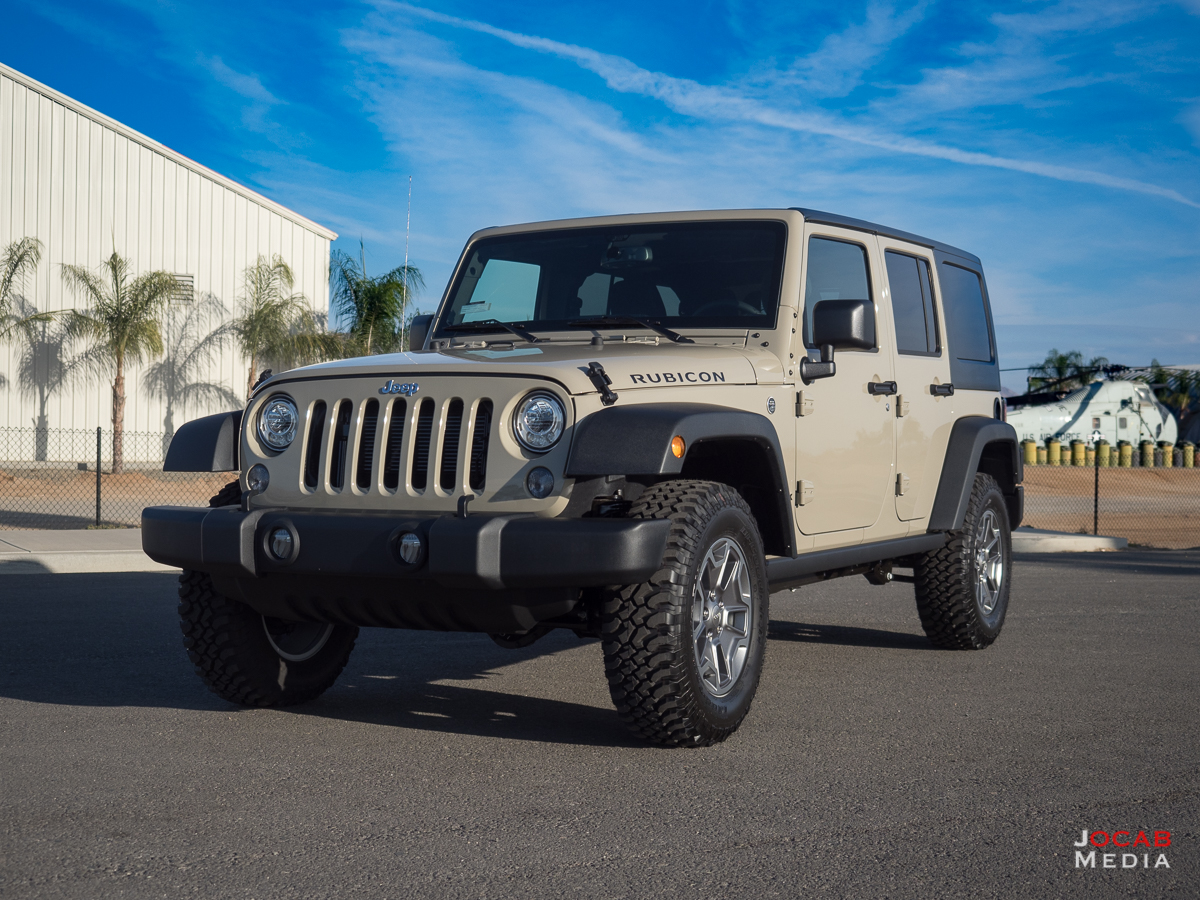
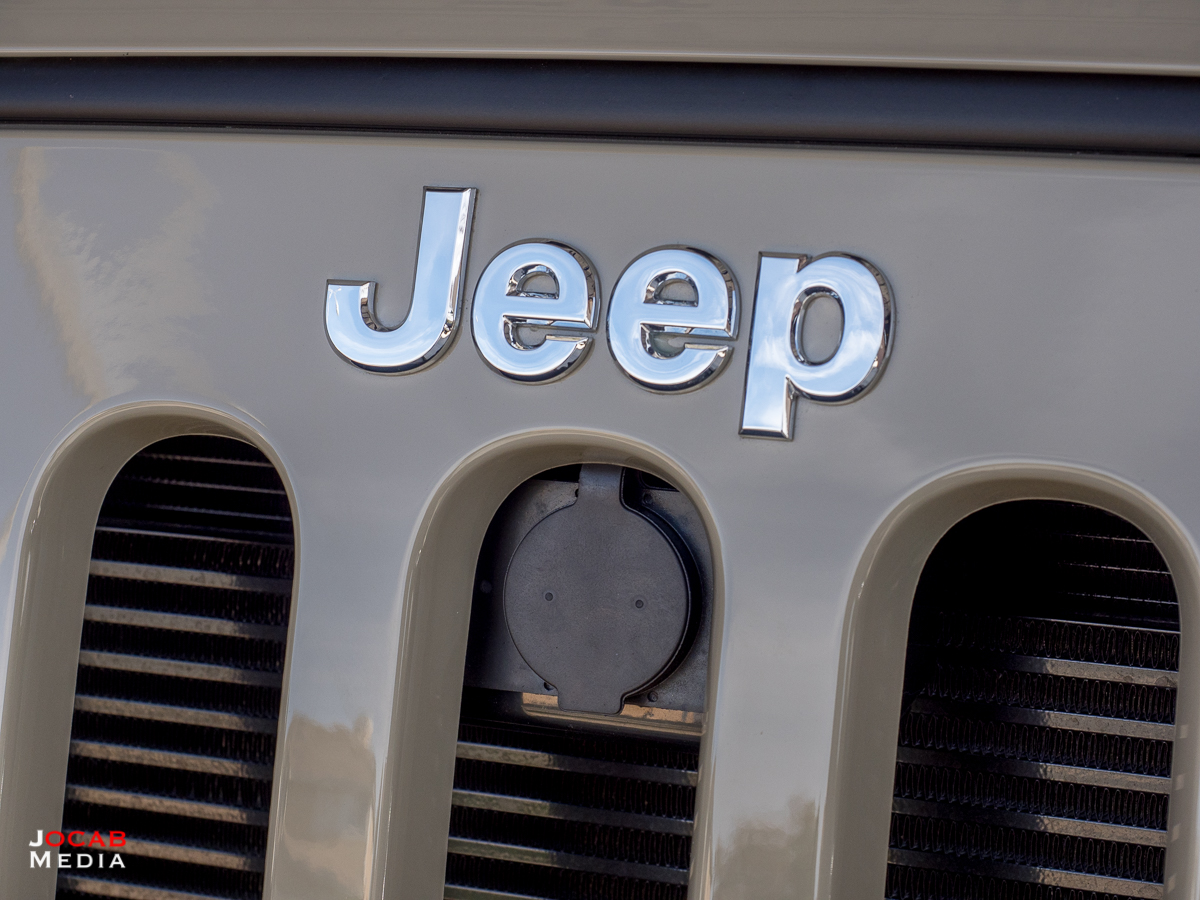
For those who are unaware, I am the proud owner of a 2018 Jeep Wrangler JK Unlimited Rubicon in Gobi that I purchased back on New Year’s Eve weekend 2017/2018.
I was going to do a “First 100 Days” report on the Jeep. But I figure two months should be sufficient time to provide some relevant feedback, especially since I put a shade over 2000 miles on it in that period. This sounds like a lot, but I really didn’t use any other vehicle during that time, which included the trip to Las Vegas for SHOT Show.
Anyway, a little background on my decision to get a Jeep Wrangler. I have actually been interested in owning a Jeep ever since I helped my dad fix a Wrangler belonging to an Air Force buddy of his back when I was in middle school (if I recall correctly). But back then, the sticker price on a YJ was maybe $12,000 USD, which was less expensive than most vehicles. I remember my parents buying a 1990 Honda Accord EX for well under $20K after taxes.
Over the years, my desire for a Jeep waned. I have never been truly into off-roading, and the Toyota 4-Runner and later my Toyota Tacoma were sufficient for range use. But in the past 3-4 years, my desire for a Jeep began to renew, and every couple of months, I would find myself on the Jeep website building a Wrangler, or looking at prices of used Jeep Wranglers on Craigslist. What has always deterred me is the price. Jeep Wrangler prices are a far cry from the MSRP from 20 years ago (and frankly automobile prices in general are ludicrous, in my opinion).
But in 2017, I had been thinking about Wranglers more frequently, and I started looking around at existing inventory. The new Wrangler JL sort of pushed me into getting a Jeep, but interestingly enough it pushed me towards a JK.
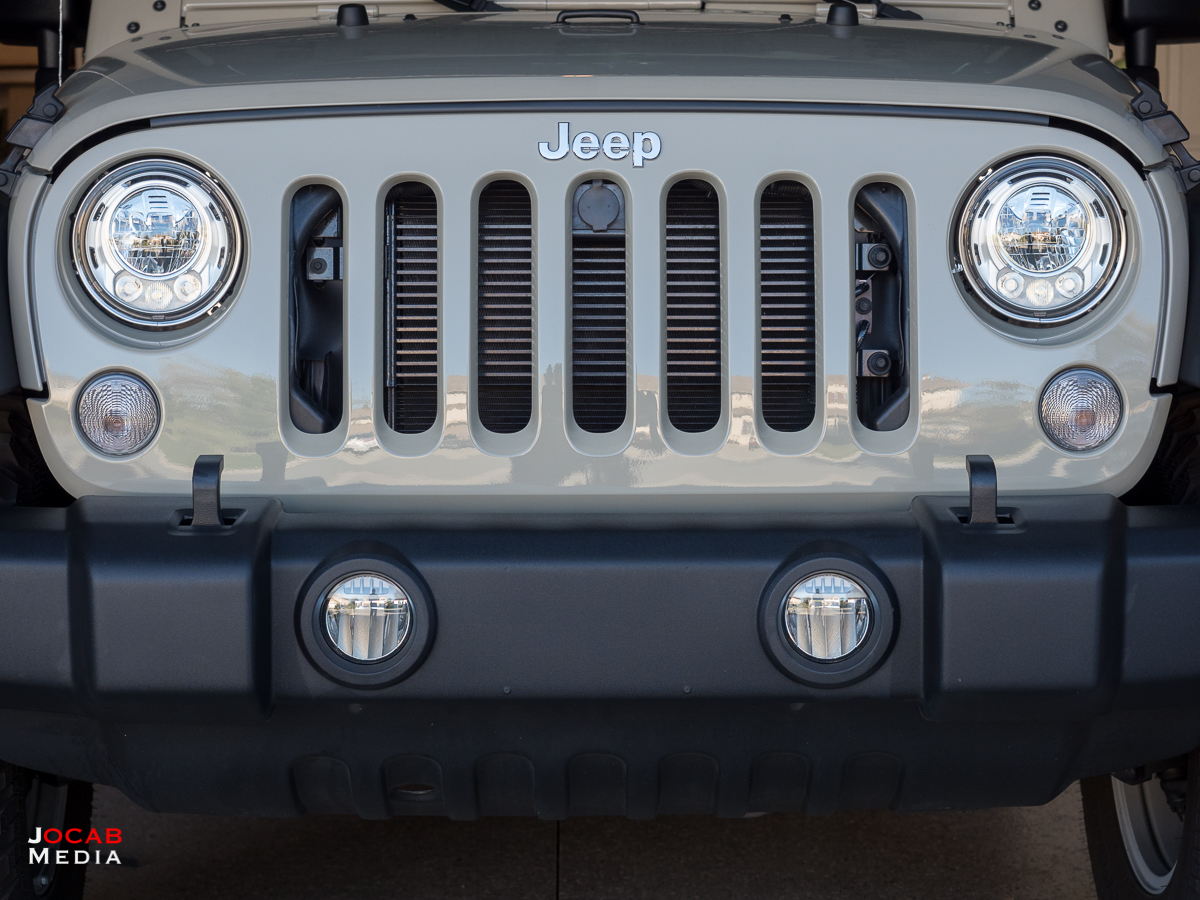
After seeing the very generic JL color options for 2018, and the fact that the color in recent years that most intrigued me, the ‘Tank’ OD green style color, was discontinued after only a couple years, I decided to shop around for a ‘Gobi’ desert tan Jeep Wrangler. The Gobi color was another color that I had a high regard for. So I found myself purchasing the 2018 Jeep Wrangler JK Unlimited Rubicon on New Year’s Eve weekend.
Note: I purchased my 2018 Jeep Wrangler JK Unlimited Rubicon from the John Elway’s Claremont Chrysler Dodge Jeep Ram (CDJR) dealership. When checking inventory, this dealership had a configuration I liked. I had no prior dealings with this dealership and went there blind. Overall, the experience was very good. I know people will have their own criticisms about their experiences at any auto dealership, but I can only attest that my own transaction at the John Elway’s Claremont CDJR was good.
First things first, why not the new Wrangler JL? Newer is better, right? In general, the JL features are improvements over the JK and a couple of the gripes I have with the JK are addressed in the JL (but I don’t want to get ahead of myself). But the timing just didn’t seem right for the JL.
The lack of JL color options is a primary concern for me. Somewhat a dumb reason, yet it is valid. But the most notable detractor for the JL is the current prices. A lot of early dealer packages are significantly higher than the JK counterparts. I have frequently seen JL Sport and JL Sahara models running for $8K or higher than their JK equivalents. The cost of a JL Sport is the same as the JKU Rubicon. If anything, I could have waited another two years or so for a JL color option I liked and for prices to stabilize. But I was pretty much ready to buy then. But I’m not here to talk about the JL versus the JK.
Second, why the Rubicon? I honestly thought about just getting a Sport and adding aftermarket parts. But when I started pricing out parts and possible labor, it just didn’t make sense to spend that much on a brand new vehicle. So I started looking at used Wranglers, but I did not want to spend that much money on a used vehicle. Thus, I decided to go with the Rubicon because of the extra features it offered at the ~20% increase in cost over the Sport: Dana 44 front and rear with lockers (Tru-Lok), rock rails, 17″ wheels, and 4.10 axle ratio.
Third, why the 4-door Unlimited over the traditional 2-door? I actually like the 2-door styling overall because of the traditional look, but I really wanted the extra cargo space. Not to mention I have not owned a 4-door vehicle since I got rid of the 1994 Toyota 4-Runner in 2010, and I wanted the ability to comfortably transport passengers if needed.
One item of note is that I bought an automatic transmission Wrangler. Yes, I know, feel free to facepalm. I did some research on Wrangler transmissions and test drove the manual, and I just wasn’t feeling the manual transmission on the Wrangler JK. I decided to go with the automatic for daily driving and for better control in very slow moving situations (e.g. crawling obstacles off-road). I know I will miss the driving feel of a manual transmission, but that’s why I kept my 2001 Honda Prelude Type-SH.
So with all that background on how I came about acquiring a 2018 Jeep Wrangler JK Unlimited Rubicon, how is the vehicle after 60 days of ownership?
Hands down the Jeep Wrangler is simply fun to drive. It has the utility feel of a truck, while not being a truck. It’s not slow, and the 285 HP / 265 lb-ft 3.6L engine has enough kick to get this vehicle moving.
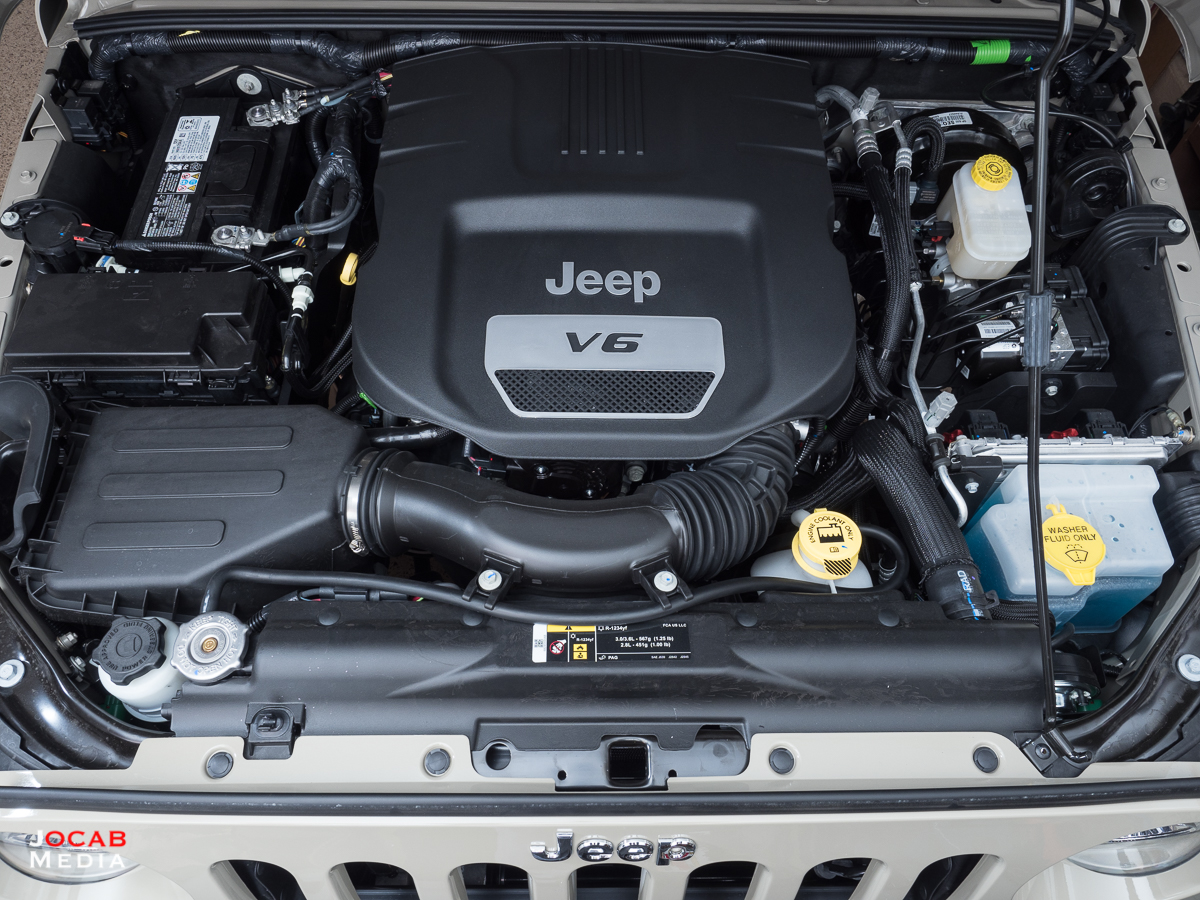
My specific vehicle retains the 4.10 axle ratio with the automatic transmission, even though the automatic transmission option usually lowers the gear ratio down to 3.73. But the factory option included restoration of the 4.10 ratio after installing the automatic transmission option. Based on some freeway driving on flat road, I am hovering around 2600-2700 rpm at 70 mph in 5th gear (auto).
I will admit that it rides a lot more comfortable than I expected. The road ride is pretty smooth, even on the 255/75R17 BFGoodrich Mud-Terrain T/A KM2 tires. Cabin noise is not as loud as you would expect, but at highway speeds, particularly when it is windy, is louder than average.
The transfer case functions easily, although I do have to be a complete stop when shifting to 4LO. The manual tells you to be moving 1-2 mph when in neutral when shifting into 4LO, but whenever I try that, it grinds the transfer gears. At a complete stop, the shift from 4HI to 4LO is seamless.
The sub-par gas mileage is not a huge deal to me. I already knew gas mileage with JK Unlimited would be a wash. The sticker rates it at 16 mpg city / 18 mpg highway. It is actually slightly less in reality, at 15 mpg city / 17 mph highway (1 mpg less). This sort of makes sense considering the automatic transmission Jeep Wrangler fuel efficiency was based on the 3.73 axle ratio, not the 4.10 ratio which is usually reserved for manual transmission Wranglers. I do get more low end power, but I pay for it at highway speeds. Anyway, my daily commute to work is only 12 miles round trip, so I don’t have to worry too much about gas mileage.
After owning the jeep for two months now, I do have some gripes about the 2018 Jeep Wrangler JK Unlimited Rubicon, a few of which I noticed within the first several days of bringing it home.
Before I begin with my complaints about the Jeep Wrangler JK Unlimited, the fundamental gripe I have with the Jeep is that I feel the Jeep is expensive, comparatively speaking. The price point of the Wrangler is exactly why it took me so long to commit to buying one in the first place. Based on the current Jeep vehicle builder website, the MSRP range of the 2018 JK Unlimited starts at $27,895 USD (Sport) to $42,945+ (Rubicon Recon). I honestly feel that in general, the whole price point across the entire Wrangler tiers should drop a few thousand dollars.
Note: I think consumer vehicle prices are way too high in general. While vehicle prices are going to be scaled to the rest of the market, in the past several years when I was shopping around on behalf of family and friends, I have noticed prices just do not make sense. When I see pickup trucks *starting* at $30K and exceeding $75K, or ‘luxury’ 4-cylinder cars starting at $40K, I think the market is out of control.
Maybe I do not truly understand the true cost to manufacture each unit, but I will say that I feel Wranglers could be less expensive, especially when considering the other gripes I have regarding the Wrangler.
Of course, the Jeep Wrangler is a ‘unique’ vehicle and it carries a history behind it (even though today’s Jeep brand is not what it was originally), which is probably what Jeep and Fiat Chrysler Automobiles uses to justify their price points.
So what are my gripes and complaints about the Jeep Wrangler JK Unlimited?
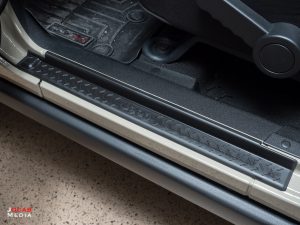
Out the gate I noticed that the door sills where the body and interior floor meet are not protected. This made no sense to me for an off-road vehicle, since a person will often be stepping onto that section of the door sill, or scraping that door sill section with their shoes while getting in or out. Not to mention, what often happens with me when I am out at the range, is gravel or even cartridge casings (brass) will get wedged in the tread of my boot. If I step on that painted exposed section of the door sill, I will gouge or scratch the paint.
-
- Driver front door sill guard.
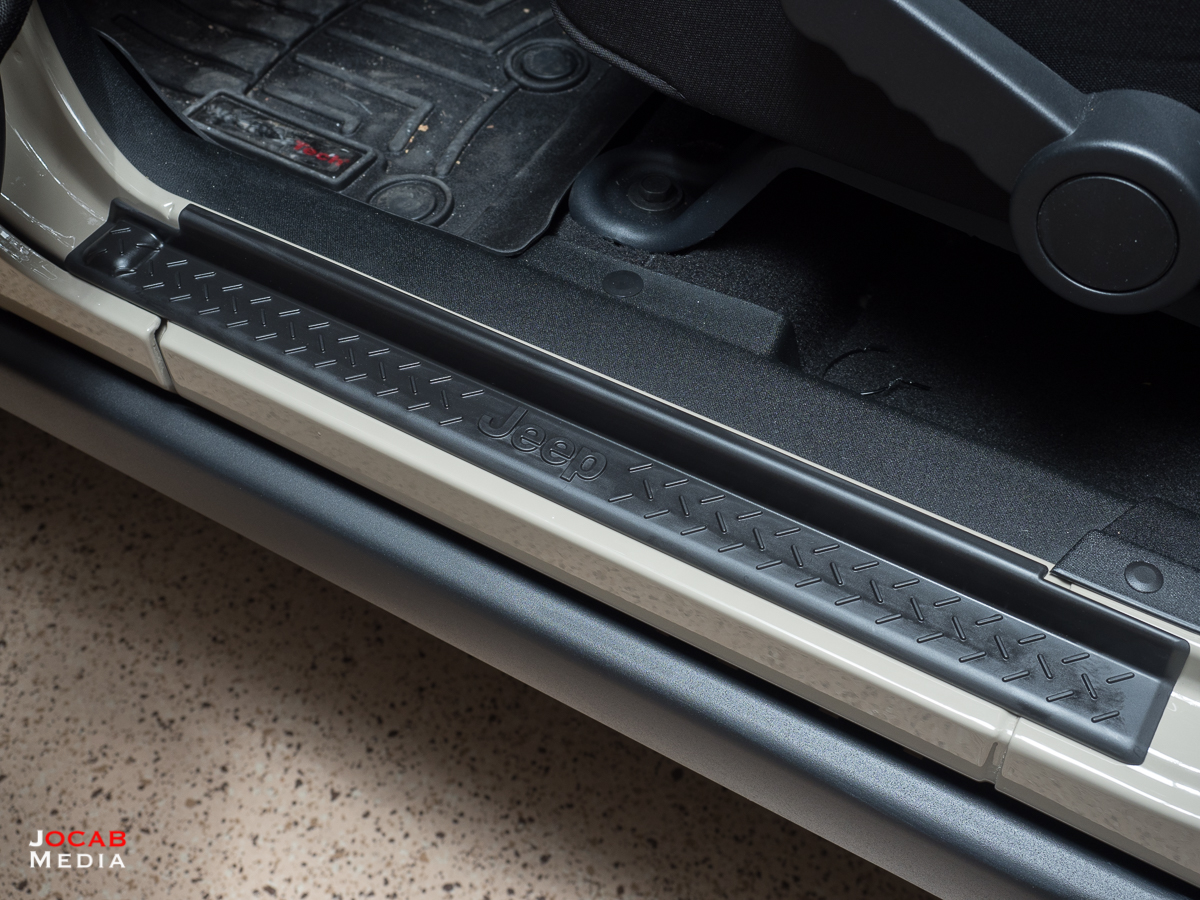
-

- Driver rear door sill guard.

With that, I remedied the situation by acquiring and installing the Mopar 82211740AC Door Sill Guards for the Jeep Wrangler JK Unlimited 4-Door.
But in my opinion, the door sill guards should be a default feature on the Wrangler.
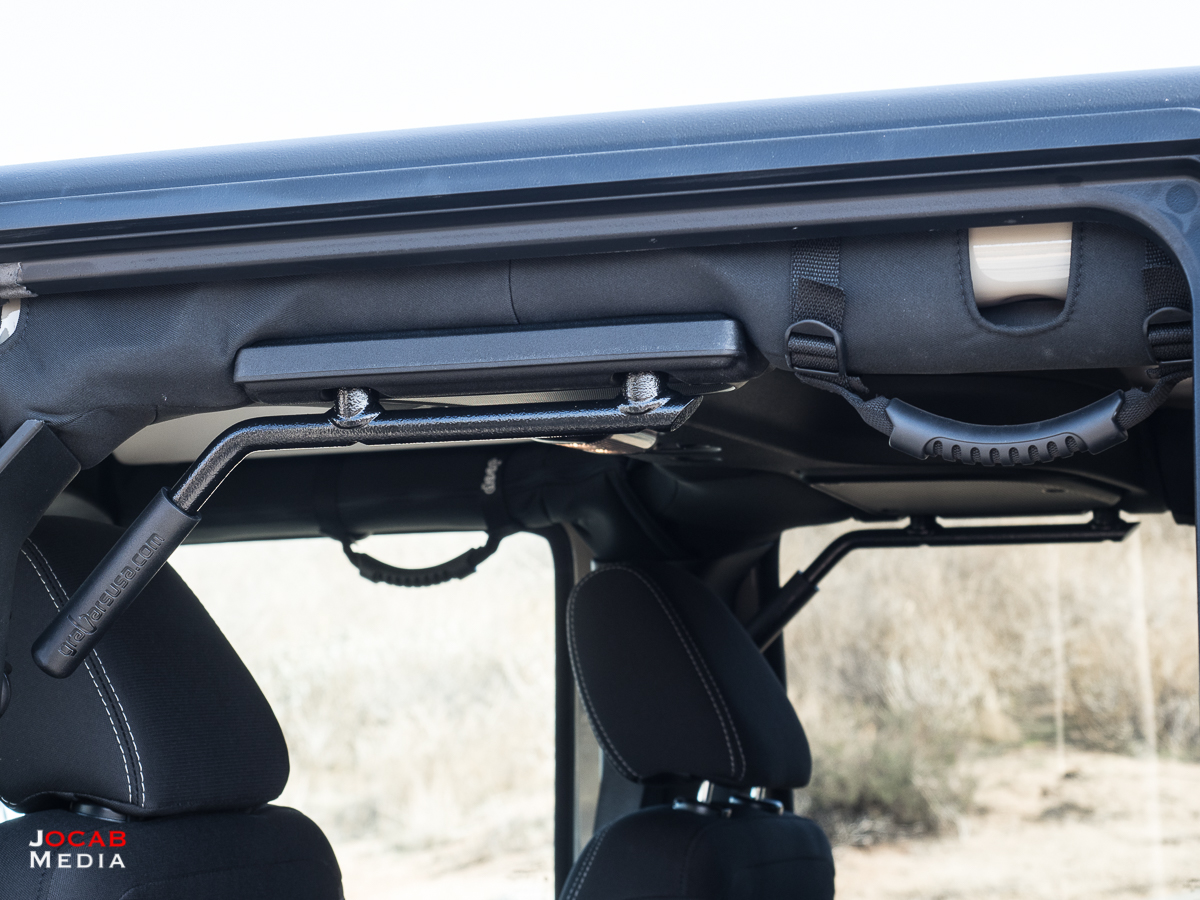
Another gripe is the grab handle situation. The Jeep Wrangler JKU included two pairs of the Mopar 82211740AC Grab Handles, which are soft handles that attach to the roll cage. These are fine and all, but cannot be placed towards the front of the opening to the door due to the roll cage limitations. The handles towards the rear of the door opening is a bit awkward and doesn’t let the person swing the body into the vehicle in a natural manner.
I decided to remedy this situation with a set of GraBars for the Jeep Wrangler JK Unlimited, which includes the set for the front and rear compartments.

The front GraBars are so natural to use, but I actually kept the Mopar 82211740AC handles on the roll bar just for the added convenience. But I almost exclusively use the GraBar on the A pillar for getting into the driver’s seat.
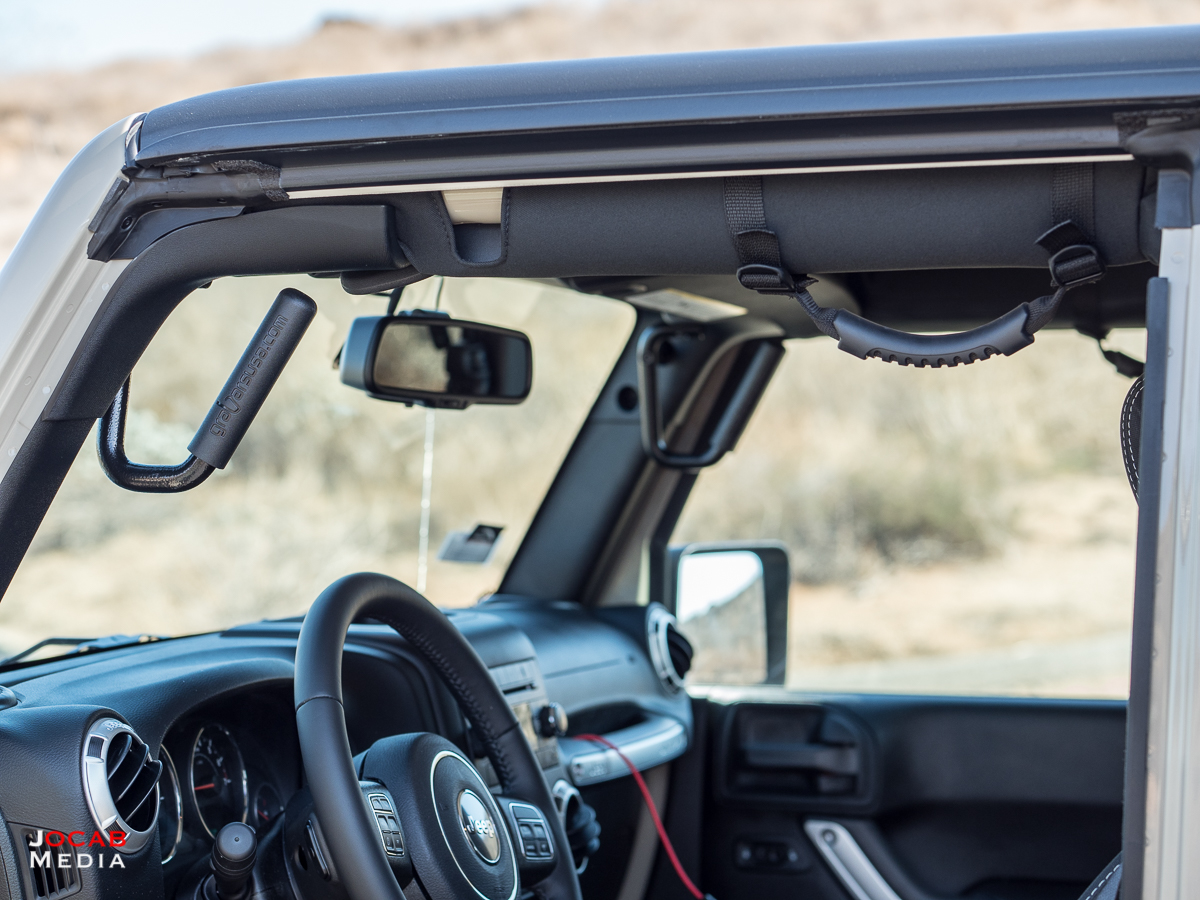
Note: GraBars are an actual trademarked product, which is all-steel and made in the USA. There are some foreign made copies of the GraBars design which are less expensive.
It is important to note that installing the front GraBars can be difficult if you do it correctly. The front GraBars are attached directly to the A pillar using some long hex cap bolts through steel spacers. The bolts will go into the holes fine by themselves, but it takes a lot of threading in and backing out to make sure you get the alignment of the GraBar and spacers correct, such that you do not cross thread the holes in the frame. Go slow, take your time, and when in doubt, back out. It took about 10 minutes of fiddling with the angles on each of the front GraBars before they were threaded in. That being said, the word online is that the Chinese made knock offs of GraBars are easier to install.
The rear GraBars were much easier to install, and are just as valuable for aiding in getting into the vehicle. Again, even though I installed the rear GraBars, I left the Mopar soft grab handles on the roll cage.
One gripe that I knew about since before I even acquired my Wrangler is the lack of a hood lock. The hood is simply held shut by two hood latches which can be removed by hand. For obvious reason, I am not a fan of a non-locking / non-secured hood. I immediately looked into the options on this and picked up the Mopar 82213051 Hood Lock for the Jeep Wrangler JK / JKU. The important aspect of the Mopar 82213051 is that it is keyed to the ignition key. Translation: No extra key just for the hood lock.
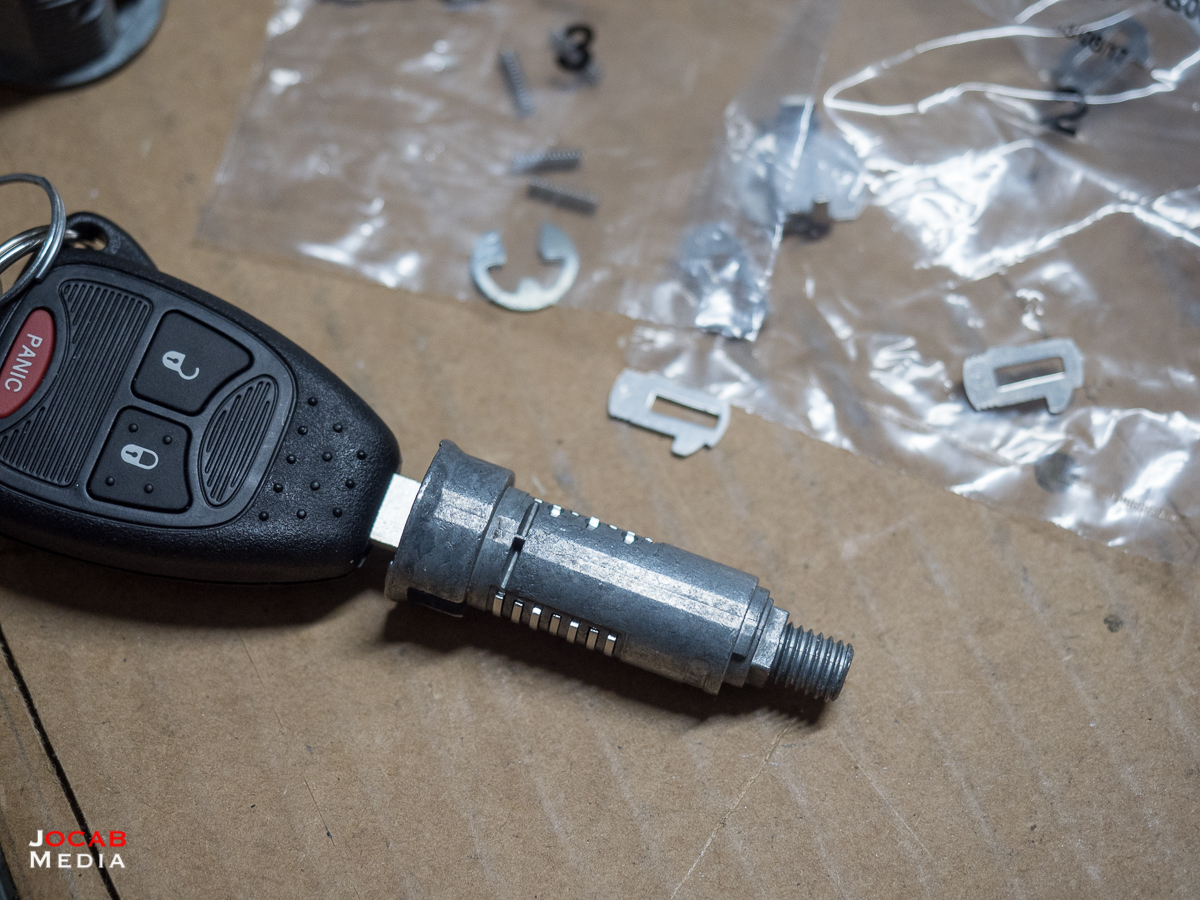
This is good. But the bad thing is that you have to key the cylinder yourself. Several wafers for each of the heights are included, so the user has to use trial and error to insert the correct wafers for each of the seven cuts. This actually isn’t that difficult, and should only take 5-10 minutes. What was difficult was getting the springs installed with the wafers. After you drop each spring into the wafer cuts, it takes some finesse to get the wafer to push into the tumbler cut.
Another bad thing about the Mopar 82213051 Hood Lock is that actual lock housing requires a larger rivet gun capable of handling up to a 1/4″ rivet body. If you bought a rivet gun from your standard home improvement store, I can almost guarantee it won’t handle the rivets included with the Mopar 82213051. I picked up one off of Amazon called the Astro 1423, but ended up using the 6mm insert instead of the 1/4″ insert to install the rivets.

The hood lock works like a charm, and I feel much better having a secure hood on the Wrangler. Simply removing the hood latches means the hood will not open without the hood lock being disengaged.
Upward movement of the hood is restricted and there is little to no gap with the latches are opened up.
The housing has a rubber cover to keep the tumbler opening protected from the elements, and the ignition key works flawlessly to allow the hatch to open.
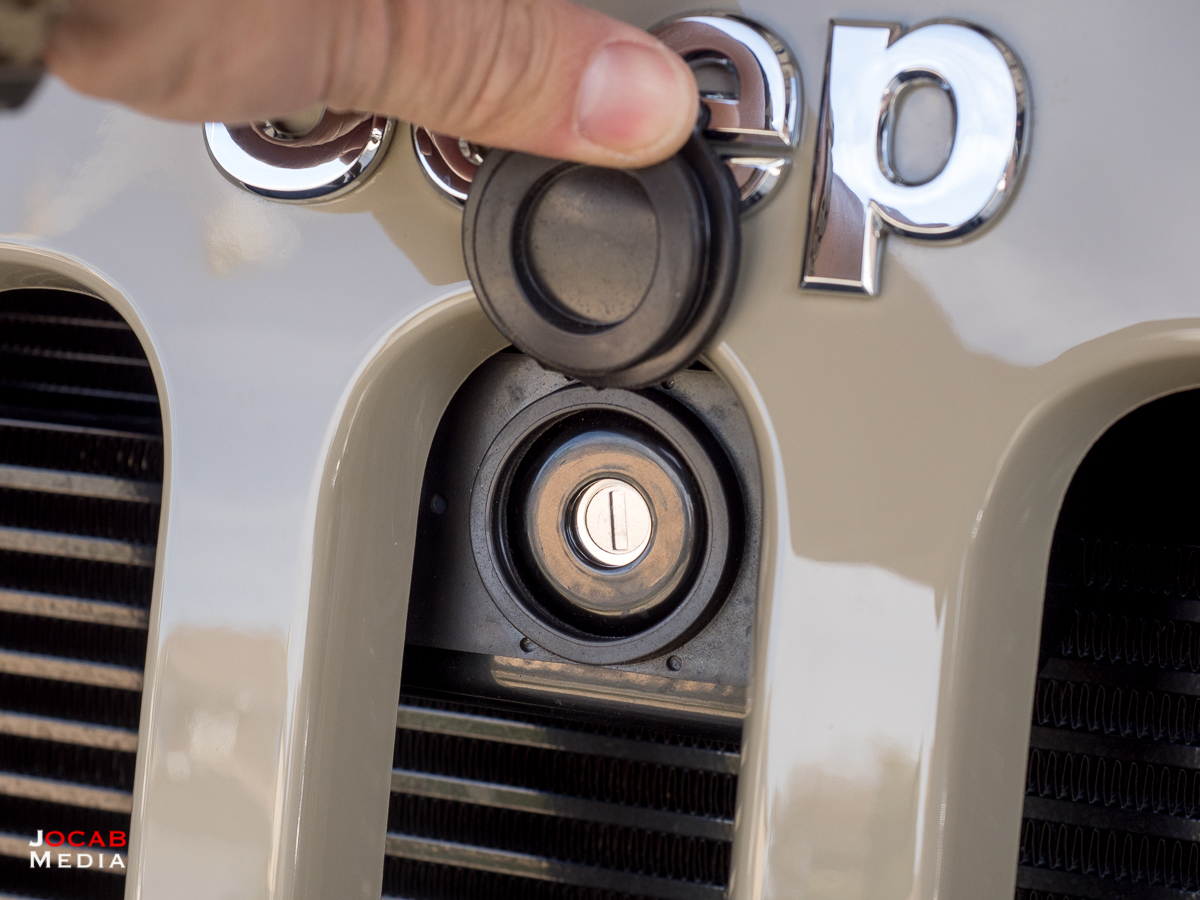
I feel that the Mopar 82213051 Hood Lock for the Jeep Wrangler JK / JKU is a must have for any Wrangler owner. It is somewhat pricey at $160 give or take depending on where you acquire it, but it only takes preventing one engine part theft for it to pay for itself. There are some aftermarket third-party options which are less expensive, and also can be keyed to the ignition key, but I elected to stick with Mopar.
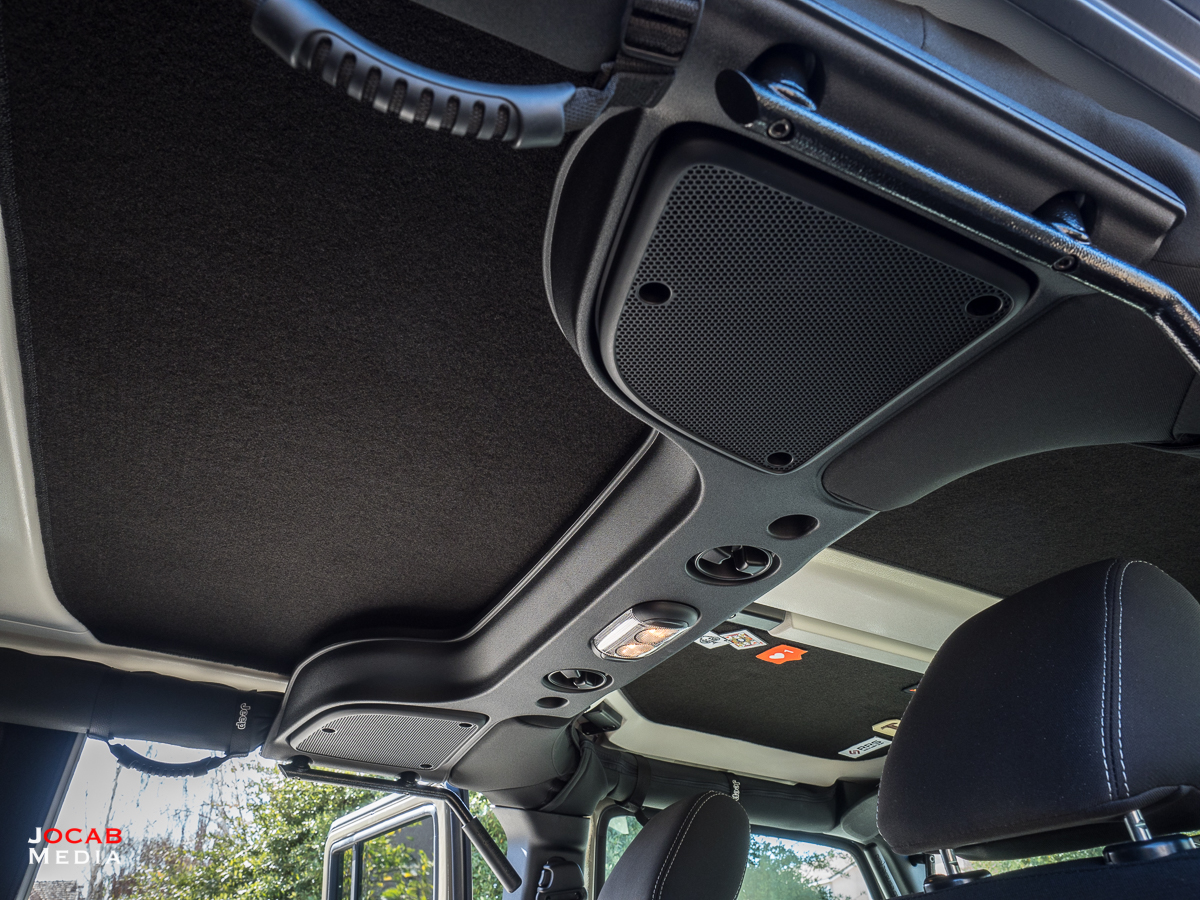
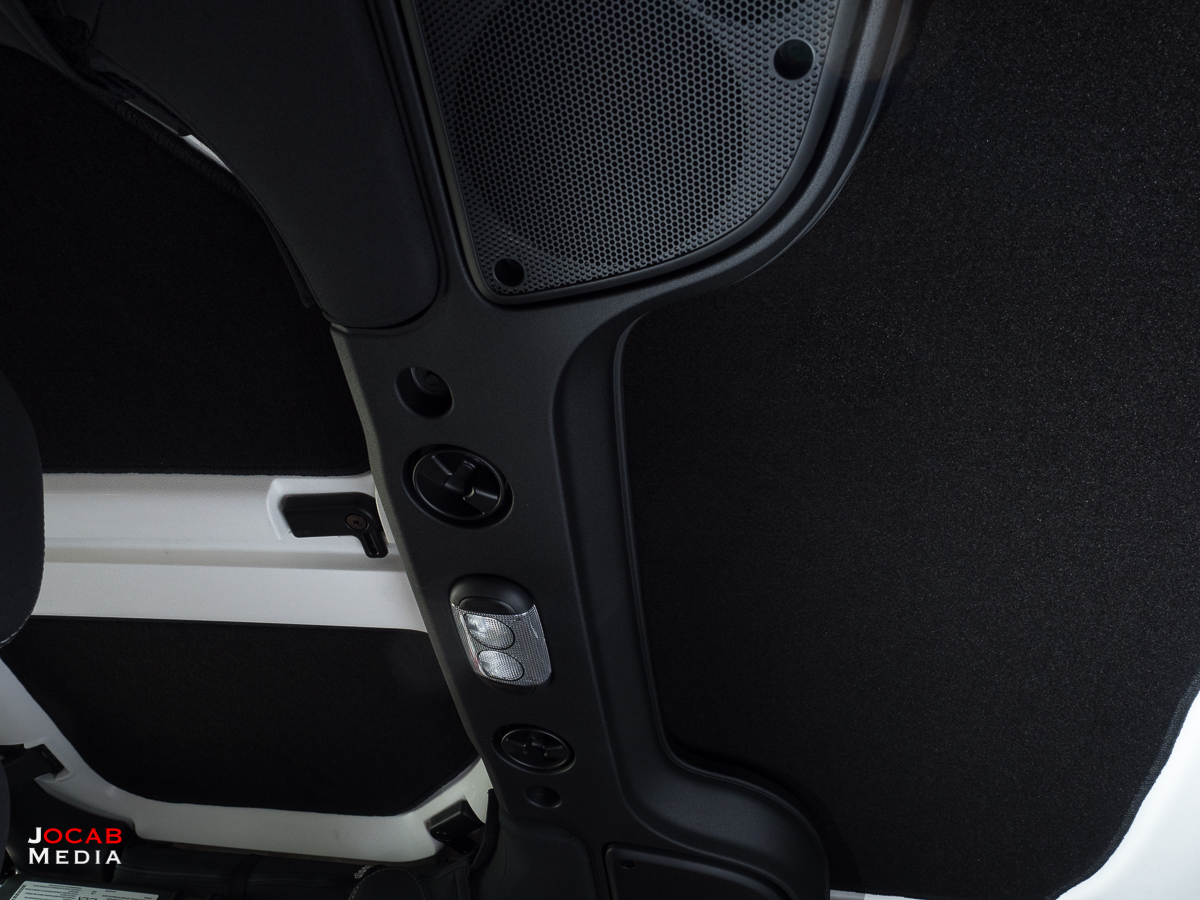
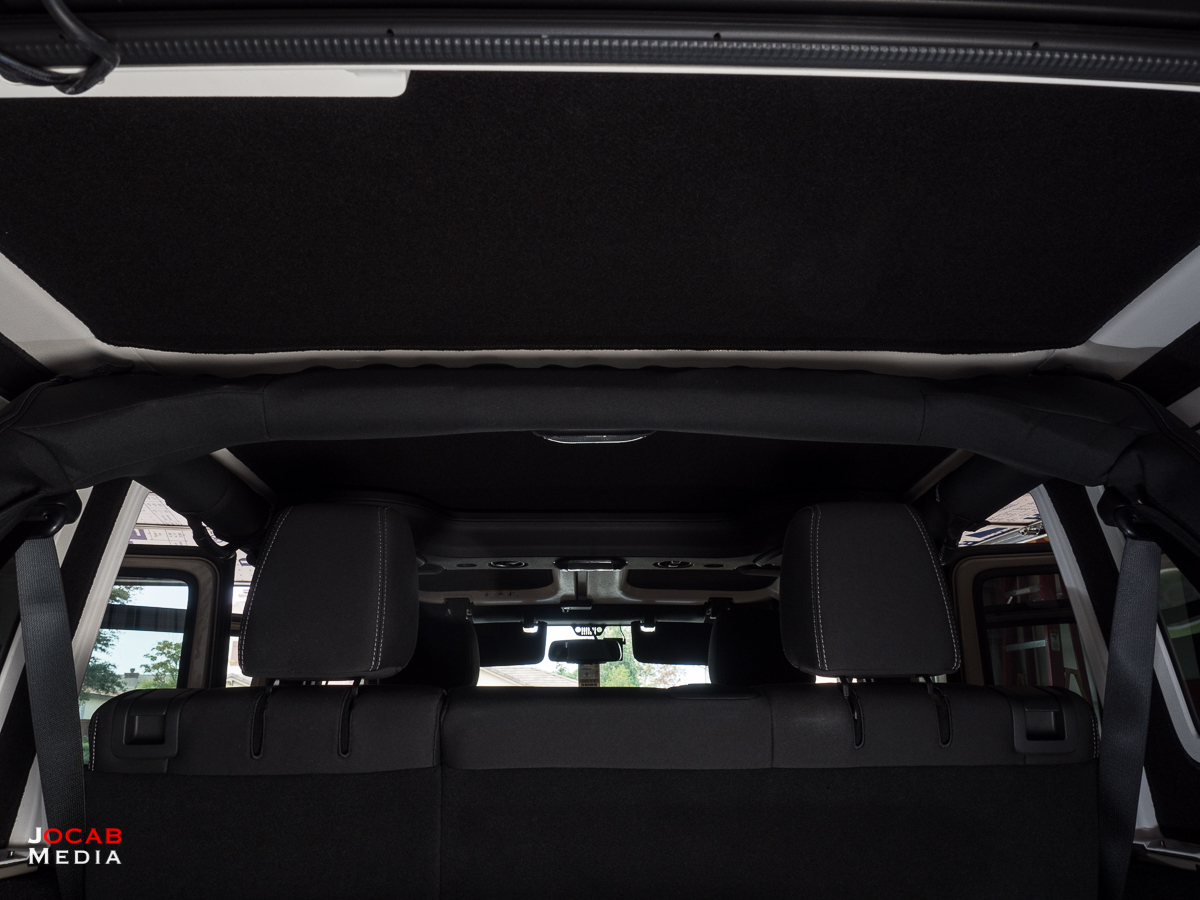
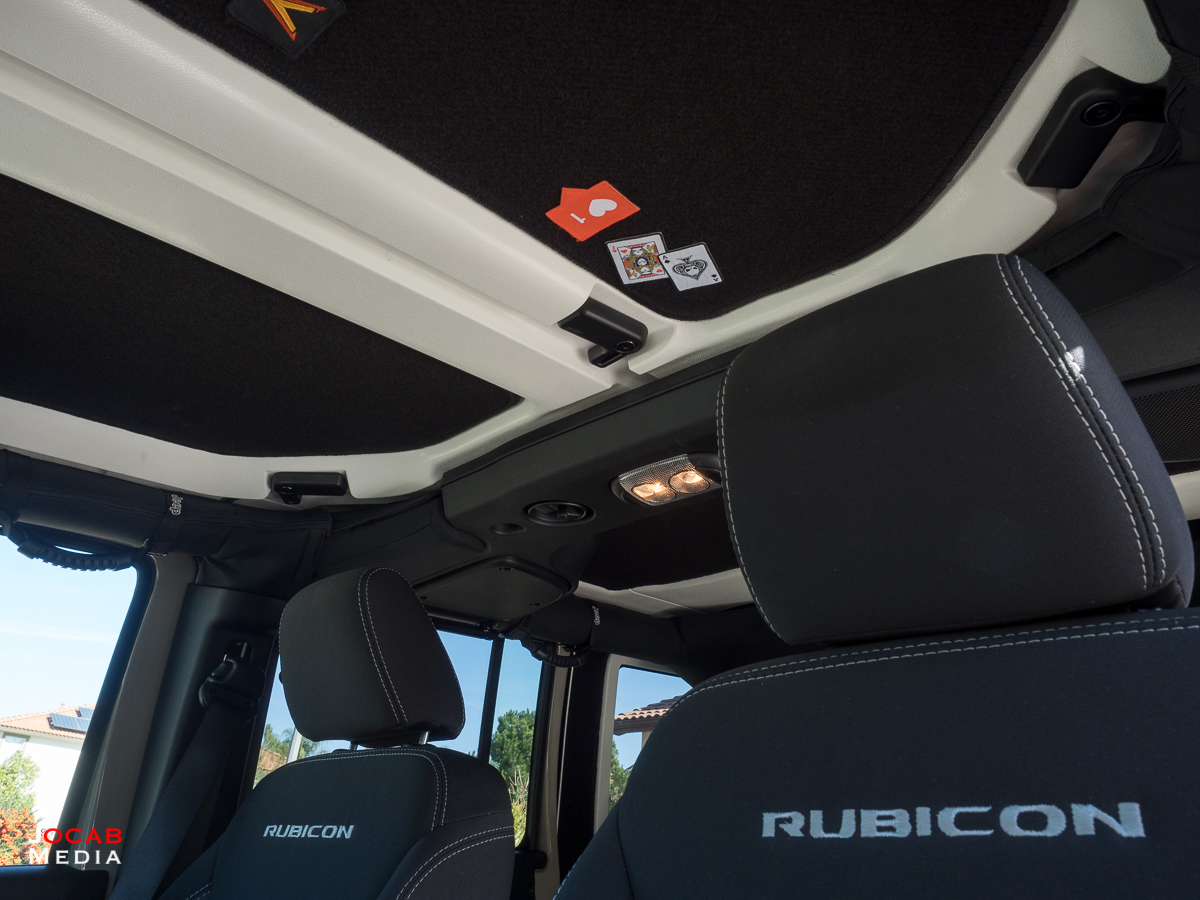
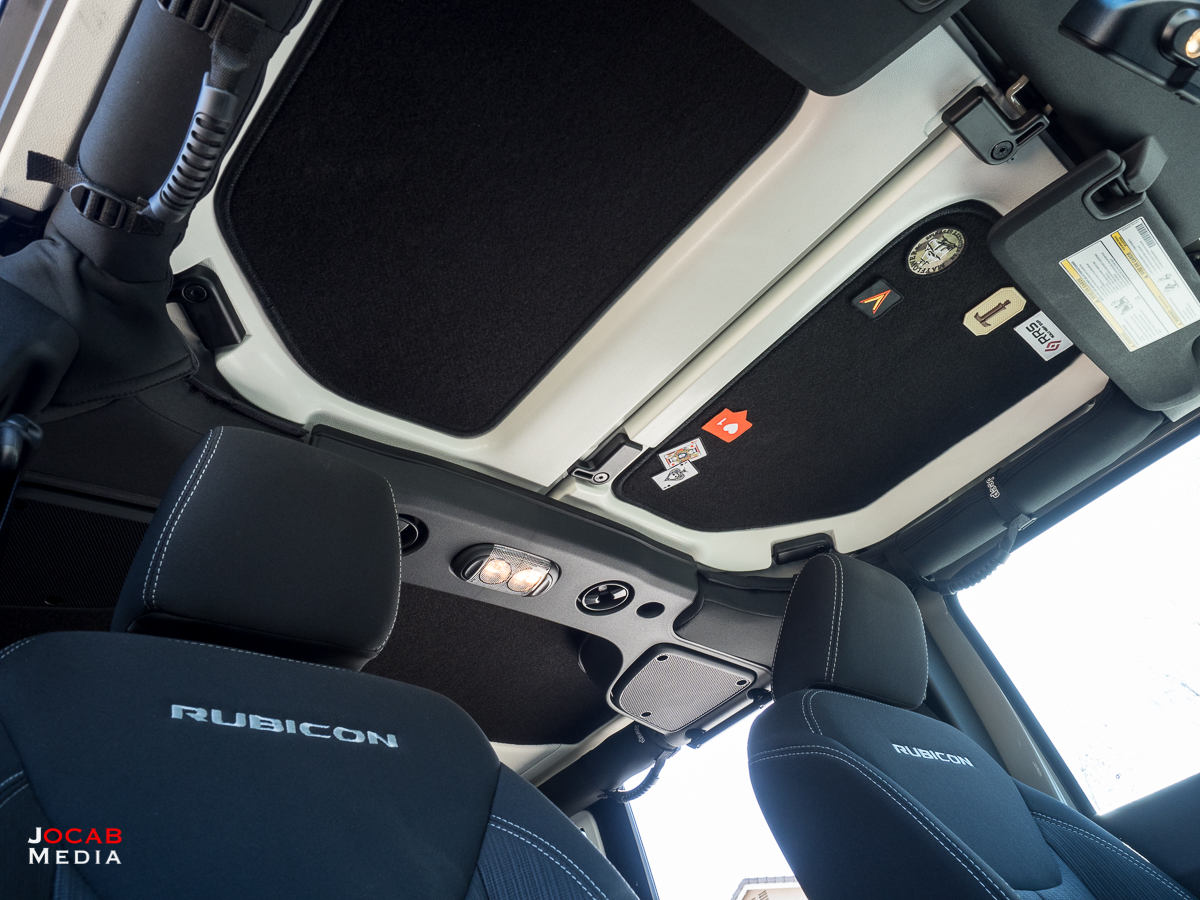
While the Jeep Wrangler JK Unlimited cabin noise is not as bad as people make it out to be, it does get loud at freeway / highway speeds when it is windy. When I was driving back from SHOT Show / Las Vegas, the windows were howling at 20+ mph, and the cabin was definitely resonating. After research regarding the hard top insulation, I found that most people discovered the cabin temperatures were regulated particularly in warmer weather climates during the summer. With that, I added the Mopar 82212464AC Hard Top Headliner for the Jeep Wrangler JK Unlimited (4-Door).
I somewhat understand why Jeep would elect to make this an optional add-on, but I have a minor gripe with regards to this being so expensive ($495 add-on from factory, under $300 elsewhere with DIY install). The cost of the Freedom Hard Top is already expensive, so at this point, Jeep may as well make the head liner / insulation part of the top.
The Mopar hard top headliners are a moderately difficult install. I took off the front Freedom panels to install the head liners with the inside facing up, but in retrospect this wasn’t necessary, since I didn’t take off the actual hard top to install the rear passenger or cargo areas. The moderate difficulty comes into play when installing the rear passenger area and the cargo area. I had to remove the speaker bar to get adequate room to install the rear passenger headliner. Both the rear passenger and cargo area headliners are wide pieces, so it is a lot easier when you have two sets of hands to line everything up and get the adhesive unpeeled and pressed into place.
The Mopar 82212464AC Hard Top Headliner for the Jeep Wrangler JK Unlimited (4-Door) is a relatively pricey add-on at around $275 USD, give or take depending on where you buy it from. There are third-party alternatives at a lower cost, but I decided to go with Mopar for this accessory.
I don’t want to say this is a must have feature, but I guess I gripe about this because I feel like it is something I should not have had to request / install as an optional feature.
But one cool aspect for me with the hard top headliners, is that I finally have a place to stick all the morale patches I have acquired over the years from firearms industry companies. I have thrown a few patches on my drivers side headliner for decoration.
Along the same lines as grumbling about the lack of the headliners from the factory, I also dislike the lack of all-weather mats by default, especially in a Rubicon trim. No one who buys a Wrangler, particularly a Rubicon, wants regular fabric floor mats. Jeep should include all-weather mats as standard features, or at least include those with the Rubicon (or even Sahara) packages on up.
I ended up getting a set of WeatherTech FloorLiner mats for the front, rear, and cargo areas.
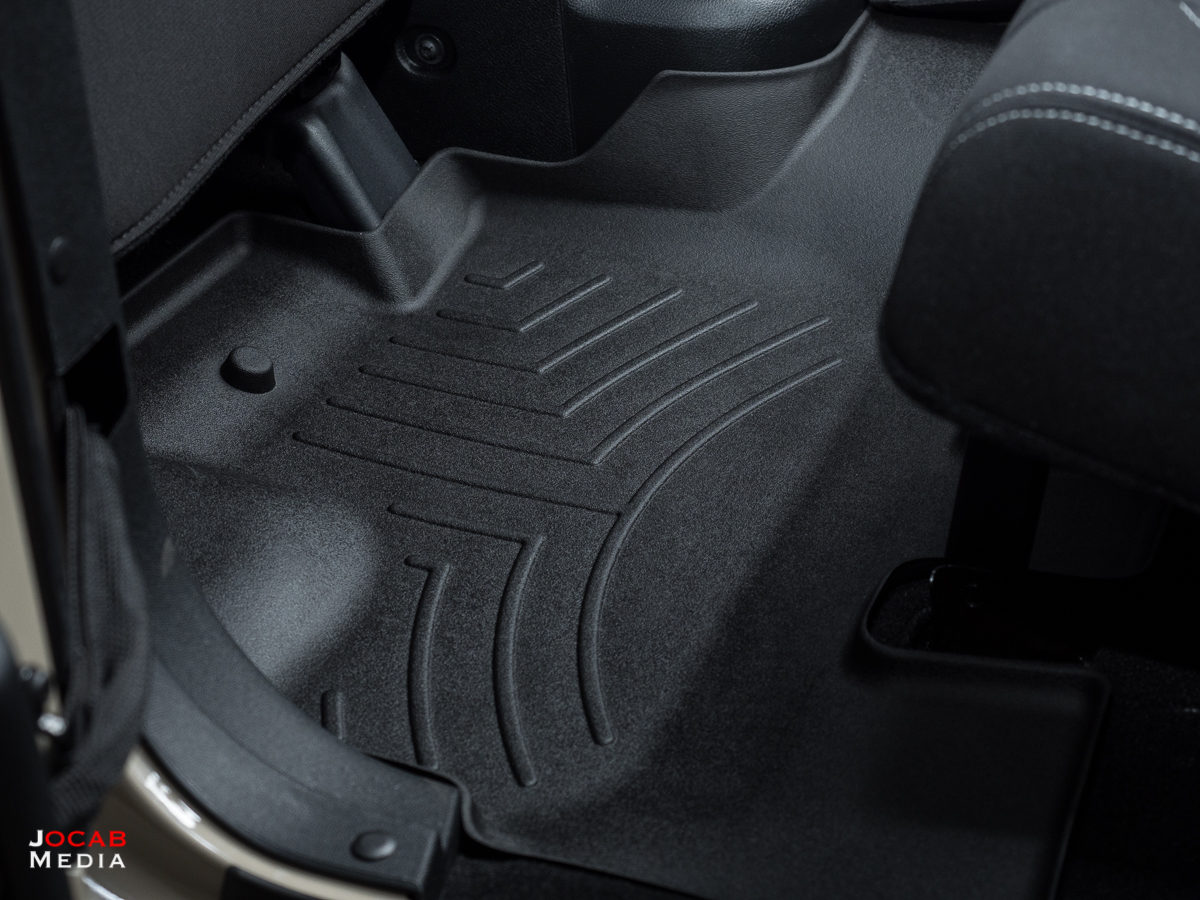
They work great, but the WeatherTech FloorLiner mats are more of a rigid plastic as opposed to rubber. WeatherTech calls it “High-Density Tri-Extruded (HDTE)” material and claims it has the friction surface similar to carpet. In some regards this is true, particularly once the mats are worn in.
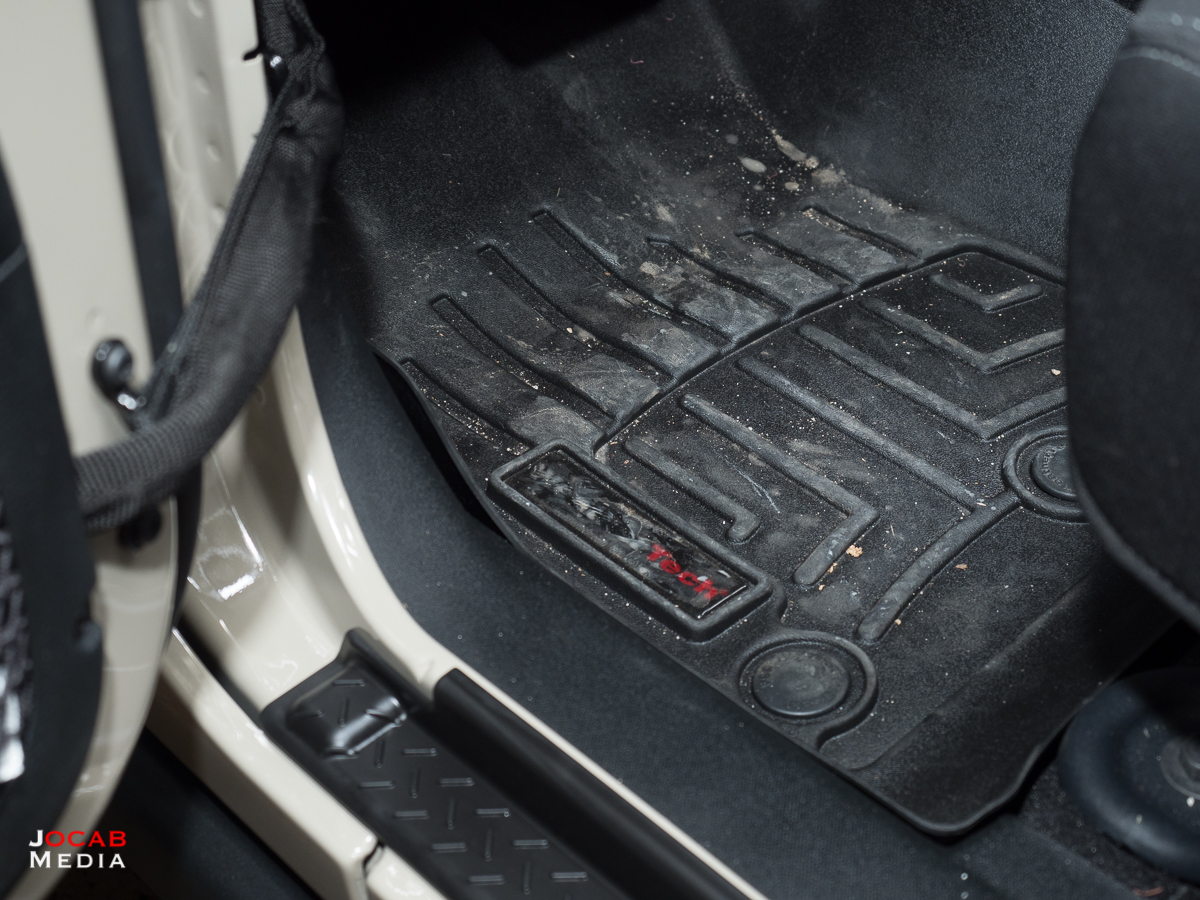
But when clean and like-new, they are a bit slippery depending on the shoe tread type. In retrospect, I should have opted for a rubber cargo liner instead, in order to have better grip for any bags and gear I store in the back. But I am quite happy with the fit and design of the WeatherTech FloorLiner mats for the JK Unlimited. They fit perfectly.
One other gripe I have with the Wrangler JK that I do not have a real solution for is the height of the gas / accelerator pedal. For some reason, the gas pedal is significantly lower than the brake pedal. On every vehicle I have ever owned and driven, the difference in height from the floor for the brake and gas pedals was not very much at all. It took me a little while to find the best seat position so I could depress the gas pedal without placing fatigue on my leg, particularly on longer drives (e.g. SoCal to Las Vegas).
But with the seat positioned for the most comfortable gas pedal reach, I really have to lift up my foot quite a bit to get over the brake pedal. If I simply let my foot come up just enough to release the gas pedal and try to pivot my foot laterally to tap the brake, I am directly under the brake pedal. I wish there was a way to adjust the gas pedal height so the difference height between the gas and brake pedals was not so substantial.
With all those gripes with my 2018 Jeep Wrangler JK Unlimited Rubicon, do I have any regrets about this vehicle? No, none so far.
Obviously it is going to be hard to find the perfect vehicle, and no matter what, one will always find something to nitpick about. If anything, the one thing that will probably eat away at me slowly is not going with a manual transmission, simply for the purity of driving a manual transmission vehicle.
Then of course, the one negative aspect of owning this Wrangler JKU Rubicon is the fact that I want to modify it, albeit conservatively.
So what is next for my Jeep Wrangler JK Unlimited?
The future modifications to my JKU Rubicon will be a slow going road map, oriented towards moderate off-roading capabilities. In stock form, the Wrangler JKU Rubicon is capable of handling basic off-road trails, and it is more than sufficient to get me to my shooting ranges here in Southern California.
But I want to make some upgrades and add-ons to start trekking out on some of the trails in my area, and to make my Jeep more capable in terms of getting out of and staying out of trouble when off paved roads.
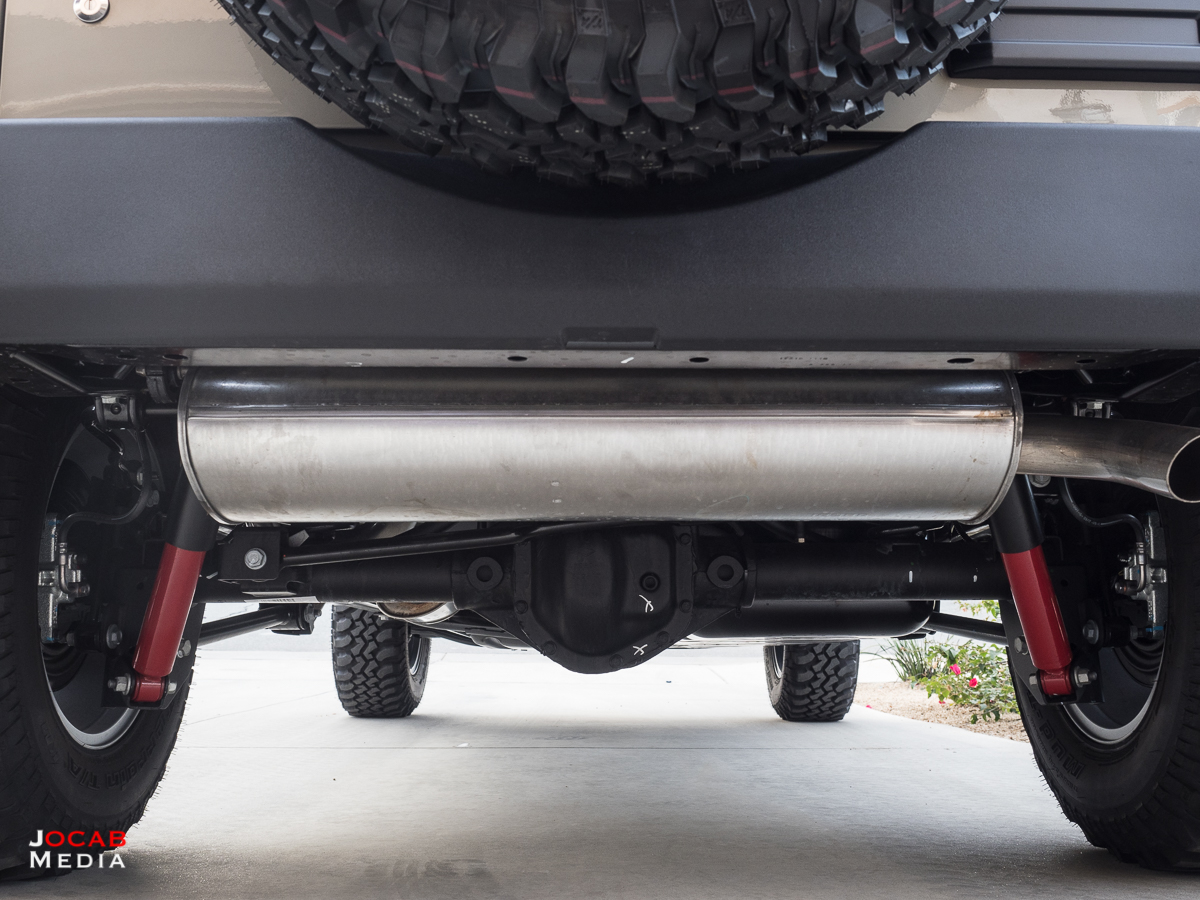
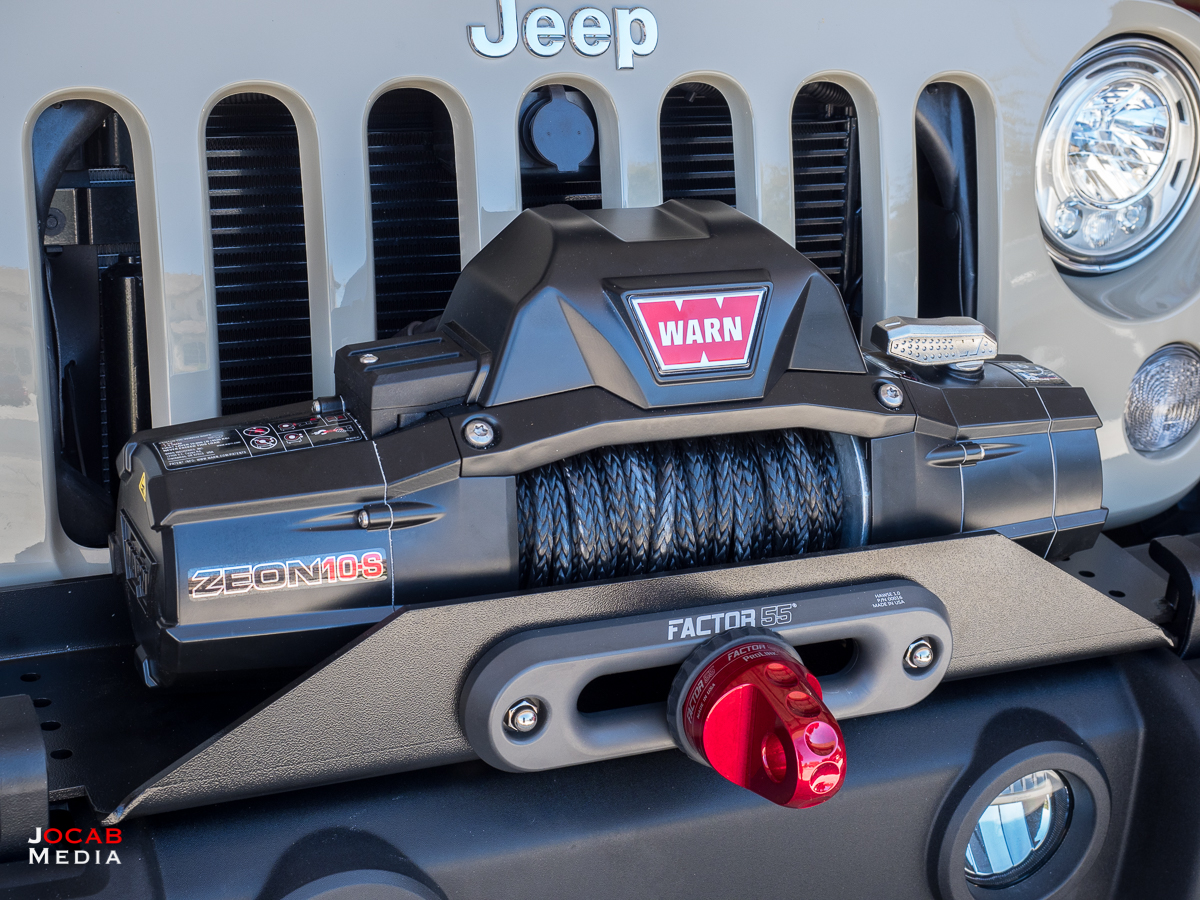
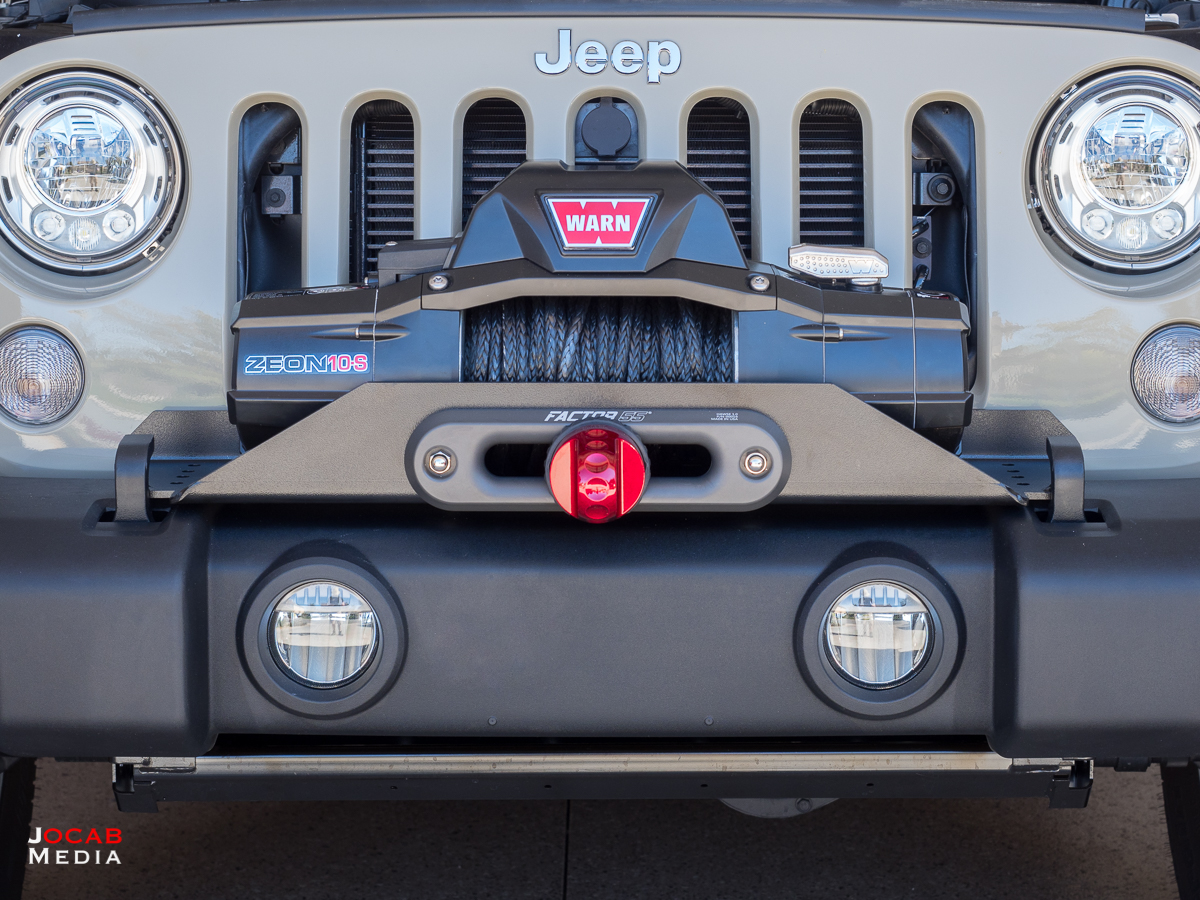
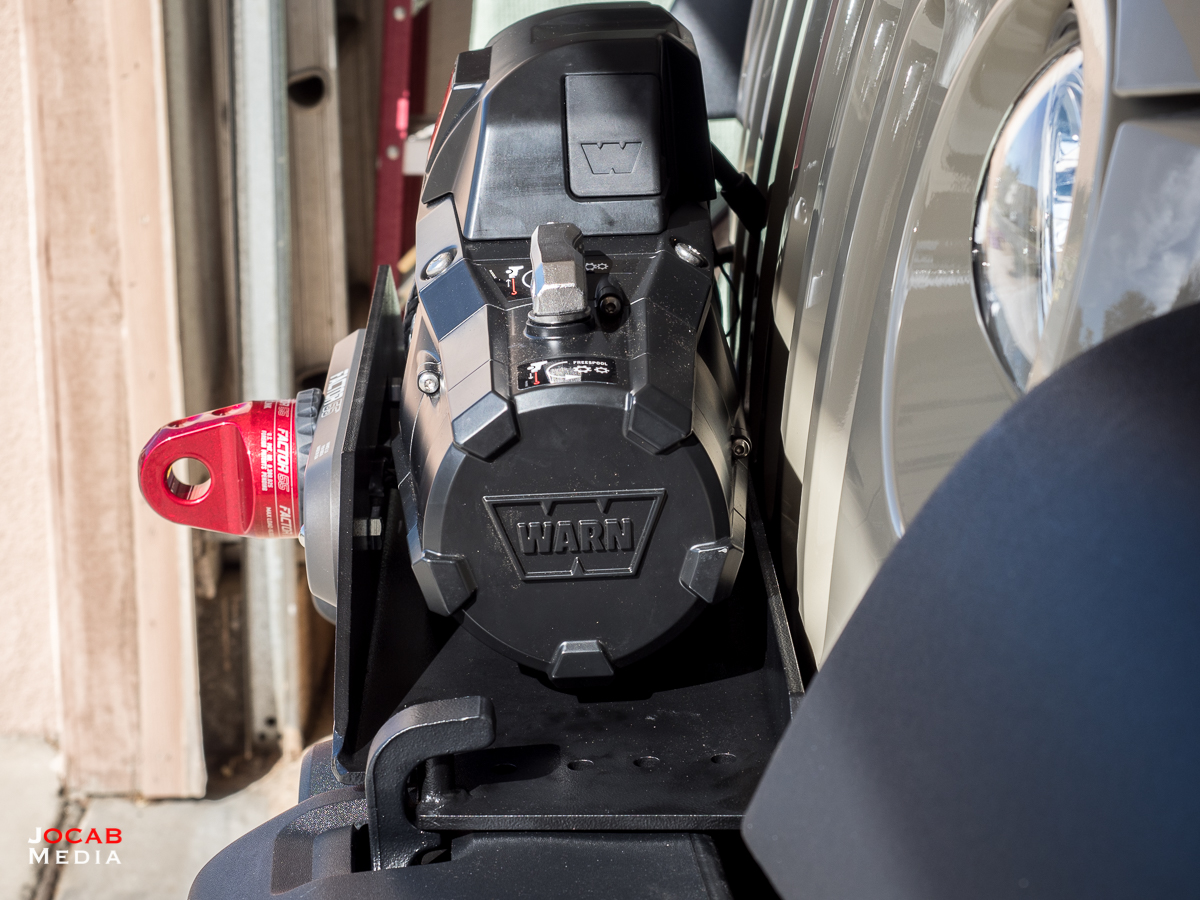
With that said, I did make one significant add-on and that is the installation of a Warn Industries Zeon 10-S winch.
I wanted a winch because even if I don’t have a lift kit or bigger 35″ or 37″ tires to get through rough terrain, I wanted the ability to get out of rough situations if need be. The mentality being that even if I spent money for upgrades to stay out of trouble (not get stuck), I would still need the ability to get out of trouble (get out of being stuck).
That is why I decided to invest in a winch, first.
But with a winch, I was looking into aftermarket bumpers with winch mounting capabilities, and spent a lot of time online research options. I became more concerned about the added weight, and then started looking at various bumpers based on weight. Then I started looking at cost and realized I would be spending at least $600 for a reputable American made bumper. Then I became caught in a spiral debating full width vs mid-width vs stubby.
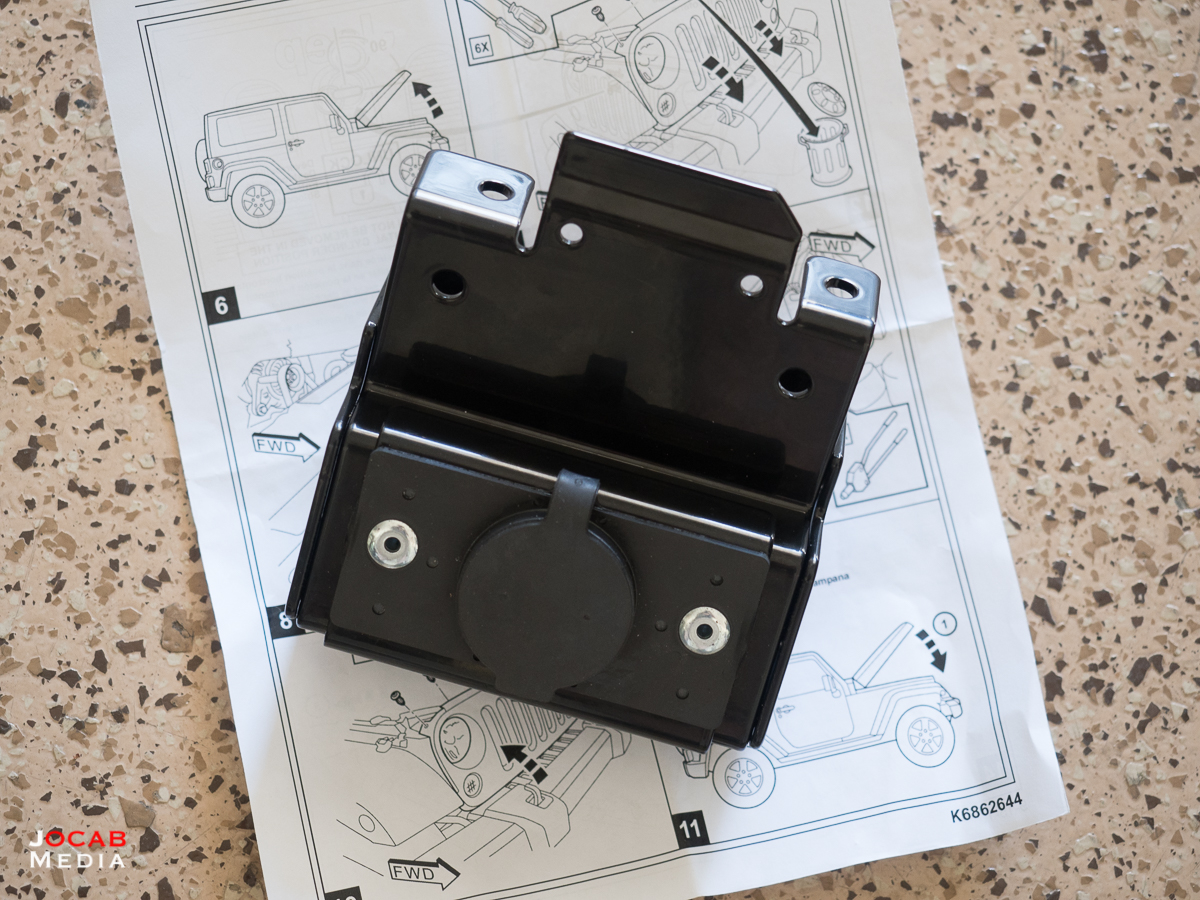
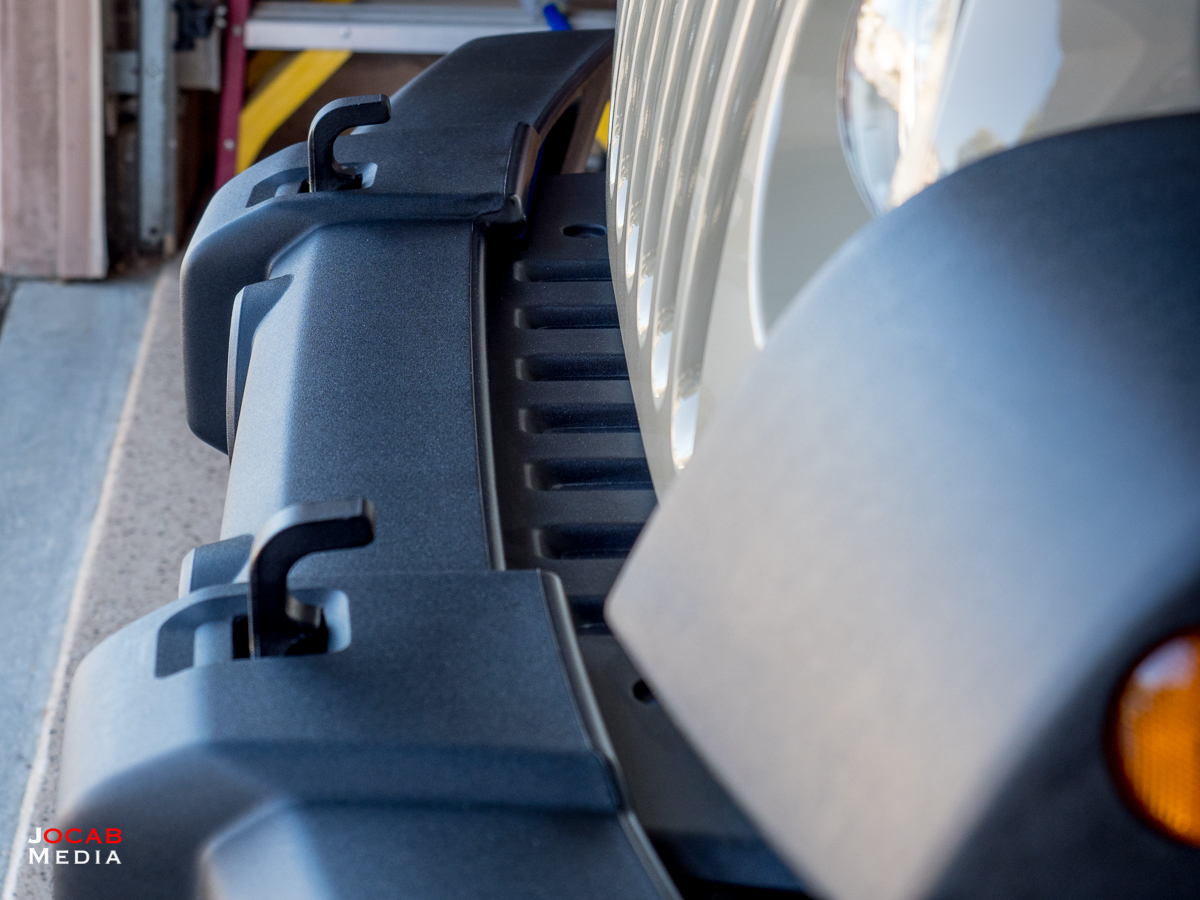
With all those variables, I looked into a way to keep things simple for now by installing a winch on the factory bumper, and came across the Rock Hard 4×4 winch plate for the factory JK/JKU bumper.
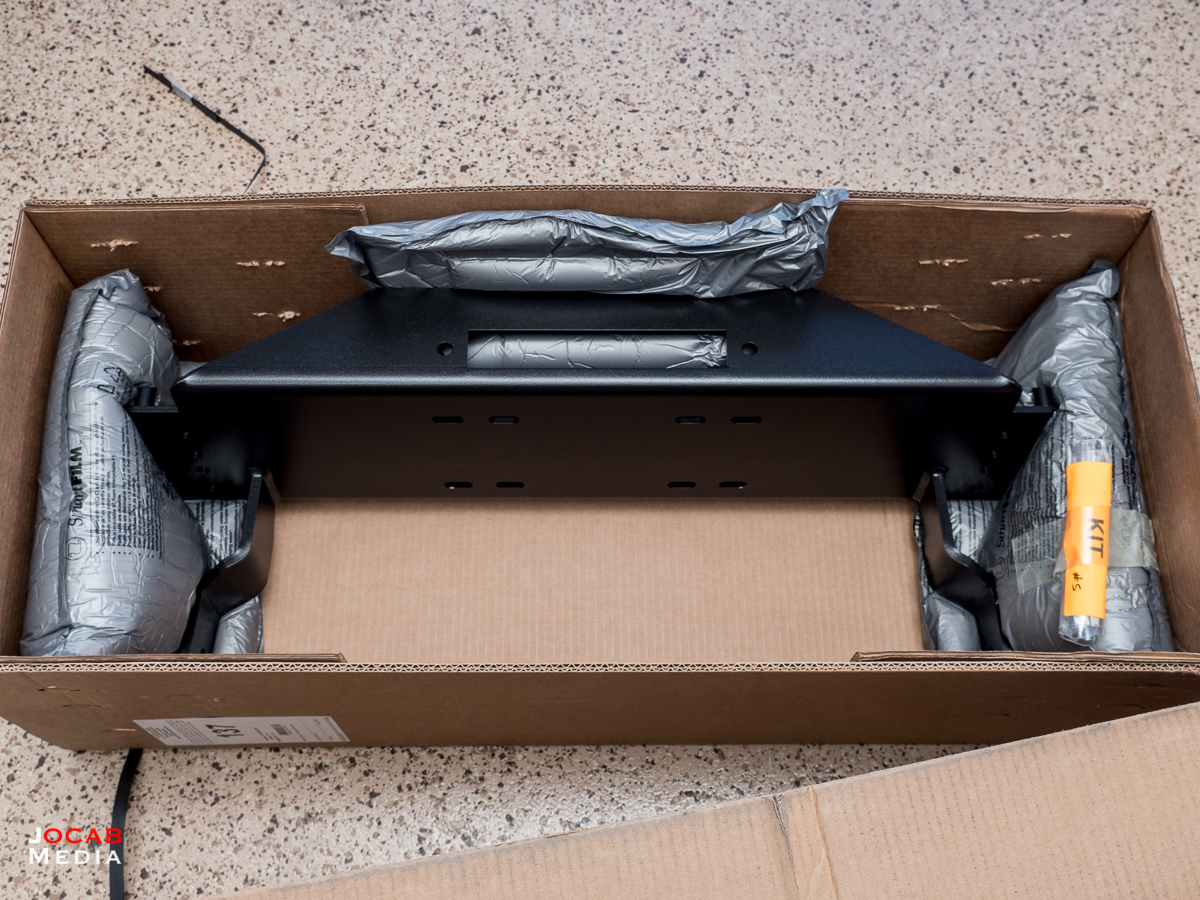
At a fairly low cost of $170, the Rock Hard 4×4 winch plate offered a stable, robust, well-thought out winch mounting option that did not require any permanent modifications to my JK, and would give me the time to decide on what front bumper to settle on. Plus, the low cost solution for winch mounting allowed me to invest more upfront for the actual winch.
I wanted a weather sealed winch, but also wanted a reputable winch. I was seriously considering the Smittybilt Gen2 X2O 12K waterproof winch, or one of the other Smittybilt winches, which are about half the price of the Warn Zeon 10-S that I ended up getting. There are a lot of people using Smittybilt winches, but I decided to invest in the Warn Industries name and reputation. Not to mention the Zeon 10-S is a very highly regarded winch.
I picked the 10-S since for the 10,000lb rating and the synthetic line. 10,000 lbs should be adequate for pulling out my vehicle, and I can always use a snatch block for more winching power (more on recovery gear later). I opted for synthetic line for the weight savings over steel cable, not to mention the inherent ‘safety’ allotted with synthetic winch line. The Warn Zeon 10-S winch (S for synthetic) is about 80lbs, where as the Warn Zeon 10 (steel cable) winch is 103lbs.
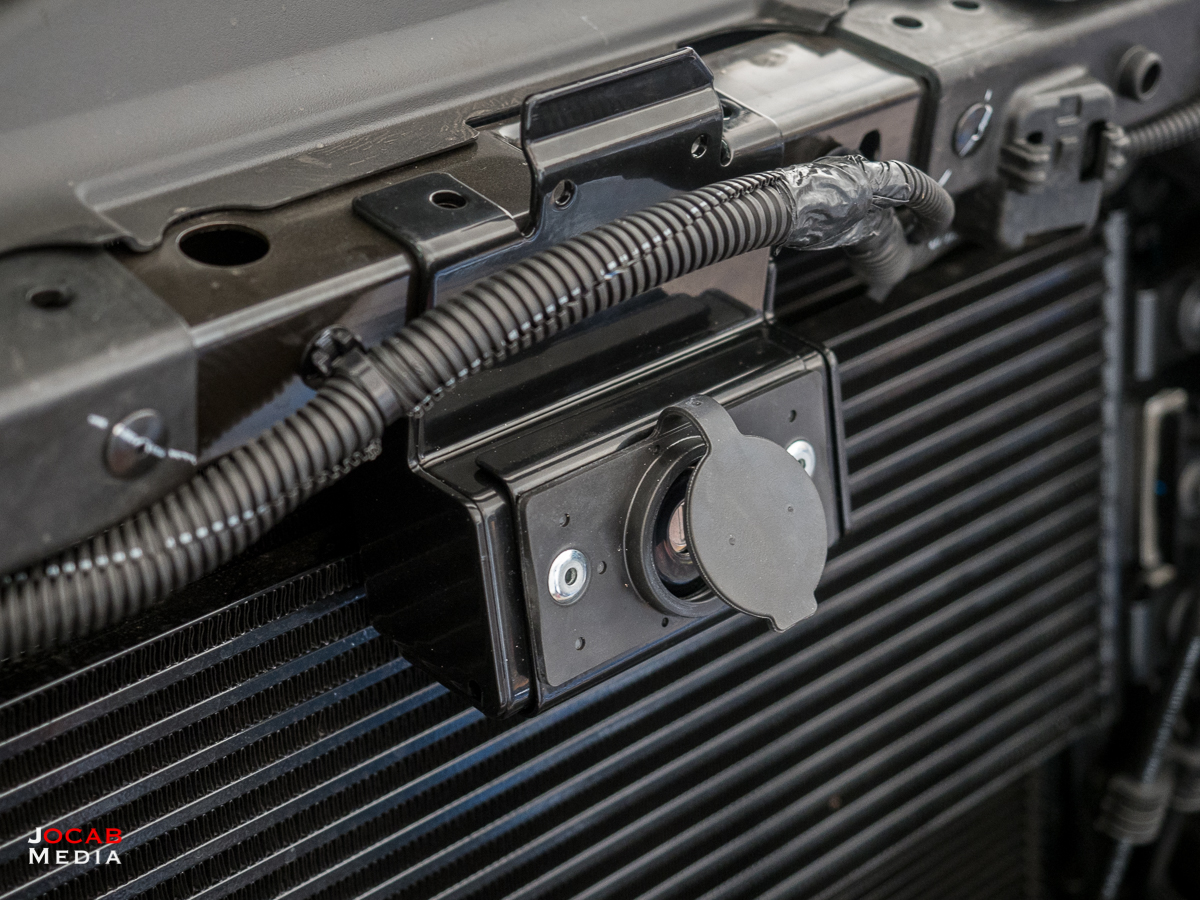
The install of the Rock Hard 4×4 winch plate and the Warn Industries Zeon 10-S winch was fairly straightforward.
The tips I have for anyone installing the same winch plate is to completely loosen / remove the top two bolts holding the factory bumper on each side (which also hold the tow hooks), but only loosen the bottom two bolts on each side. This will allow you to pull the bumper forward, but tilt the top of the bumper away from the grille, which gives you the right amount of clearance to drop the winch plate into position. Do this without the winch installed just to make sure there is clearance.
Using the above method to pull and tilt the bumper forward will save you the time of having to completely remove the bumper, which requires cutting a zip tie holding the OEM fog light cables in place, and removing the OEM fog lights.
Once clearance is confirmed for winch plate to drop into place, take out the winch plate and install the winch to the plate.
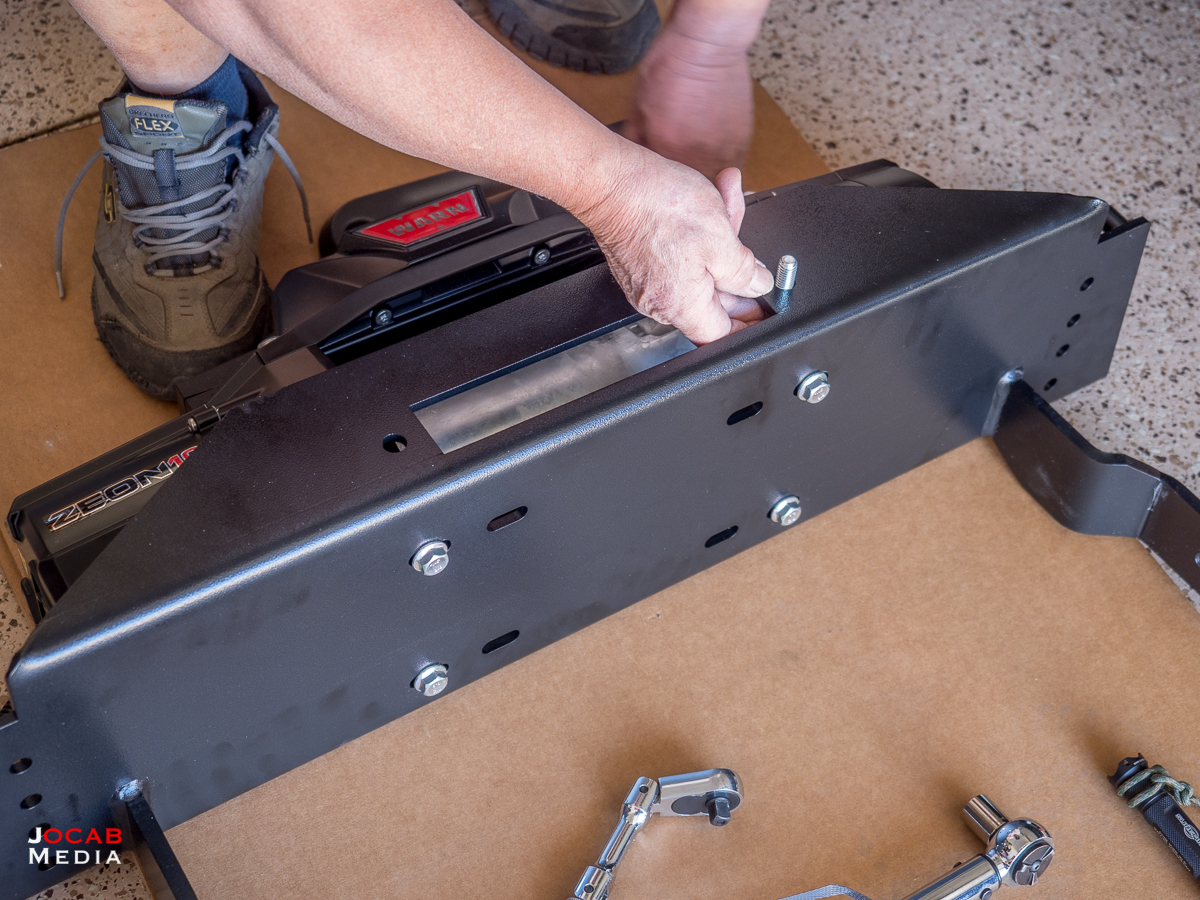
From there you can then drop the winch + winch plate back into position.
With regards to the winch wiring, I ended up going through the grille and down. When facing the Jeep head on, I ran the negative/ground cable through the far left grille opening and the positive cable through the grille opening third from the left.
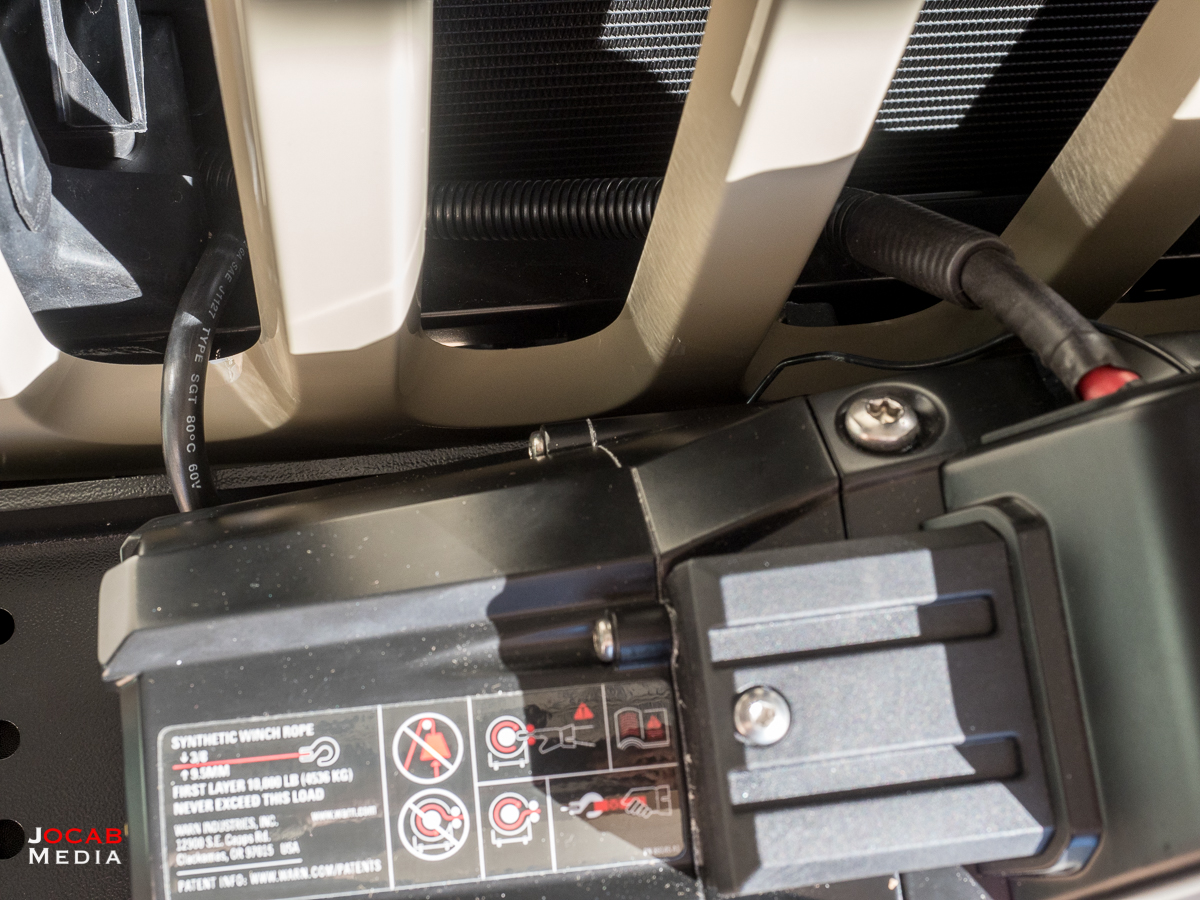
I then routed both cables down below the radiator between two crossbeams / brackets, where one of the crossbeams / crossbars keep the winch cables from making contact with the radiator.
I did use a cable zip tie to keep the positive and negative/ground cables together right at this point (but not zip tied to the crossbar / beam). From there, I routed the cables back up towards to the top of the engine compartment, along the intake.
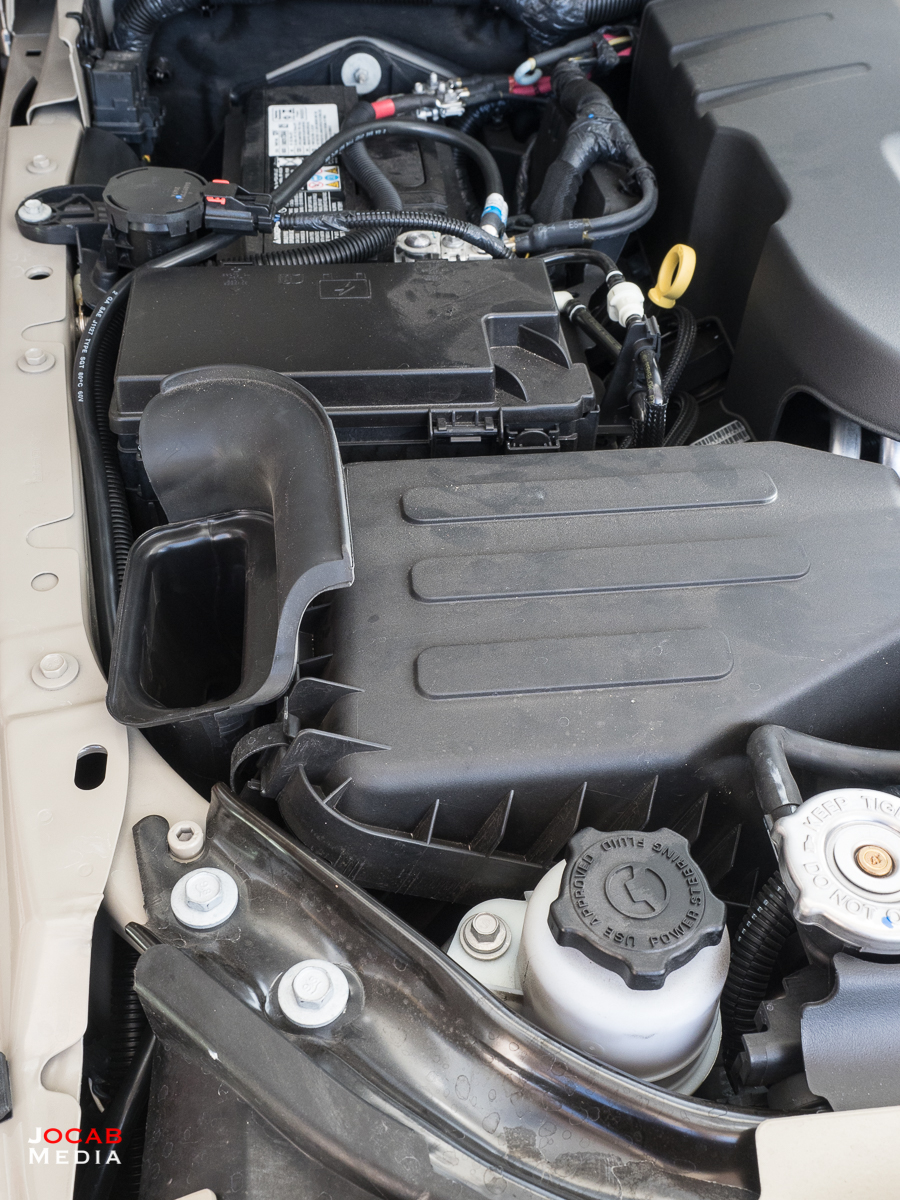
This path up past / behind the intake brings the cables between the edge of the engine compartment and the fuse box directly to the battery terminals.
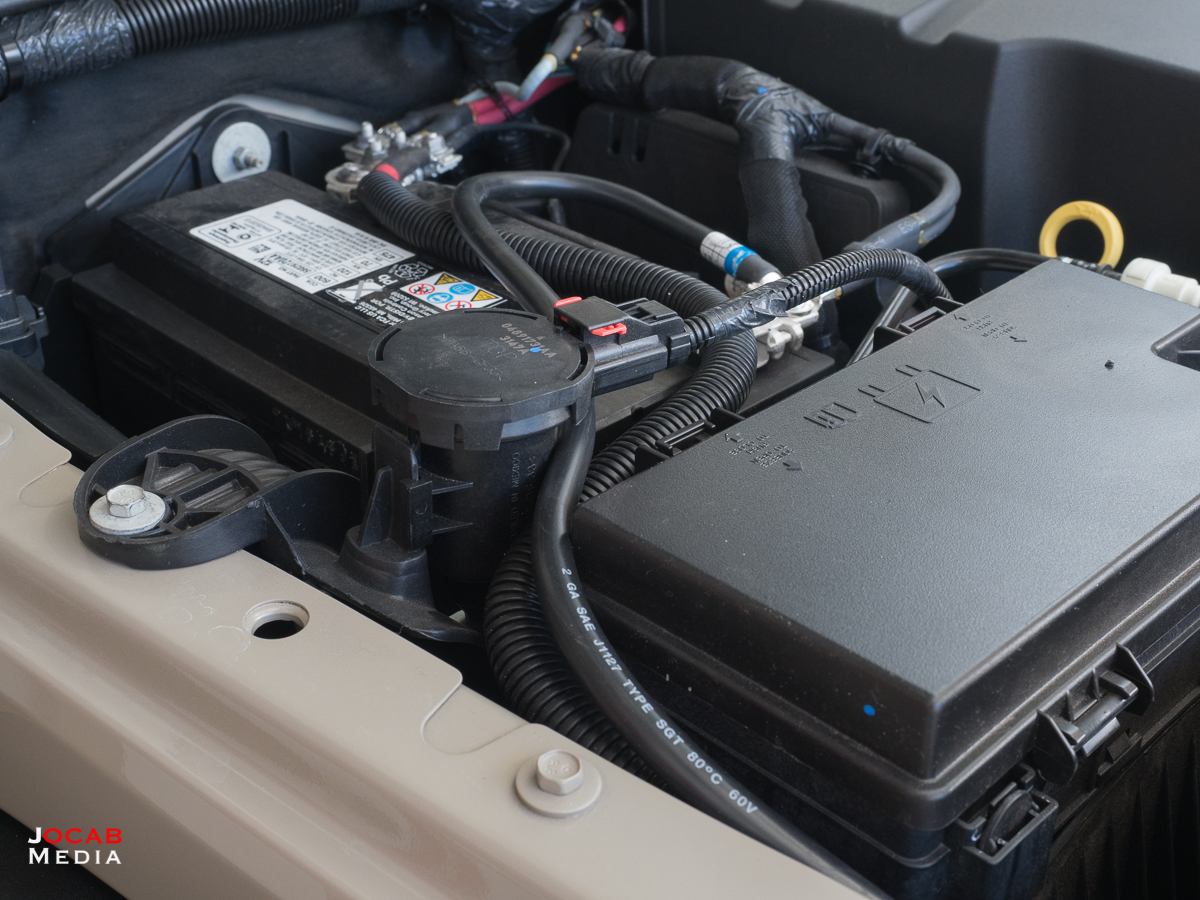
The positive cable was secured to one of the accessory posts that already existed on the positive terminal. But the negative/ground cable was attached to the negative terminal accessory post with a M6x1.0 flange nut. The accessory post on the negative terminal is actually bare (no nut), so you will have to get one at your local hardware store and should only set you back 30 cents assuming they sell them in singles.
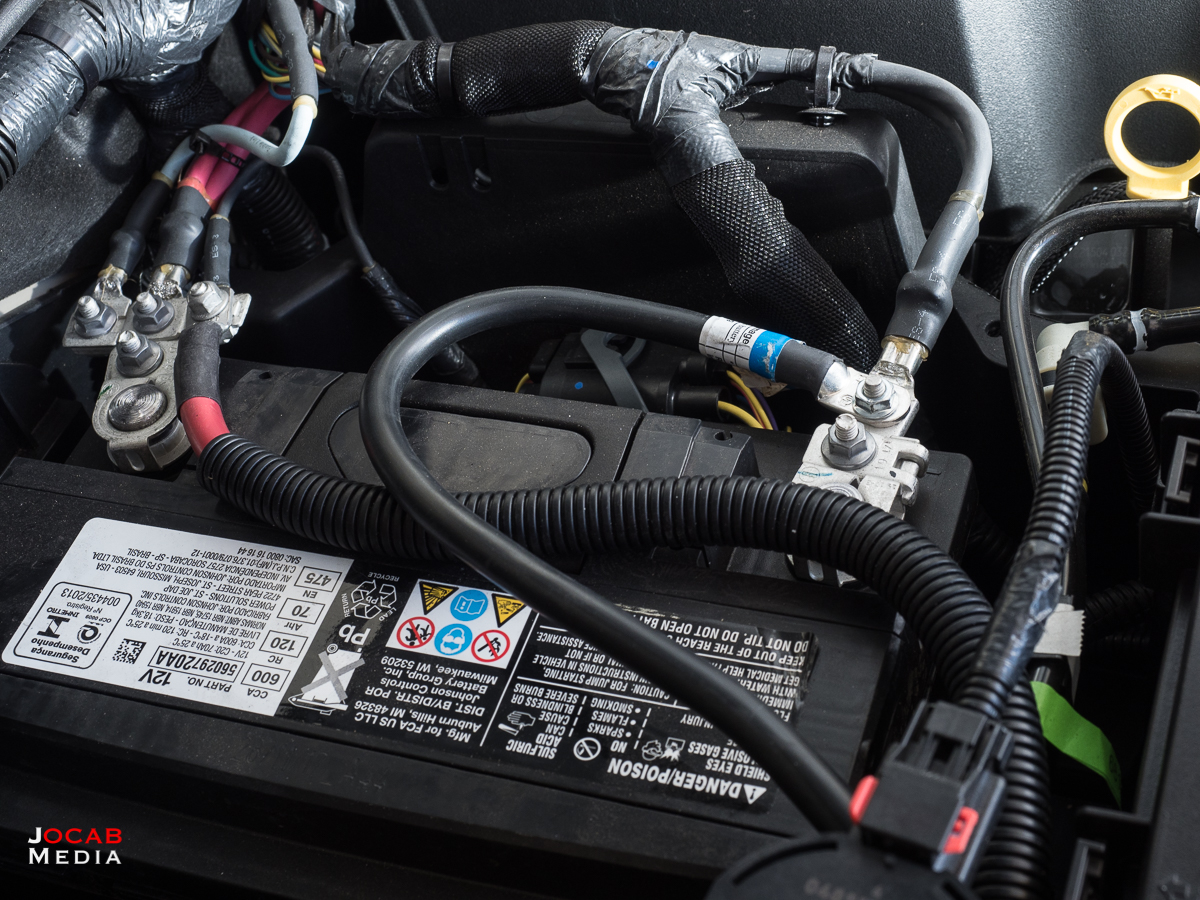
Under no circumstance should you install an accessory’s negative / ground cable to the nut on the negative terminal closest to the battery clamp. That nut is conical and is what actually keeps the negative terminal clamped to the battery post. If you try to put an accessory cable between that nut and the clamp, the conical nut will not apply force to the clamp and result in a loose terminal clamp.
Readers will notice the Factor 55 Precision Engineering hardware in the photos. I decided to get a Factor 55 Hawse Fairlead 1.0 and a Factor 55 ProLink to use instead of the Warn provided fairlead and line hook, respectively.

The Factor 55 Hawse Fairlead 1.0 has a wider opening with more of a flare which will allow for better synthetic line movement, particularly if the line is operated at an angle, with less risk of binding or damage to the line when rubbing against the Hawse Fairlead. Plus, the Factor 55 Hawse Fairlead 1.0 is Type III hard anodized with an abrasion resistant surface, for lower risk of synthetic line damage. As far as the Factor 55 ProLink, even though I have little to no experience with winching, I read about the benefits of a closed winching system and decided to go that route by opting for the ProLink.
I am quite happy with the Warn Industries Zeon 10-S post-install. Granted I haven’t truly used it, I will probably head out somewhere and test it out to get some experience using it.
The look of the Warn Zeon 10-S and Rock Hard 4×4 winch plate on the factory bumper is clean.
While I would like a more customized look along with ruggedness of an aftermarket front steel bumper, I will divert funds elsewhere on the Wrangler JK right now. At least until I damage the front bumper, which will be a more opportune time to do a front bumper upgrade.
The current weight added onto the front of the Wrangler JK with the winch setup is about 115 lbs (80lb winch + 35 lb winch plate). This is all unofficial, but based on measurements I took of the height of the front bumper and the front portion of driver’s side rock rail before the winch installation, the Wrangler has dipped on the front end about half an inch. Again, this isn’t a very scientific measurement, since I did this with a tape measure and eyeballed the levelness of the tape measure when I made the measurement.
I read that the factory front bumper with the tow hooks is going to be approximately 40lbs. So theoretically, if I swapped out for a winch capable front bumper, removing the Rock Hard 4×4 which plate and the factory front bumper plus tow hooks accounts for 75 lbs, which is about even with some of the aftermarket front bumpers out there, especially in a mid-range or stubby width. So the weight of an aftermarket bumper is not really a concern when compared to my existing winch mounting setup.
That being said, there are several things I am looking into for future upgrades:
- Teraflex Wrangler JK Aluminum Hinged Tire Carrier – Specifically to upgrade the factory hinges to handle more weight on the tailgate (e.g. accessory mounts).
- Rear Bumper – I want a rear bumper that has an integrated hitch receiver and shackle mounts. But I am also debating if I want to relocate the spare tire carrier from the tailgate to the rear bumper.
- MOLLE Cargo Attachment Points – There are a couple of aftermarket manufacturers that make panels for the cargo and cabin areas to allow for MOLLE compatible pouches to be attached. I am looking into these simply for cargo management, especially for a recovery gear bag, medical kit, etc.
- Lift Kit – This is an upgrade farther down the path. I am thinking of keeping things conservative at 2.5″ to 3.5″.
- Skid Plates – I am looking into getting a variety of skid plates to protect the oil pan, transmission, transfer case, and fuel tank. For the type of terrain I go through when visiting my shooting facilities, the transmission and oil pan armor are going to be very beneficial. I know the fuel tank armor is more of a priority for the JKU longer wheel base when going over crests of obstacles, but for the regular terrain I go over, I am more concerned about the initial strikes to the forward end of the undercarriage.
- 33″ or 35″ tires – This is along the lines of the lift kit in terms of timelines. A 33″ tire will work on the stock 17″ wheels with no lift, but it will require wheel spacers. If I go with 35″ tires, then I need a lift, so a lift kit may need to happen first. I do not plan on upgrading tires until the next tire replacement.
- Powertank CO2 System – Even though I am nowhere near an avid off-roader, I am wanting to engage in more off-road activities, and the concept of airing down tires needs to be facilitated. I can get a vehicle battery powered air compressor for about $150, but I like the idea of the Powertank CO2 system strapped to the roll cage for fast tire refills.
- Hi-Lift Jack and Mounting System – The Hi-Lift Jack is a much maligned accessory for Jeeps. As dumb as it sounds, my reason for wanting to mount a Hi-Lift Jack in my JK is so I have a mount point for the Krazy Beaver Super Shovel that I keep in the vehicle. The shovel is actually a required tool at my main shooting facility (West End Gun Club) for fire safety.
If you got this far in the article, I commend you for reading all of this content about my Gobi 2018 Jeep Wrangler JK Unlimited Rubicon. Definitely a lot of information about why I decided to acquire a Jeep Wrangler, my gripes about the vehicle so far, and what I have done to the vehicle to address those issues as well as improve the vehicle, along with the future upgrades and add-ons that I am considering.
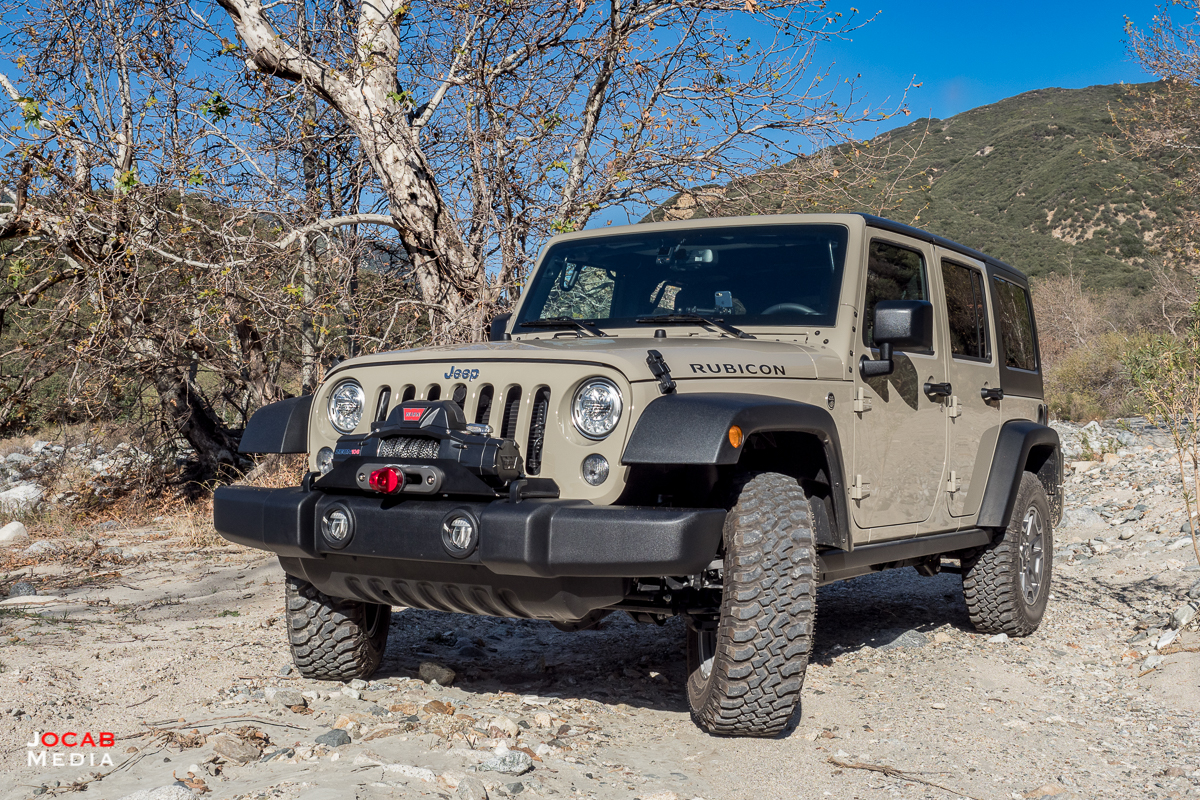
I am happy that I finally own and drive a Jeep Wrangler, and have no regrets with my decision. The Wranger JK Unlimited Rubicon is absolutely fun to drive around, and while I am “urban crawling” more often than off-roading, I like having this range capable vehicle that also works fine for my short daily commute to the office.
Expect a Wrangler JK Unlimited update sometime later this year, hopefully prompted by more upgrades and add-ons.
Ron Ochse
Really nice upgrades so far. All great, can’t wait to read about future upgrades. Nice job! Ron
Tom Saroch
Basically ok article. I think he is off on his pricing though. I just took delivery of my jl Rubi super loaded & it was very little above his. Also, him being from Calif, tells me something I will not get into along with his comments. Hell, he still likes his jap crap car-Calif. all the way.
Josh
Nice. How did you get patches to stick to the headliner?
ocabj
The patches are hook on the back side (as in hook and loop aka Velcro). That attaches naturally to the headliner.
Joshua
Gotcha. I got the Mopar headliners with my JL and of course, my morale patches won’t stick. Some genius at Jeep must have decided not to do the loop material anymore. Now I’m gonna have to figure out some way to get it to work. Recon looks great! One of my fave editions.
LoD Offroad Destroyer Full-Width Rear Bumper with Tire Carrier Install and Review – ocabj.net
[…] my article outlining the first 60 days of Jeep Wrangler JK ownership, I discussed several possible upgrades I would make on the Wrangler. One of the upgrades mentioned […]
2018 Jeep Wrangler JK Unlimited Rubicon: The First 365 Days – ocabj.net
[…] I documented in the first deep-dive blog post about my new vehicle, a Jeep Wrangler was a vehicle that I had been seriously pondering off and on for over a year. I […]
Recovery Gear: What’s in my kit? – ocabj.net
[…] a recently minted Jeep Wrangler owner and an off-road novice, I committed a lot of time to research into recovery gear. After I brought […]
davidadams18
hey man! just came across your blog post after doing wayyyy too much reading on the jk forums. i’m a gobi wrangler owner too :) love your approach to things (e.g. installing a winch before getting crazy with a lift or bumpers). keep up the good work man. i really appreciate your POV
Jonathan Ocab
Thanks. Lots of stuff happened since I wrote this in 2018, though. During pandemic/lockdown 2020, I ended up doing the lift along with a few other things which are documented on my site.
davidadams18
oh yeah, i figured a lot has changed since this post!