
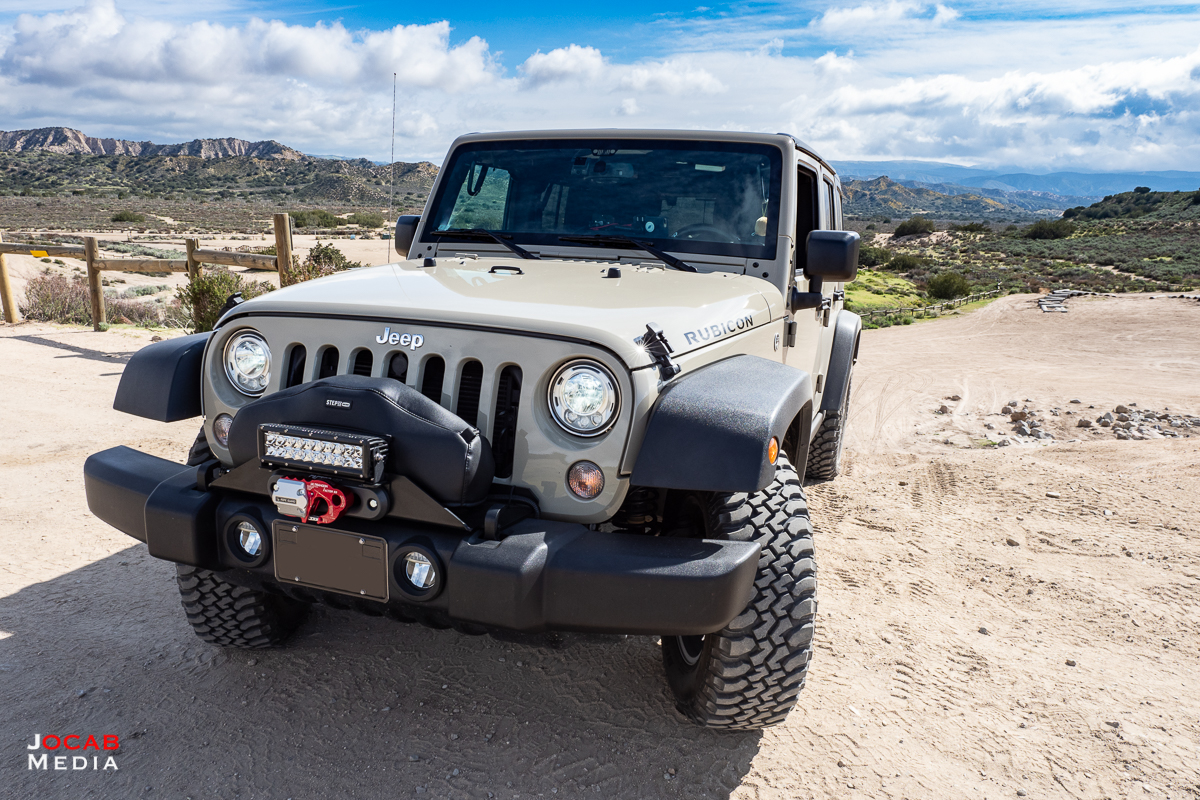
One of the very first additions to my 2018 Jeep Wrangler JK Unlimited was a Warn Zeon 10S winch. I initially went the lower cost route by using a Rock Hard 4×4 Patriot winch plate that works with the Jeep factory bumper. At around $175, it offered an inexpensive yet effective way to get a winch installed on my Jeep. Of course as time passed, my desire to change out the front bumper increased.
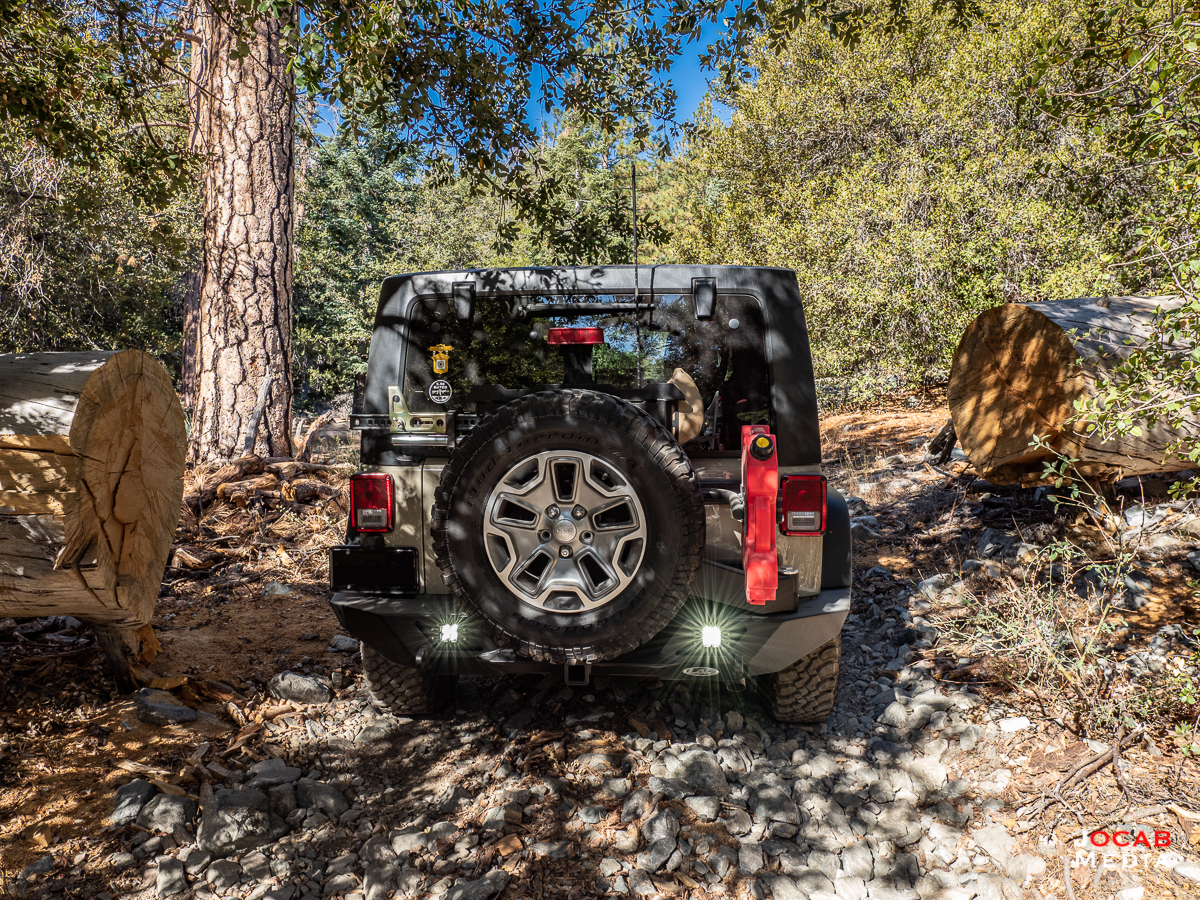
In 2018 I installed the LoD Offroad Destroyer rear bumper with tire carrier on my 2018 Jeep Wrangler JK Unlimited. After some slight quirks discovered during and after install, I have learned to appreciate the LoD Offroad Destroyer rear bumper. It has held up so far in a year and a half of use without any issues.
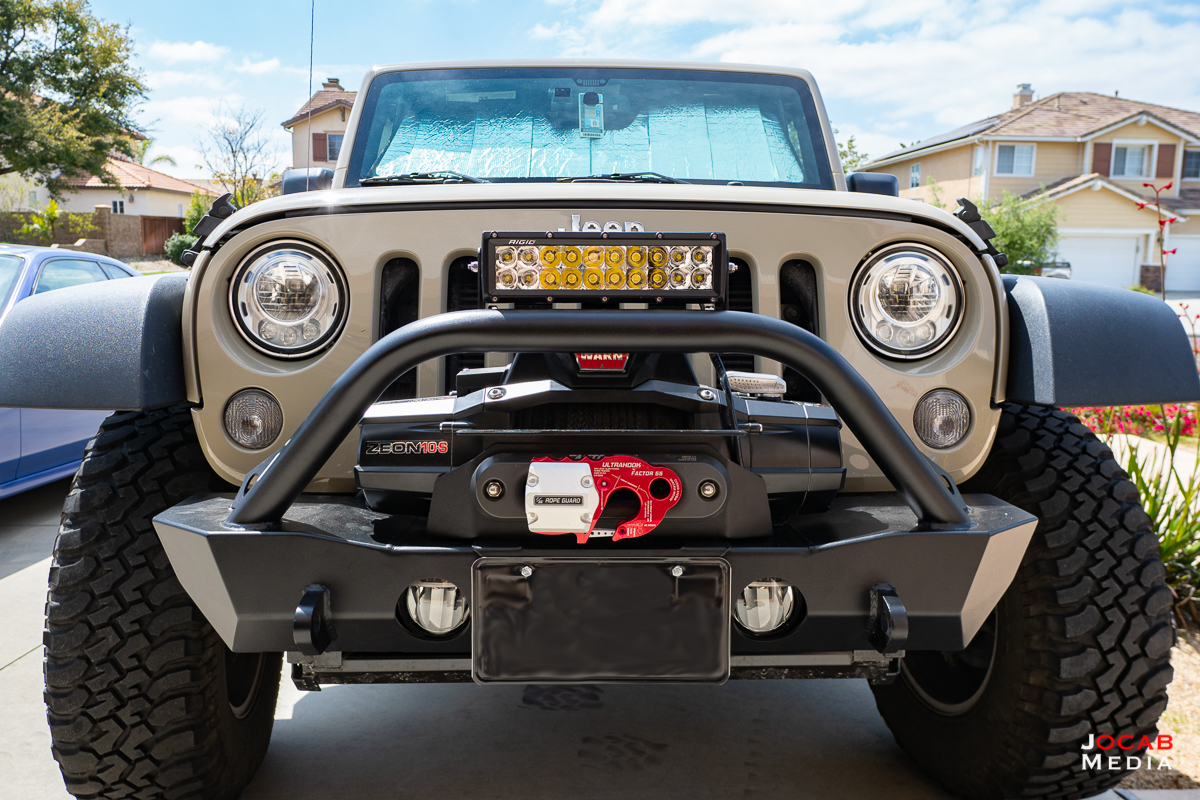
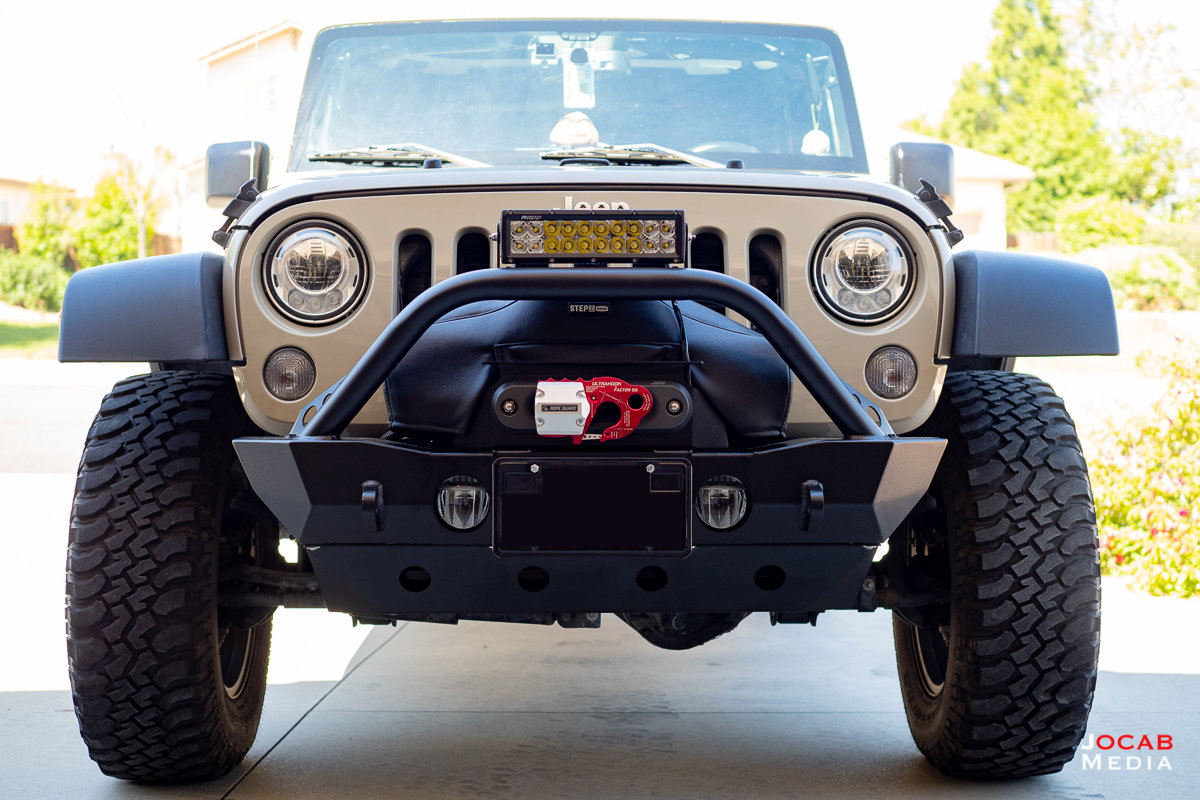
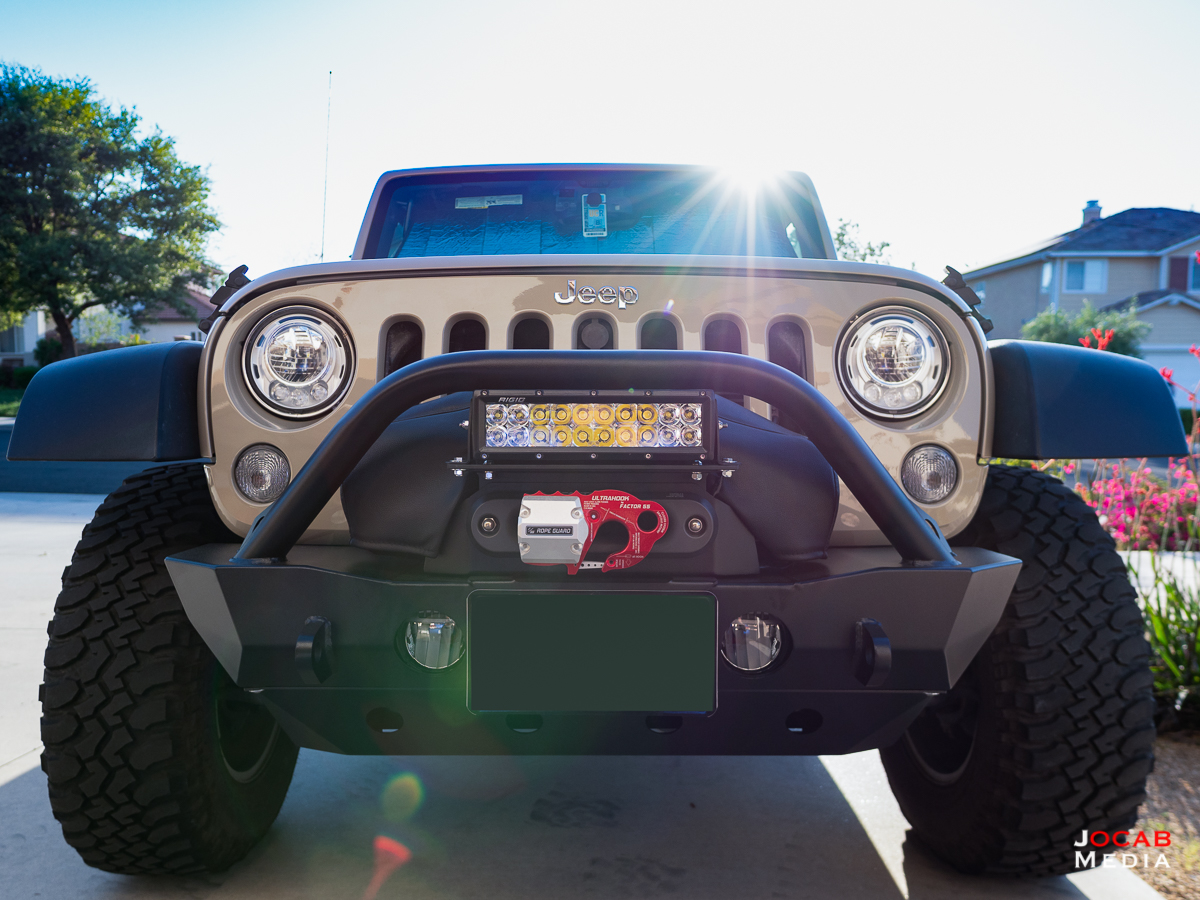
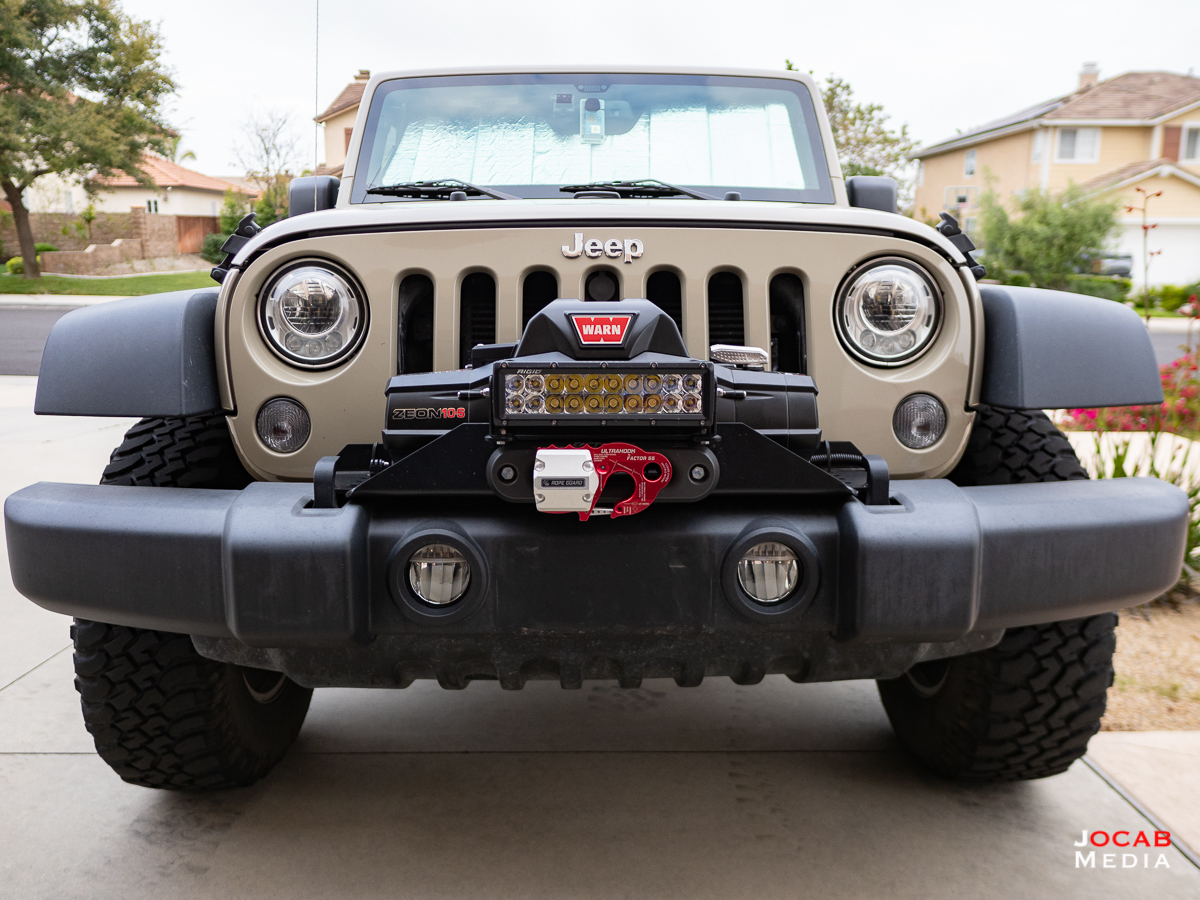
For the front bumper, I decided to stick with LoD Offroad and go with the LoD Offroad Destroyer Shorty Front Bumper with Bull Bar. After a lot of research online, I thought it offered a lot of good features including the front license plate mount (front license plate required in California) that looked good. Also, I wanted to retain my factory LED fog lights and this bumper accommodates the fog lights.
For a long time I went back and forth in my head between a mid-width and stubby bumper. I definitely was leaning away from a full width bumper to keep some weight off while going to an all steel bumper. I liked the idea of having some extra width on the bumper to still protect the lower corners of the grille. But I decided that that a stubby (or in this case a shorty as LoD named it) bumper was the width I wanted to roll with.
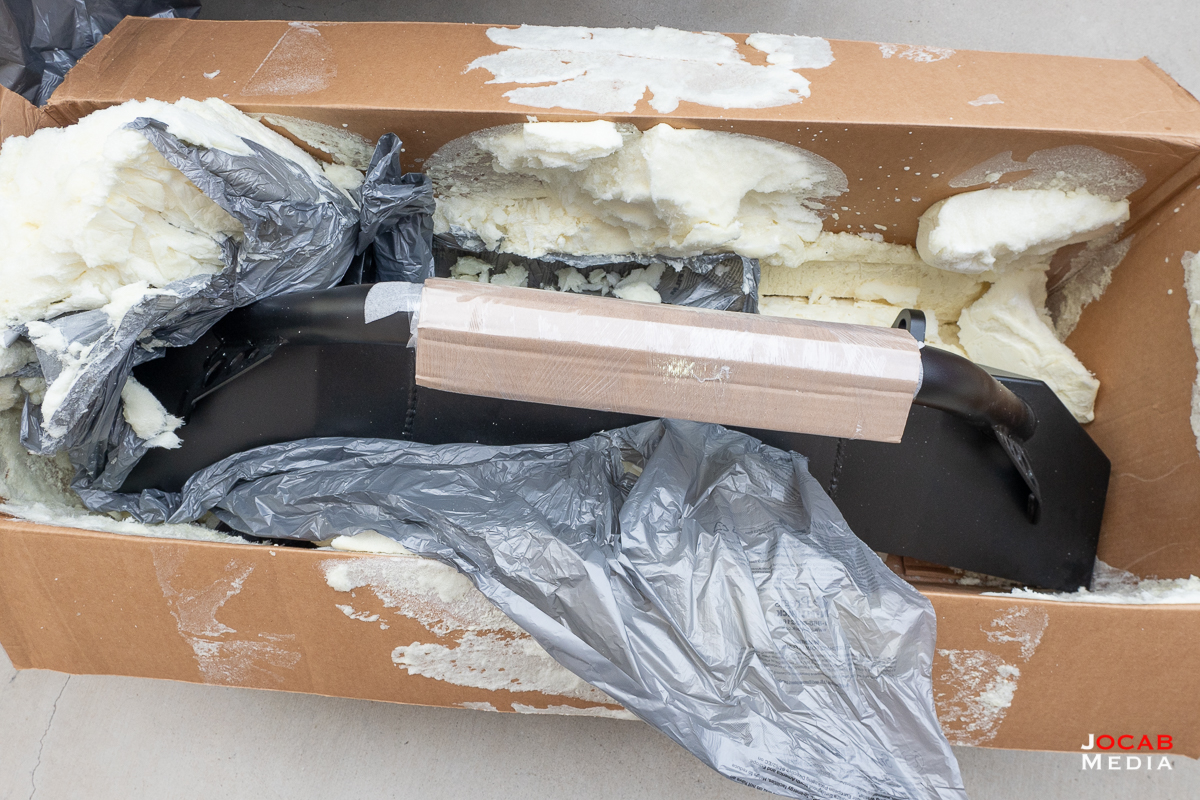
After finding a good price through Quadratec, I pulled the trigger on the LoD Offroad Destroyer shorty front bumper with bull bar, LoD Offroad license plate mount, LoD Offroad fairlead mount, LoD Offroad fairlead accessory mount, and LoD Offroad Destroyer front bumper skid plate. All of the parts were factory powder coated.
The one thing LoD Offroad undoubtedly does right is packing the parts securely. Like the Destroyer rear bumper I bought nearly two years ago, the bumper arrived well packed using some spray on styrofoam packing material that keep the bumper from shifting around in the box and cushioning it from impacts if the box were mishandled.
Removing the factory bumper and winch plate setup was straightforward. Just disconnect the fog lights and unclip the harness from the inside of the bumper, remove the eight bolts retaining the bumper to the frame, and in my case removing the two bolts holding the Rock Hard 4×4 winch plate to the frame.
Installing the LoD Offroad Destroy shorty front bumper was not so straightforward as the instructions imply.
Mounting the factory fog lights was easy. A couple of the screw holes on the fog lights were enlarged slightly to properly mount the tabs to the ports in the bumper without any binding
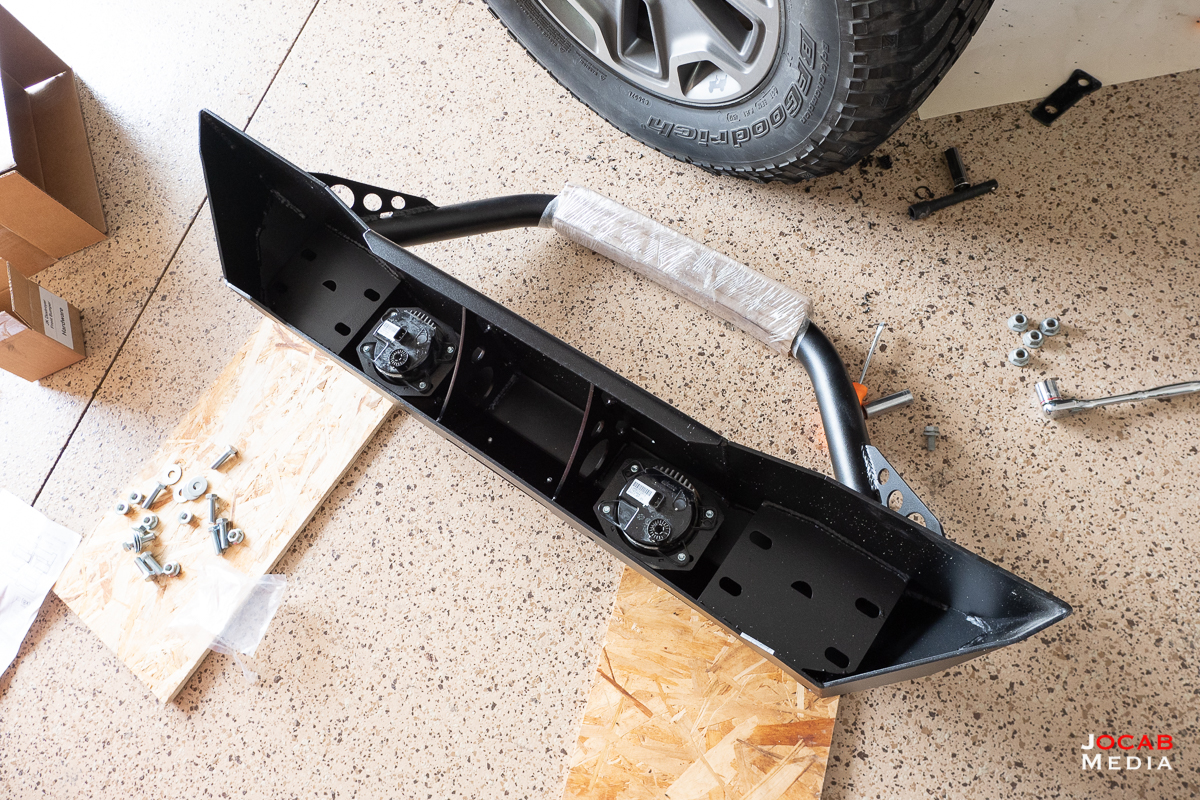
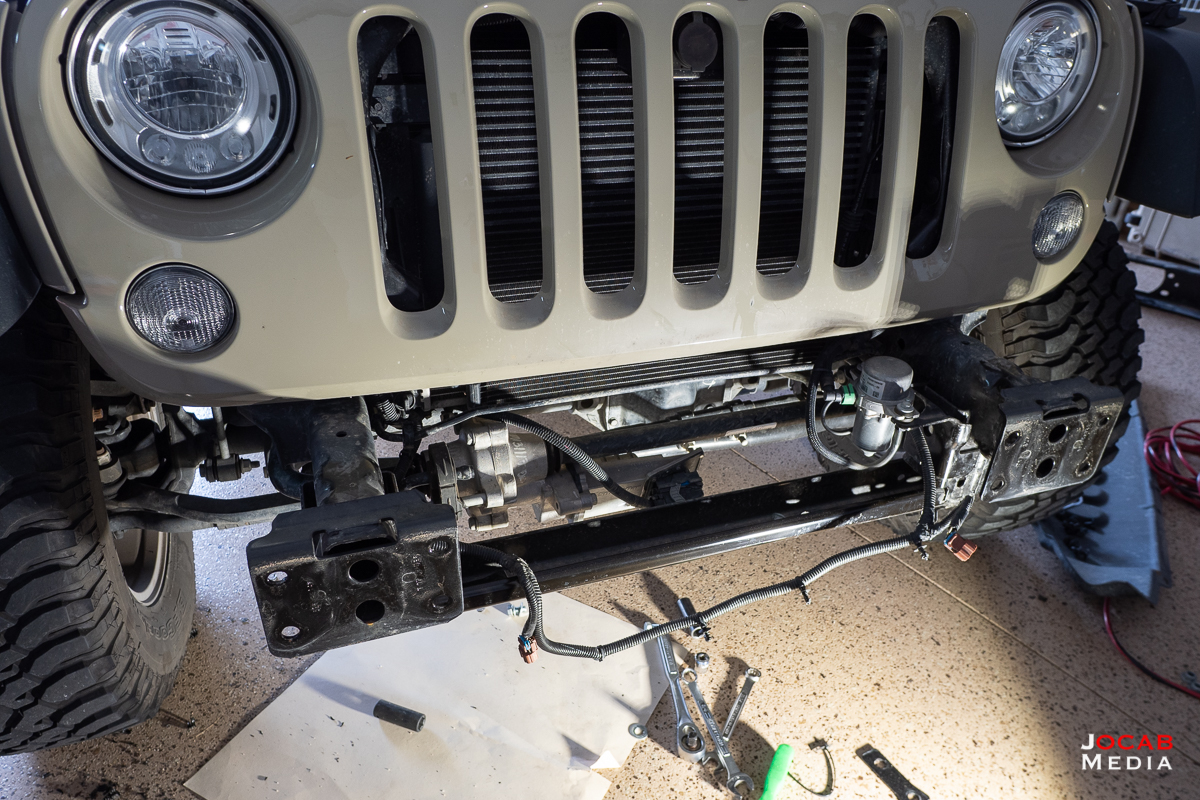
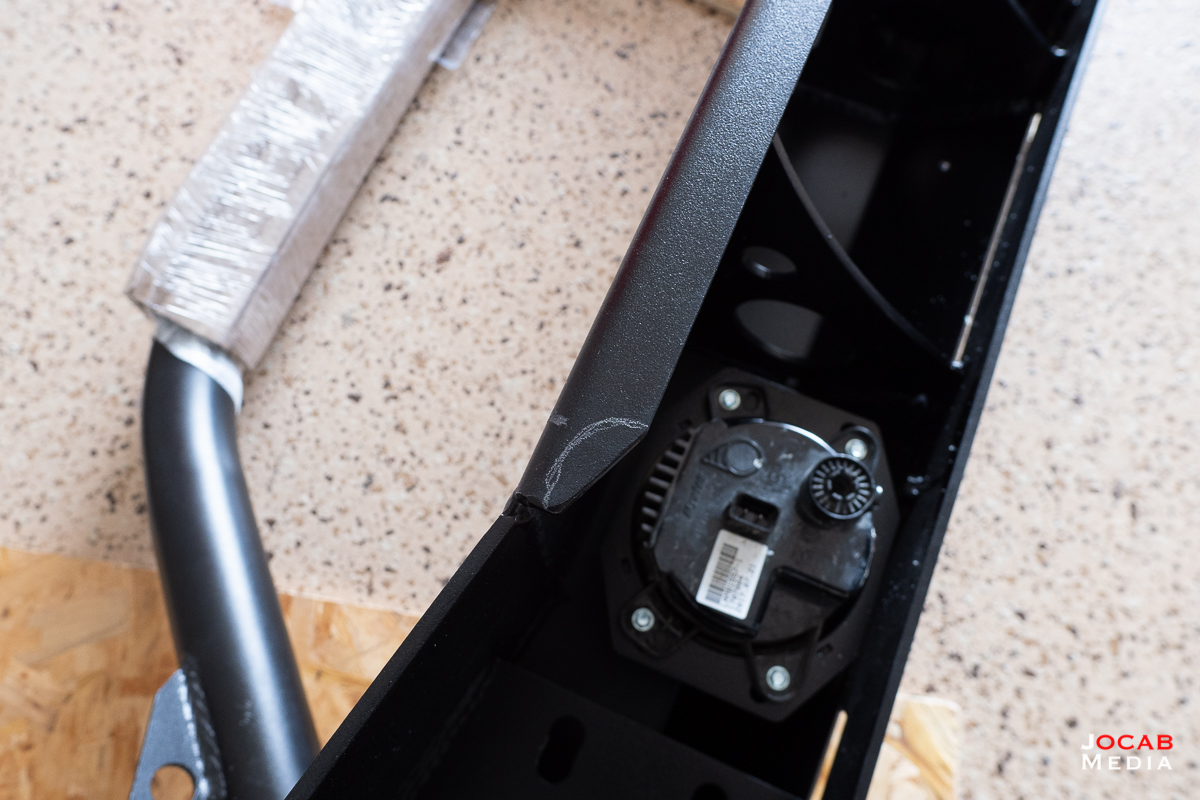
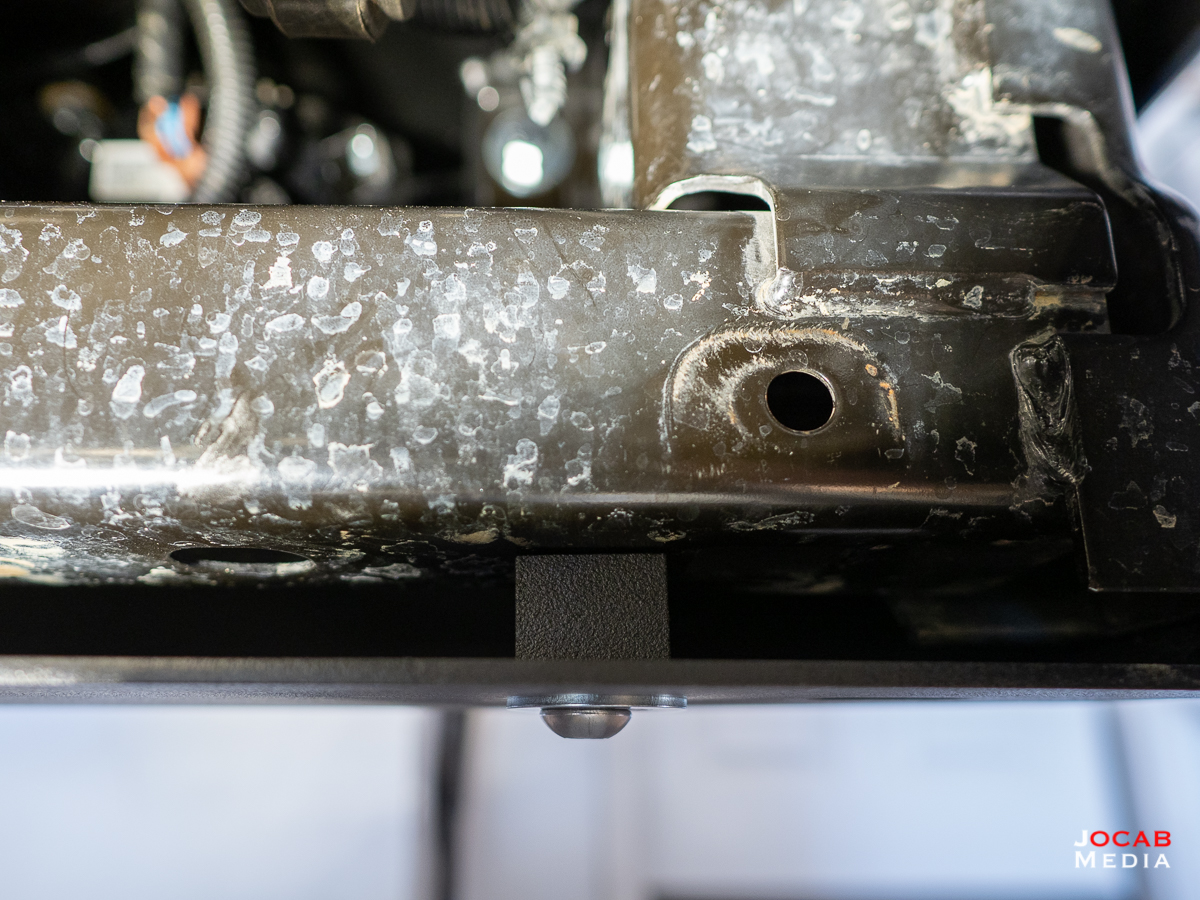
Placing the bumper onto the front of the frame yielded the first issue. The vacuum pump on the 2012+ Jeep JKs is on the lower driver’s side of the frame in front of the radiator and is sometimes relocated in order to accommodate recessed winch installs.
While the winch sits on top of the LoD Offroad Destroyer bumper and not a problem for clearance, the rear lip of the LoD bumper itself was making contact with the vacuum pump when the bumper is mounted. I’m not sure if it is just a machining variance by Jeep that resulted in the vacuum pump being higher than expected (and making contact with the LoD bumper), but I had to make an adjustment for this on my specific Jeep.
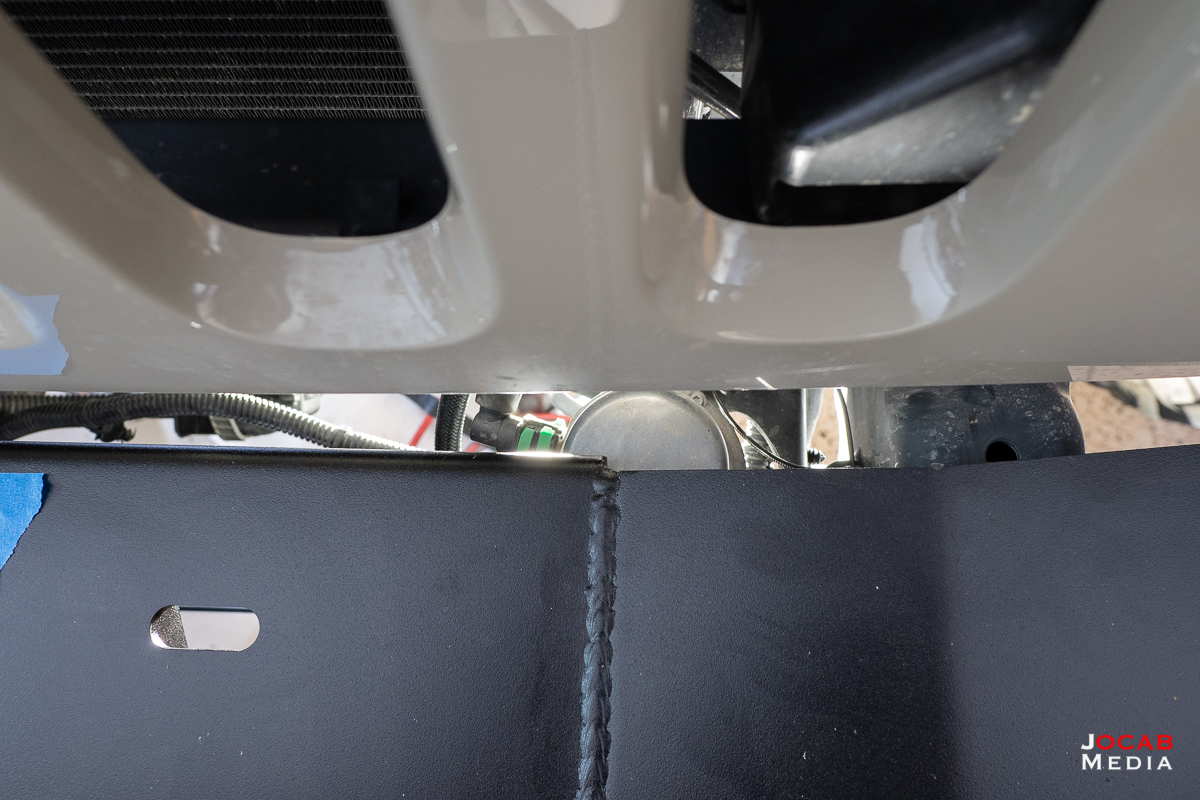
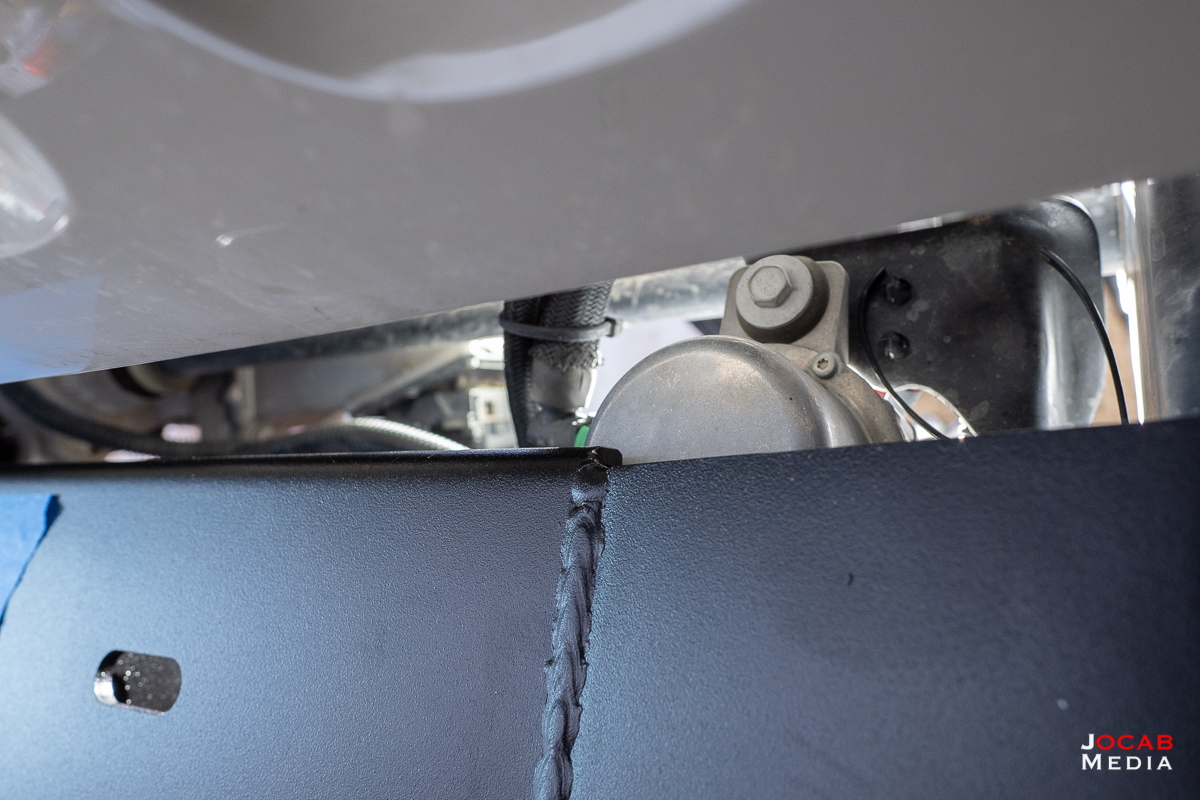
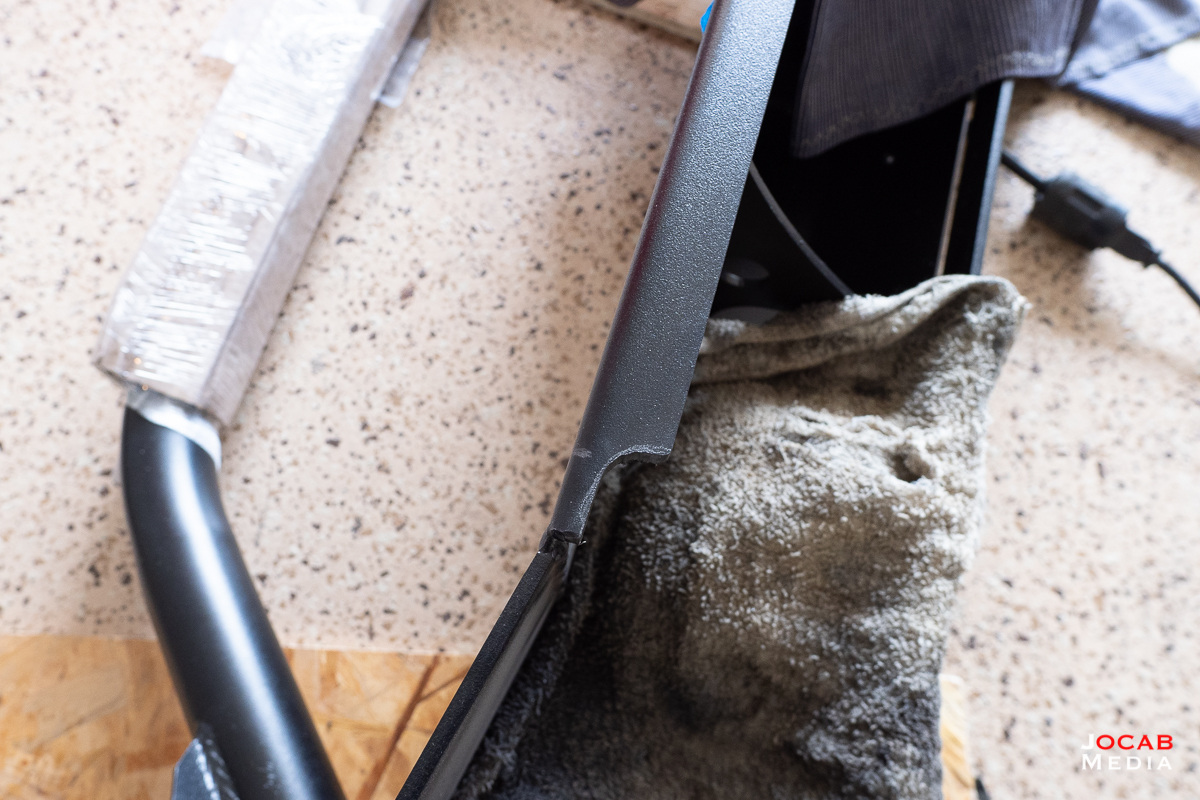
Instead of trying to relocate the vacuum pump or bend the bracket to get an additional 3/8″ clearance, a relief cut was ground off the LoD Destroyer bumper to give it adequate clearance (some allowance for vibration of the vacuum pump on the bracket), and subsequently painted to prevent rust.
After this, getting the bumper secured to the frame via eight (8) bolts simply required a lot of maneuvering with various combinations of ratchets, deep wall sockets, shallow sockets, low-profile sockets, socket extensions, and open ended wrenches.
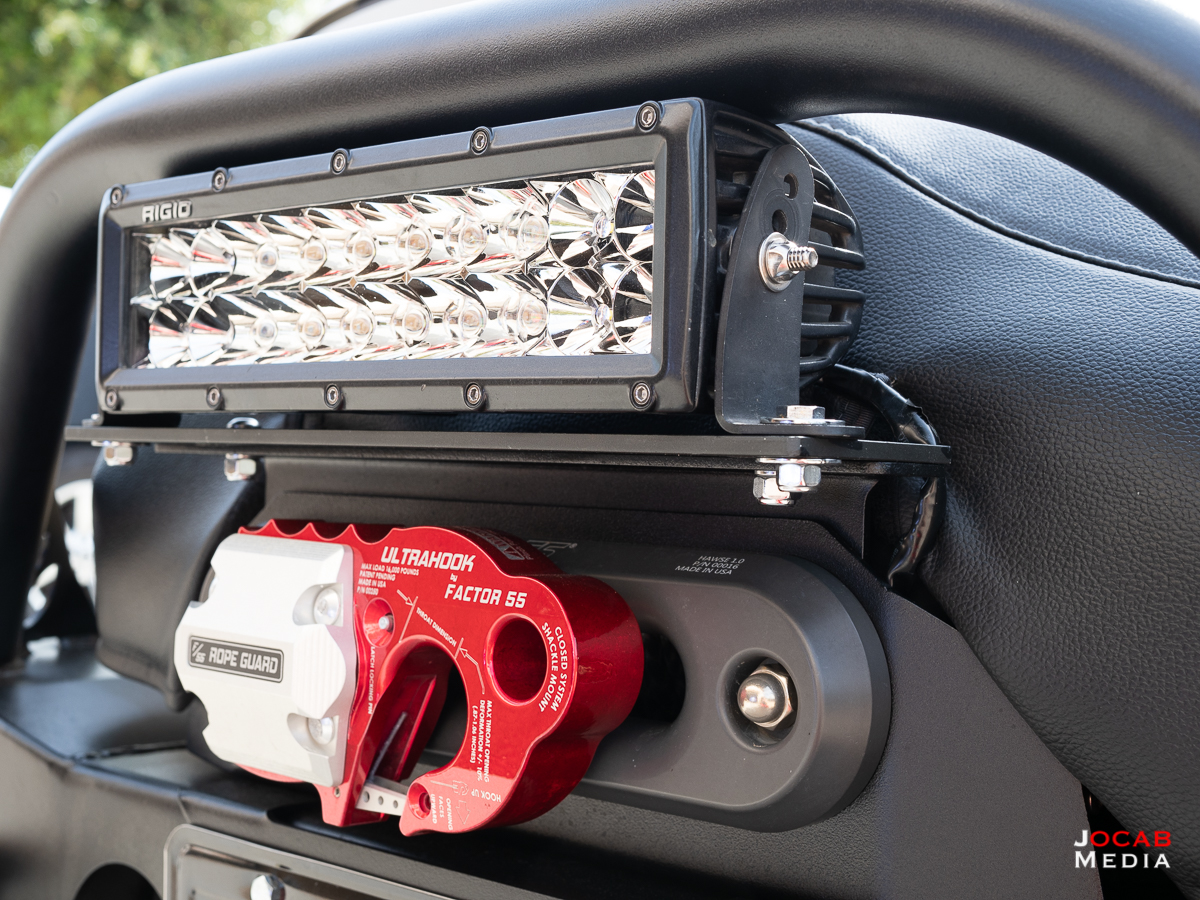
Getting the accessory mounts installed showed some quality control flaws. The fairlead mount and the license plate mounts are basically L-brackets that sandwich between the winch and the bumper. But when I stacked the fairlead and license plate mount, I noticed some inconsistency in the machining such that they were not square.
Once the winch was placed on top, it took a lot of work to get everything centered up since the fairlead mount, license plate mount, and winch all can move independently side-to-side to center each one. I have this aversion to symmetry and it was bugging me that I couldn’t get it all lined up perfect (within a millimeter). I eventually settled on what looked centered and rolled with it.
Tightening down the winch plate bolts offered one of the most difficult aspects of the LoD Offroad Destroyer front bumper install. The fog lights block direct access to the front winch mount bolts so it involved a combination of sockets and extensions and socket swivel to get it all tightened down.
But it wasn’t over after this.
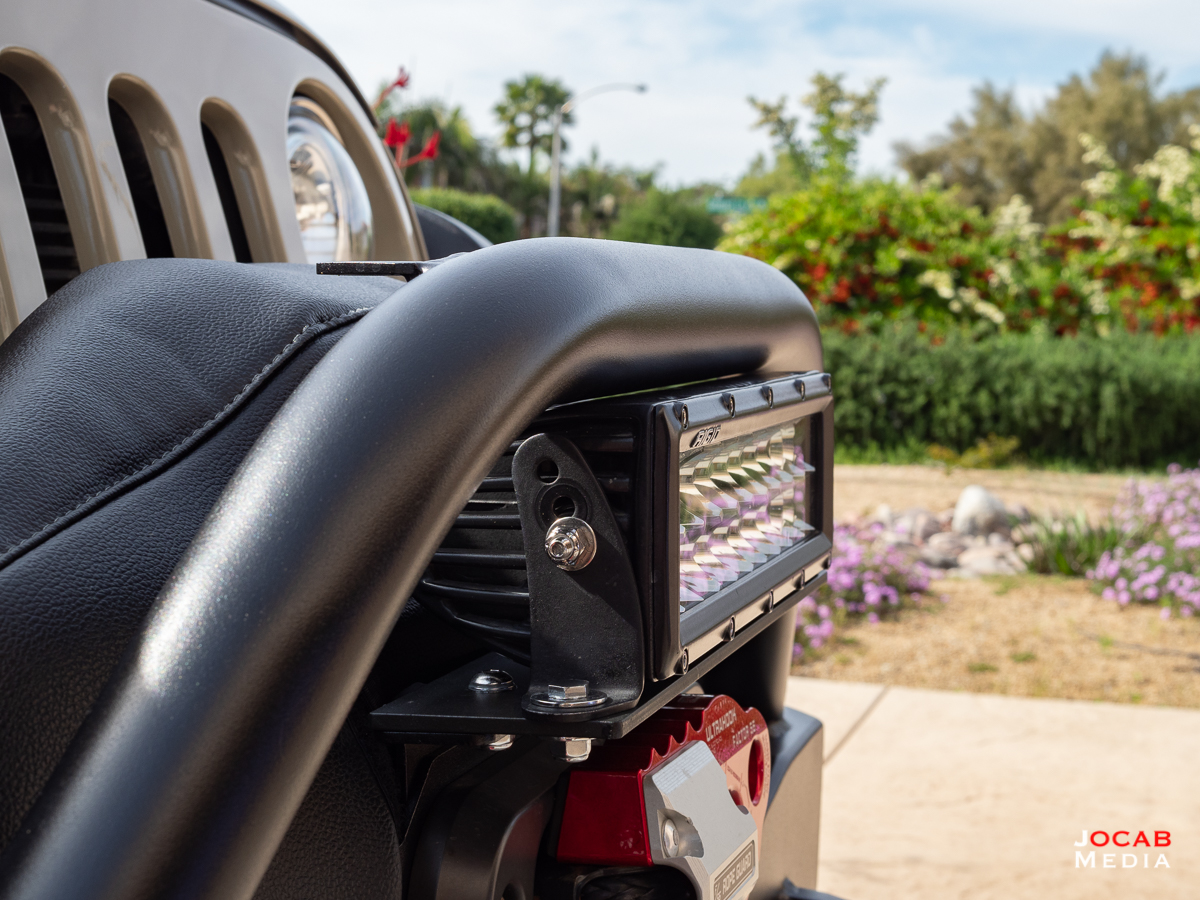
When I started to mount my Rigid Industries E-Series 10″ light bar, I discovered that the light bar had no clearance to install. The rear of the light bar was hitting the front of the winch and could not be mounted to the fairlead accessory mount. I compared the LoD accessory mount to the Poison Spyder fairlead accessory mount and both had the same amount of offset to the front, yet I had no clearance issues with my original setup on the Rock Hard 4×4 winch plate. This issue is because the fairlead mount is not offset far enough from the winch and/or the winch mount bolt holes in the bumper are too far forward.
I noticed that there is far more clearance between the back of the Warn Zeon 10S winch and the grille on the LoD bumper than my original configuration. What LoD could have done is placed the winch holes an 1″ farther back towards the grille and offset the fairlead (and license plate) mount 2″ forward. This could have allowed the Rigid light bar to fit. Also, the Rigid E-Series 10″ light bar was too tall and was hitting the bull bar, so I had to mount it lower on the adjustable feet/legs of the light bar. I decided to manufacture a plate to offset the light.
But in the meantime while I manufactured a mounting plate, I decided to mounted the Rigid Industries E-Series 10″ light bar onto the bull bar which has an accessory mount tab welded to it.
This is when I discovered another quality control issue on the LoD Offroad Destroyer bumper. The accessory tab on the bull bar was significantly off-center by around 5/8″ towards the passenger side.
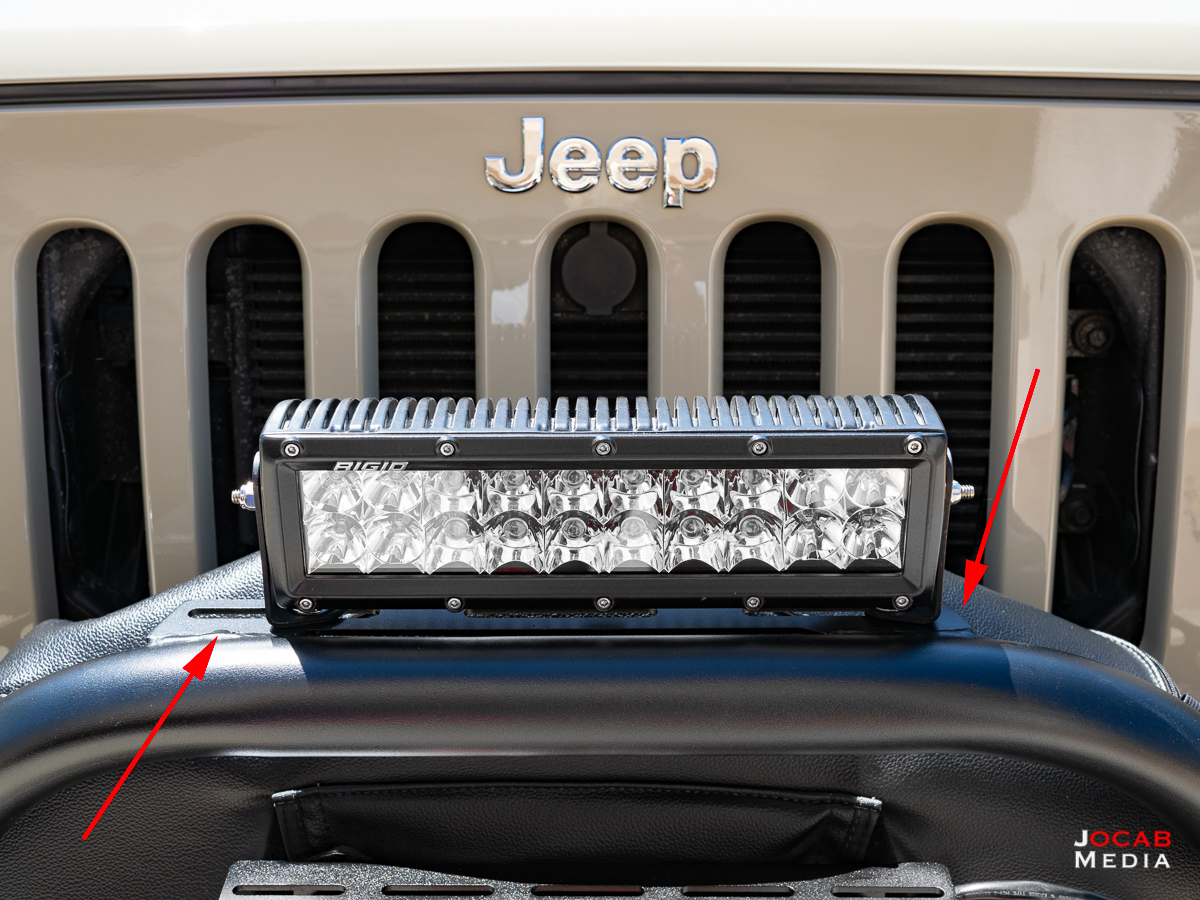
You will only notice if you look at the bull bar and a light attached up close from a top view angle. It’s not a big deal but definitely an annoyance to me.
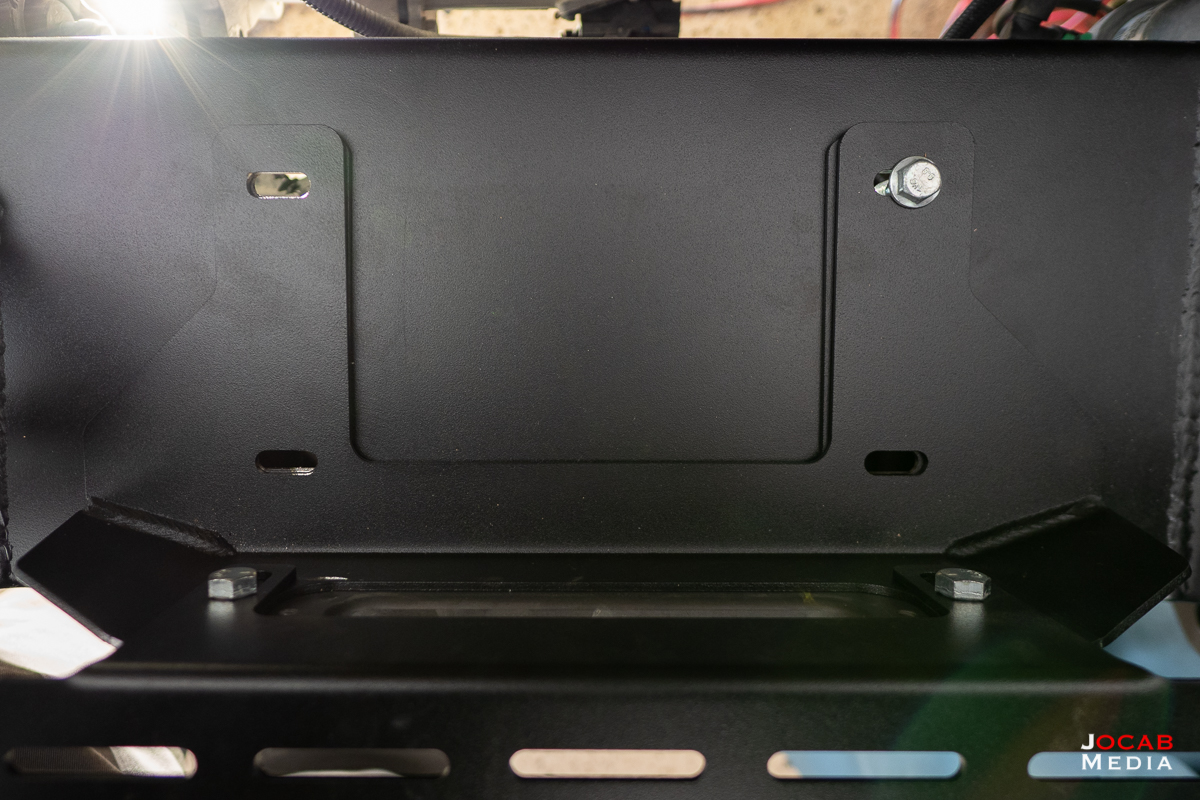
The final part of the install was the front bumper skid plate which looks like a very simple process with six (6) bolts. But, it actually wasn’t a straightforward install.
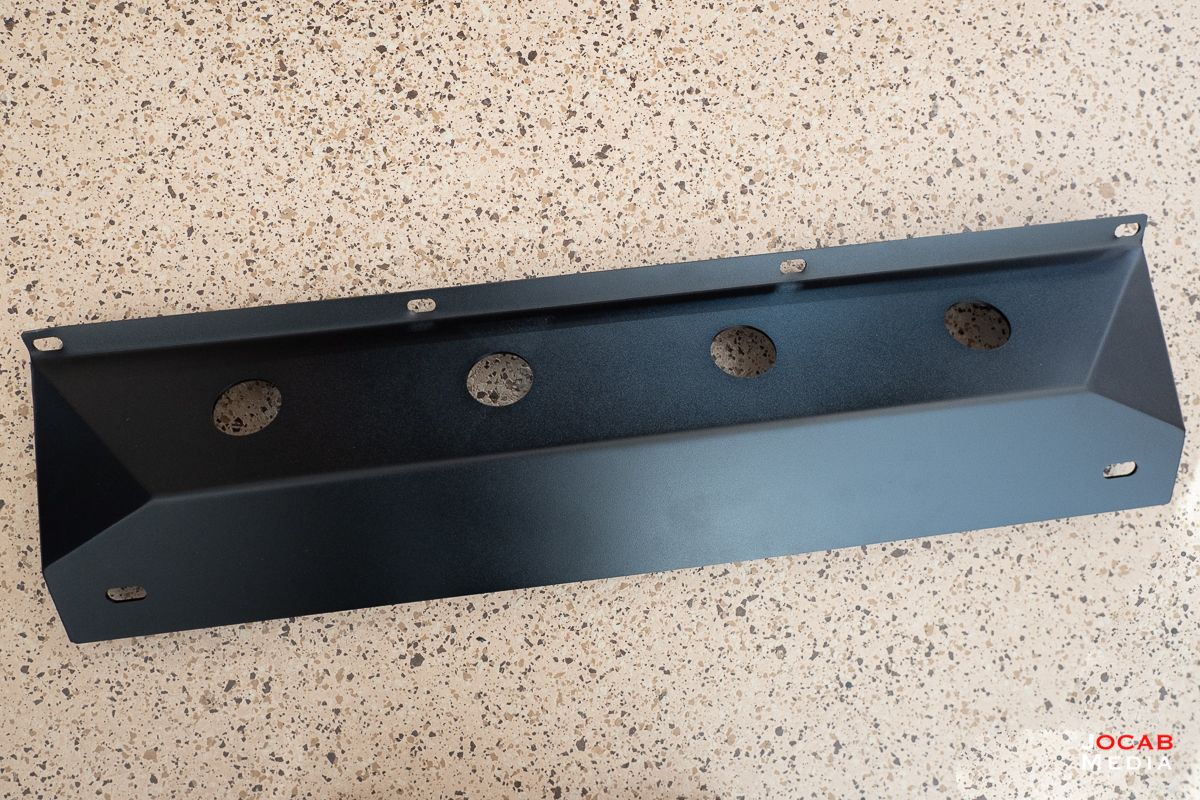
The four front bolts thread into the LoD Offroad Destroyer front bumper (threaded holes), but the two rear bolts are supposed to go into the frame where the instructions indicate that you will need to drill out the frame for the passenger side rear bolt.
What I discovered was that there is a square notched hole in the frame above where the hole for the passenger side of the skid plate was, but offset. So if I drilled out the frame for that, there would not be much frame left above that skid plate bolt hole.
Secondly, the rear portion of the skid plate does not actually meet the frame. If the bolts are used to secure the rear of the skid plate to the frame, there is a 3/4″ gap. If you were to tighten the bolts down, you’re basically just squeezing (flexing) the skid plate towards the frame and the bolts and nuts are glorified hangers.
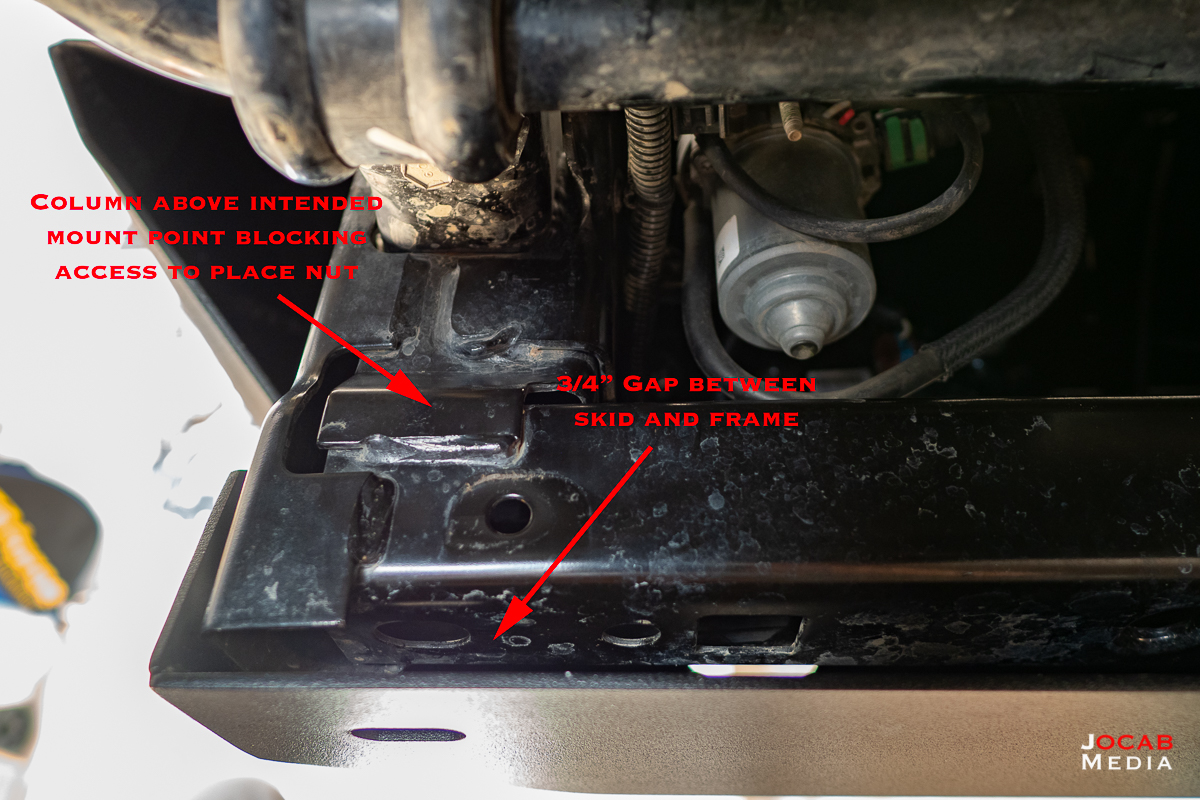
Third, the existing rear bolt holes in the skid plate line up with vertical bars above the front frame rail where it is impossible to get your hand to line up a nut, much less a wrench.
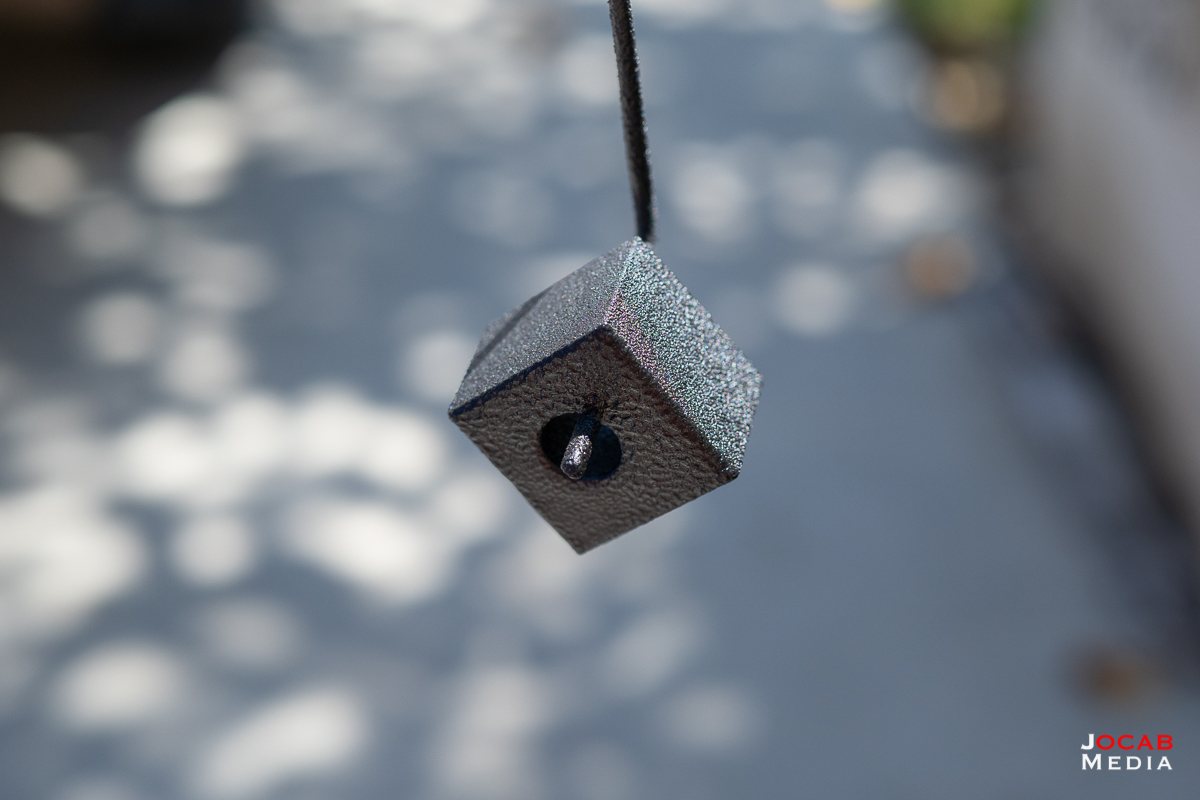
I ended up taking some 1″x1″ solid steel bar that I had and cutting two 3/4″ pieces and drilling holes into them to make spacers. I painted these down with some undercarriage paint to prevent rust and dropped them in between the skid plate and frame as spacers. This makes for a more secure bolt point and mitigates rattle and vibration.
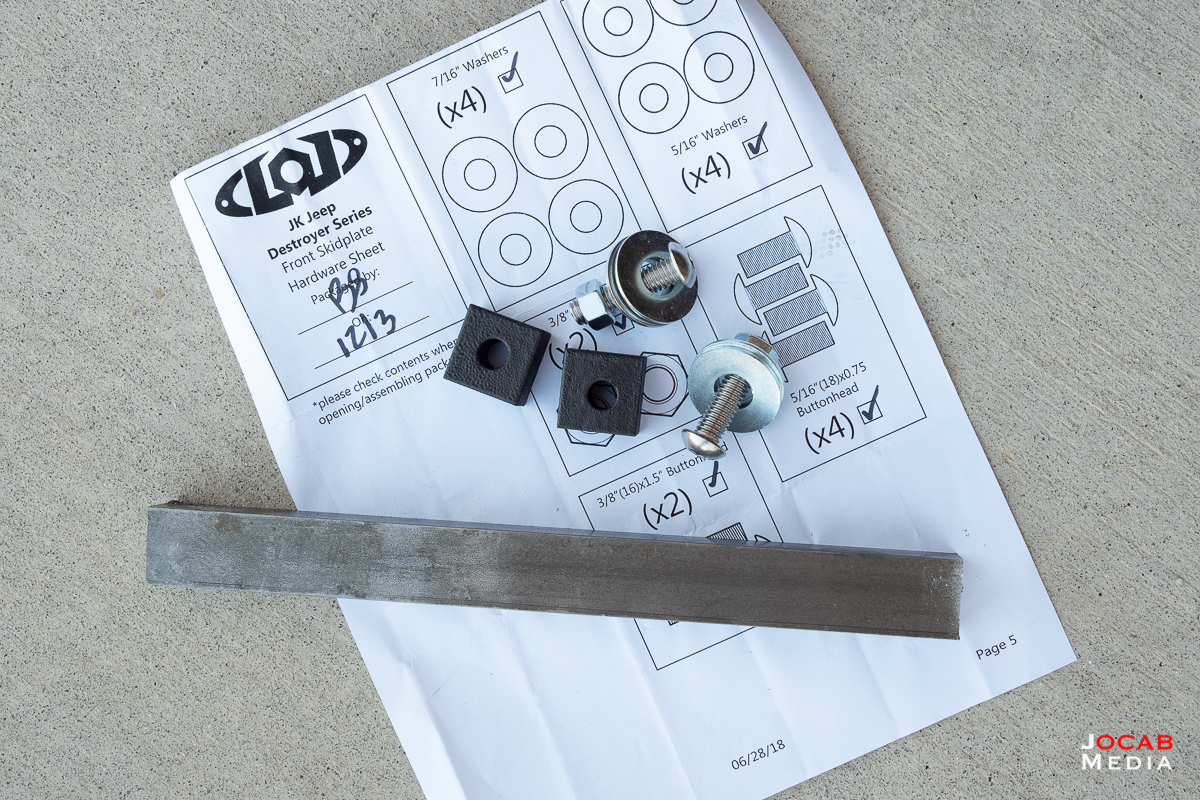
Also, new holes for the rear skid plate bolts were drilled an inch or so closer to center on each side (and those holes painted to prevent corrosion) to line up with some other notches in the front frame rail where you can actually get a hand tool to secure the nut.
All this said, the install of the LoD Offroad Destroy shorty front bumper took about four (4) hours of actual time. The corresponding skid plate took about 30 minutes of actual time, minus the few extra days spent manufacturing some spacers and drilling and painting new holes in the skid plate.
I did end up making a plate to offset the Rigid Industries E-Series 10″ light bar so it can fit on the fairlead accessory mount out of a 3/8″ thick (3″ wide) piece of aluminum.
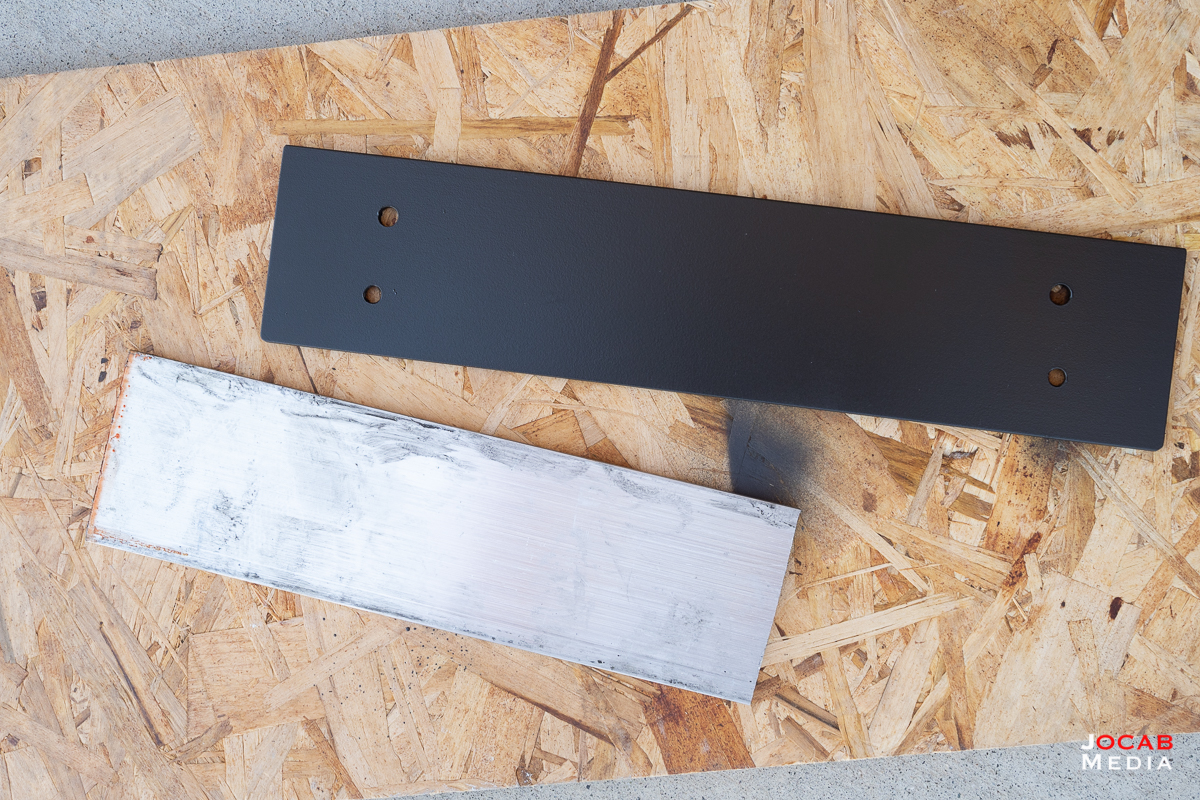
I tried to paint it, but the paint didn’t hold well after compression of the plate against the fairlead accessory mount and the bolts (and washers), so I’m probably going to take it off in a few months and refinish it or make another one and swap it out.
But the offset plate I made help get enough clearance between the back of the light bar and the front of the winch.
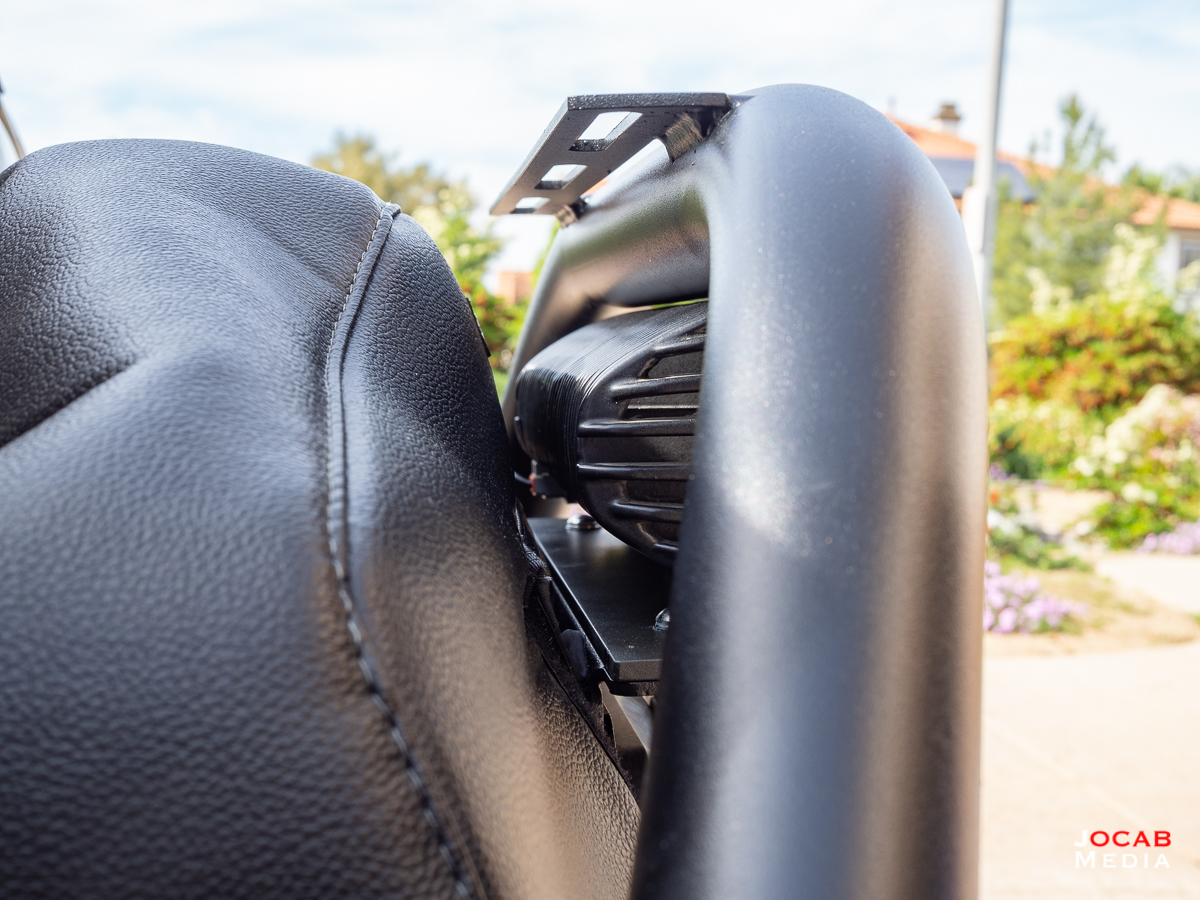
The Rigid Industries E-Series 10″ light bar barely had enough clearance to fit underneath the bull bar itself.
Back when I opted to stick with the factory bumper for a while and use the Rock Hard 4×4 Patriot winch plate, I thought I would be saving weight compared to an aftermarket bumper. I discovered that this ended up not being the case after I ran the numbers of the old hardware.
The Rock Hard 4×4 Patriot winch plate weighs in at 30.4 lbs. The Jeep JK factory plastic bumper shell weighs 12.2 lbs. The inner factory metal bumper base weighs 15.0 lbs and the two tow hooks weight 4.0 lbs each. That comes out to about 65.6 lbs total for the Jeep JK factory bumper and Rock Hard 4×4 winch plate combination.
I neglected to weigh the LoD Offroad Destroyer shorty front bumper prior to install. But according to the LoD Offroad product page, the base shorty bumper weighs 58 lbs. Even if the bull bar adds another 10 lbs, that only puts the LoD Offroad Destroy shorty front bumper to 68 lbs, which is only a few lbs heavier than the factory bumper and Rock Hard 4×4 winch plate combination.
Of course, the LoD Offroad Destroyer front bumper skid plate adds an additional 16 lbs (manufacturer spec, I also neglected to weigh it myself) which offsets the factory plastic air dam which only weighs 2.2 lbs.
Thus, the aftermarket LoD Offroad setup that I am running only weighs around 14 lbs more than the factory bumper setup with winch plate.
While the install was not as straightforward as the instructions lead you to believe, the only real thing that bugs me is the how the bull bar accessory tab was welded in off-center. I understand it not being perfectly center and I would have accepted 1/4″ error. But it looks like a good 3/4″ towards the passenger side. Again, I have an aversion towards symmetry so maybe that won’t bug most people like it does me.
Not to mention, the accessory tab on the bull bar is not an ‘easy’ fix like it was for the other issues I came across. I guess I could grind some of the passenger side accessory tab and paint the bare metal. But this work around won’t look clean and be very visible.
Here is a summary of the issues that I found during install:
- Slight clearance issue with vacuum pump
- Fairlead Mount and Fairlead Accessory Mount brackets are set too close to the winch and/or winch is set too far forward on bumper. Perhaps winch mount holes could be drilled closer to the grille by an inch and the brackets drilled to set the accessories farther out an inch.
- Bull bar accessory tab welded off-center
- Skid plate should have come with spacers for rear bolts
Even with the above issues, I am happy with the LOd Offroad Destroyer shorty front Bumper and Skid Plate overall. I do like the appearance and style of the LoD Offroad Destroyer front bumper. The ability to use the factory LED fog lamps is a huge requirement that this bumper meets and the ability to mount my front license plate easily is a significant benefit.
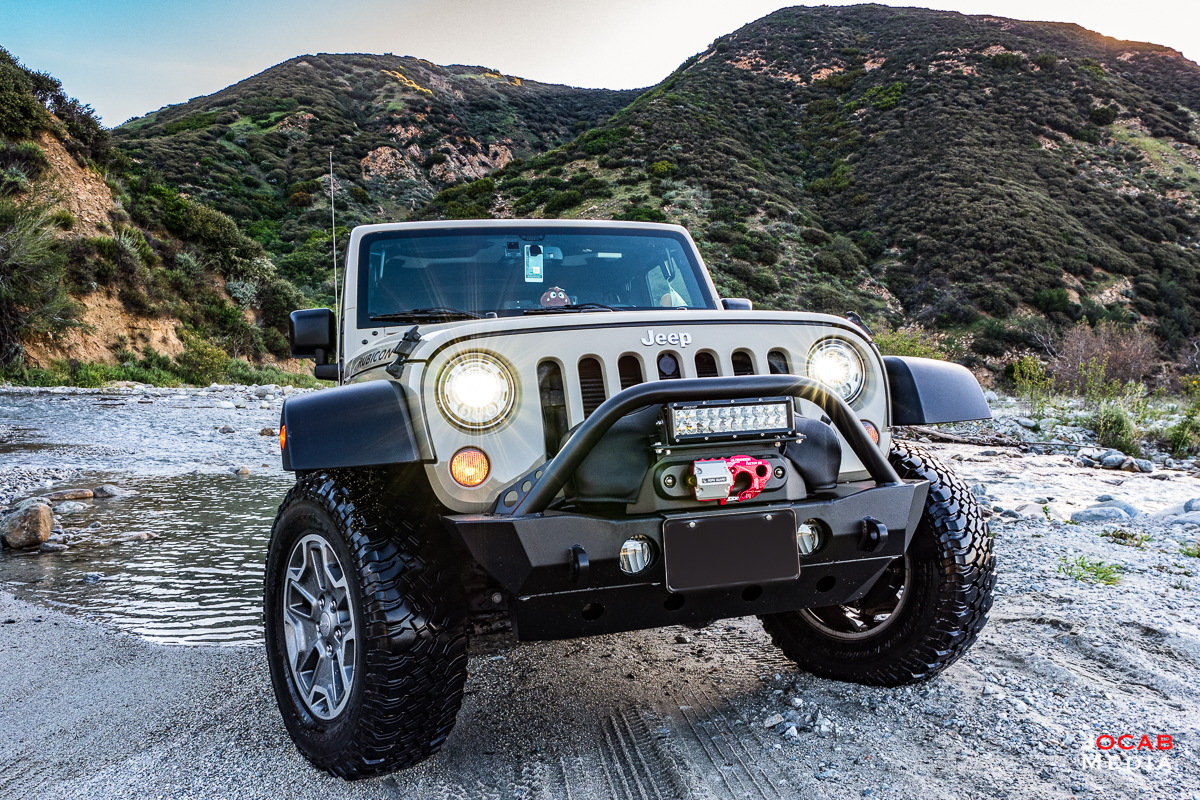
The finish looks solid like on my LoD Offroad Destroyer rear bumper. The overall weight is respectable when you compare it to my original factory bumper and winch plate setup.
Before After
Hopefully this write-up gives you an idea of what the LoD Offroad Destroyer shorty front bumper and skid plate offers and helps guide you in a purchase of this bumper or perhaps an alternate option.
Gary Doak
Did you ever contact LoD directly or do you know if they have seen your video/write-up? I have the LoD Destroyer sliders which I’m very happy with. I purchased directly from LoD and had a couple questions during install. They answered the phone right away & were very helpful and quite aware of the fitment contact points I had questions about. Your findings seem to not be in the nature of the company’s product quality & fitment standards, though I like your creativity in resolving your issues. Thanks for sharing with the rest of us.
Jonathan Ocab
No, I didn’t contact them. I had other grips with my LOD Destroyer rear, too. They apparently revised their bumper tire carrier to address some of the deficiencies I found. Funny enough, I might get the LOD Signature sliders since they’re frame mounted. I’ve learned to accept that aftermarket Jeep parts are never a straightforward install.
Gary Doak
I like the look of the Signature’s and they’re undoubtedly just as strong as the Destroyer’s. But I carry and use a Hi-Lift jack away from home and the Destroyer has two places on each side to secure a Hi-Lift and it’ll lift the whole side. Plus, I wanted a more significant step for the Mrs to use. I haven’t received my new tires/wheels 285/75 (34”) yet, but still, with the 3” lift, the steps are actually very useful. You can see pics of mine at https://revkit.com/it-s-just-a-rubicon. These are frame mounted as well. Happy trails!